Last time, I began a tutorial showing you how to draw a landscape on sanded art paper. In that article, we worked through the first layers of color and ended with a solvent blend. Here’s how our landscape looked after the first blend.
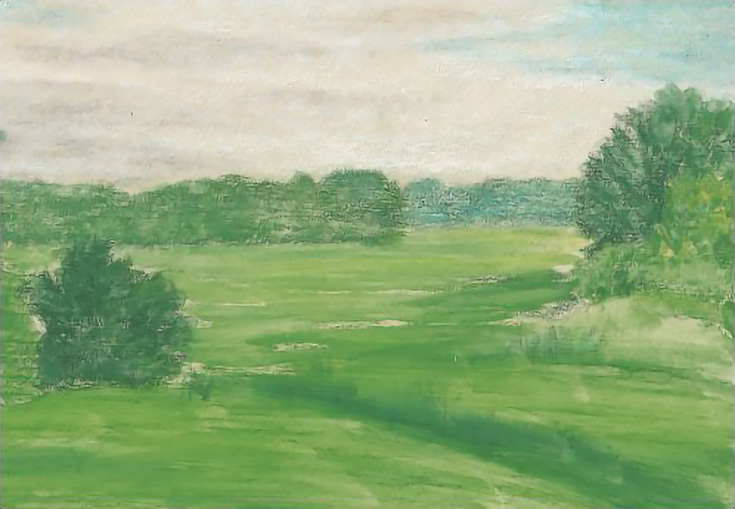
For this article, we’ll be working through the drawing for the second time and adding more values and layers.
I continued using Koh-I-Nor Progresso Woodless colored pencils. Although they have limited color selection, I like them for working on sanded art paper because they lay down so quickly.
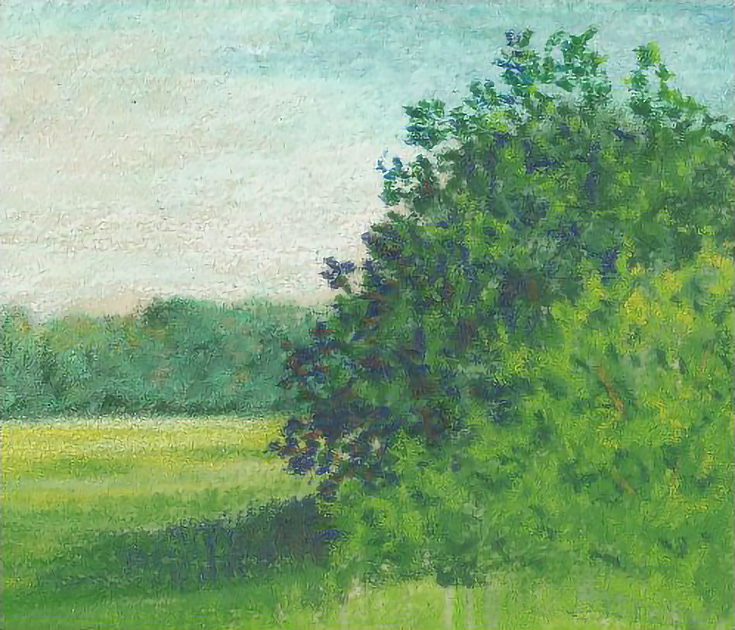
Step 7. The sky and distant trees
After the paper dries completely from the solvent blend, go over the drawing again. Use Sky Blue, Dark Green, White and Light Gray in the sky; and Hooker’s Green, Light Ochre, and Sap Green in the trees and field. The greens should be cooler (more blue) in the background and warmer (more yellow) as you move into the foreground.
Use two or three layers to fill in the texture of the paper more completely, and blend colors by layering. Medium-heavy to heavy pressure is best for getting color down into the paper’s tooth.
Add more detail, but don’t fuss over it. Instead, work on improving values. Details will be added later.
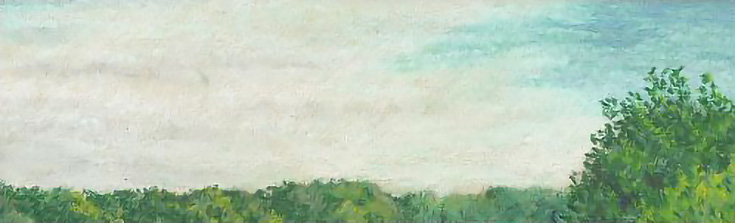
In all three areas—sky and trees—work back and forth between the existing colors to blend color and shape the trees.
When you’re satisfied, blend these areas with solvent and let the paper dry.
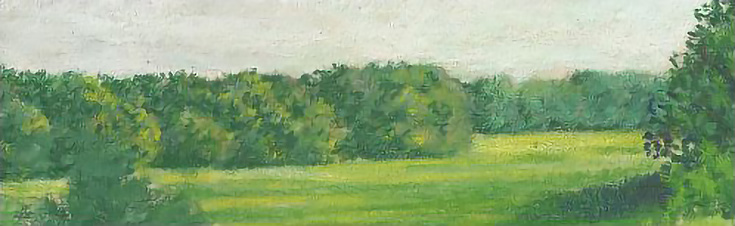
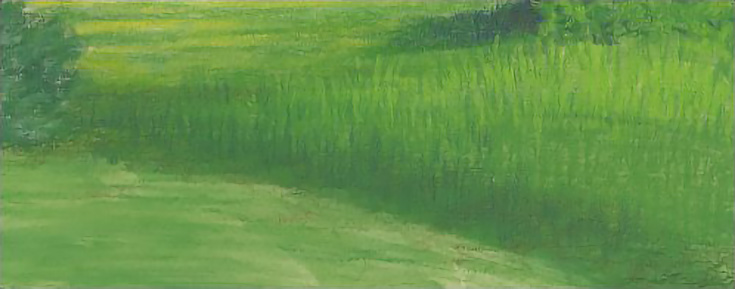
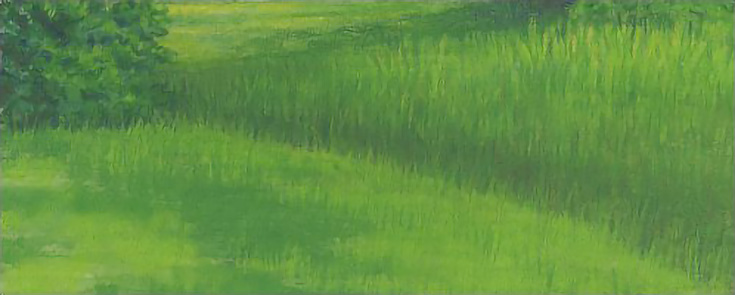
Step 8. The middle ground
After letting the paper dry, “spruce up” the values in the distant trees with additional layers of Dark Green, Sap Green, and Light Yellow. Use heavy pressure and short, “staccato” strokes to mimic the look of foliage seen from a distance. Stipple in random highlights of Light Yellow with heavy pressure.
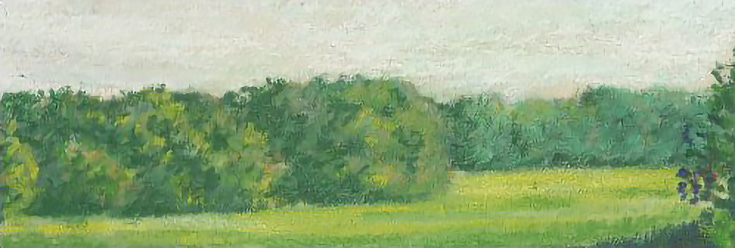
Alternate layers of Light Yellow and White in the distant field. Use horizontal strokes and medium heavy pressure. As you move forward across the field, add Sap Green to the mix, but continue alternating layers. Change the percentage of yellow, white, and green as you move into the foreground: more white than yellow in the background and more yellow than white in the foreground.
Soften the line between the field and trees if it gets too crisp to further enhance the look of distance. Either layer color over that edge, to dry blend with a stiff brush.

Blend again with solvent if you wish.
Step 9. The foreground trees
Next, add Dark Green, Sap Green, and Light Green to the larger of the foreground trees. Use heavy pressure to fill the paper’s tooth, but use a stippling stroke or very short directional strokes to draw clumps of leaves.
Mix the greens so that strokes of Sap Green appear in the shadows, and some of the Dark Green appears in the Sap Green. Once the basic values are in place, mix Dark Blue and Brown in the shadow side and anywhere you want dark interior shadows.
Put as much detail as you wish into this tree, then move to the smaller, lighter tree in front of it. Use the same stippling patterns for this tree, but use Sap Green and Light Green for the dark and middle values.
For the brightest highlights, use Light Yellow. Draw the cast shadow for the trees by mixing layers of Dark Green, Dark Blue, and Brown. Make the shadow darkest near the trees with Dark Blue and Brown, then blend them out with Dark Green as the shadow stretches away from the trees.
Blend the cast shadow into the slightly darker values near the small tree on the left with layers of Dark Green applied with medium pressure, and a layer of Dark Blue and Brown applied with light pressure.
Step 10. The foreground
Use the side of the pencils to stroke Dark Blue and Brown over the foreground. Stroke along the contours of the ground with light pressure in the shadowed area.
Then use the same type of stroke to layer Dark Green over the foreground. Allow the paper to show through in some areas.
Draw tall grass with medium pressure and directional, upward strokes of Light Green. Start just in front of the trees and work your way across the drawing to the small tree at the left. Also work forward a short distance.
Next, repeat the stroking with Sap Green. Mix that color with the previous work, especially near the center of the drawing, where that grass is going into shadow. Lay down a few “rows” of Sap Green starting at the top and working forward to about half the distance to the shadows.
Switch to Dark Green and overlap the darker green over the lighter greens. Add strokes of Dark Green down far enough to reach the shadows you blocked in previously. In the shadows, use Dark Blue, then finish with Brown.
Step 11. Darken your foreground values
Finish the grass (for now) with alternating layers of Dark Blue, Brown, and Dark Green. Vary the length, shape, and curve of strokes so the grass doesn’t become too uniform. Then add vertical strokes of Sap Green and Light Green.
You can also use the side of the Sap Green and Light Green pencils to block in the middle values across the rest of the foreground with short, back-and-forth vertical strokes. Don’t cover the entire area. Notice the areas where the color of the paper is still showing.
TIP: If you find yourself getting tired or bored, or if you start to feel discomfort in your hand, arm, or back, take a break! It’s better to take frequent breaks than to force continued work and end up having to do something over.
No drawing goes 100% smoothly. There always seem to be problem areas to correct and difficulties to overcome. This drawing was no different—next week in Part 3, I’ll explain the difficulties I encountered and how I overcame them.
This post may contain affiliate links.