Welcome to the fourth article in my latest series describing the classic Flemish Method of painting.
If you haven’t done so already, you’ll probably want to read each of the previous articles in this series (listed in order below) so that you’re all caught up.
So far we’ve covered:
How to prepare your composition and paint the imprimatura layer.
How to complete an umber underpainting.
And how to paint the dead layer (AKA, the grayscale layer).
This week begins the final stage in the Flemish process—adding color.
Preparing to paint
Make sure that the dead layer phase of your painting has dried for about four weeks. The paint must be dry all the way through to provide a reliable foundation for color.
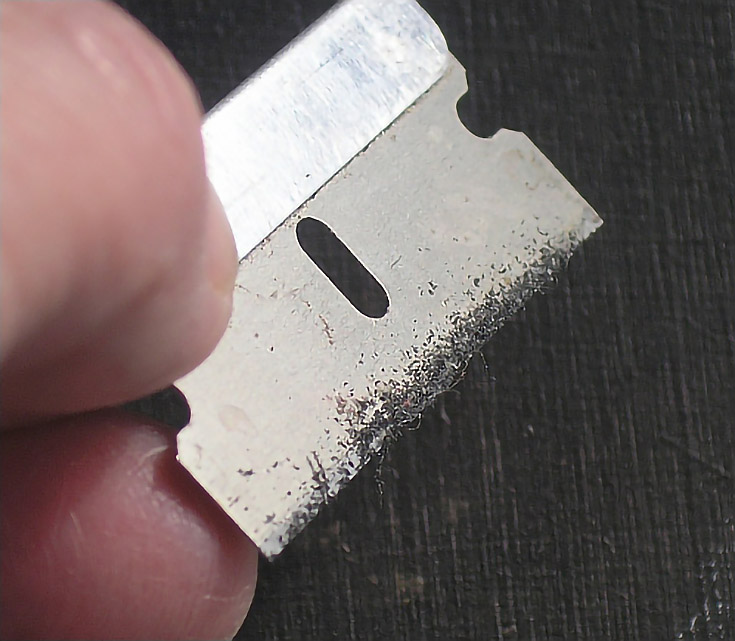
To determine if the painting is dry enough, lightly scrape it with a razor blade. If paint comes off as dust or powder, it’s ready. If paint comes off and rolls along the edge of the razor blade, it’s still wet inside. You shouldn’t get a lot of paint in either case.

Once you’ve made sure the paint is dry (as shown above) pour a little linseed or walnut oil into the palm of your hand and rub it onto the painting. The warmth of your hand warms the oil so that it penetrates the paint film more easily, which will help condition the dry paint to create a better bond with the next layer.
Keep in mind, you don’t want too much oil on the surface, either, so wipe any excess oil off with a clean cloth or paper towel. And, if your painting is large or the composition is complex, you might want to prep only the area you plan to work on in that session.
Painting the initial color glazes
The initial color glazes are designed with a specific goal—to darken shadows and make the painting more colorful. As you glaze, keep the following instructions in mind for each area of the painting:
1. Paint your shadow areas with transparent color. Thin your shadow colors if necessary with a little painting medium. The resulting color layer should be strokeless, very thin, and transparent.
2. Paint middle tones with semi-transparent colors. Use a less transparent mixture of color or reduce the amount of painting medium you add.
3. Highlights should be painted with opaque color and thicker paint.
NOTE: Flemish medium is made by mixing 2 parts turpentine and one part Damar varnish. You can add a drop of lavender oil if you like.
The Flemish painting method calls for using a small brush even on larger paintings. Use short strokes to lay down paint almost as if you were using a pencil, leaving spaces between the strokes. I began with Transparent Yellow Oxide around the eye, over the jowl, and the part of the neck behind the ears.
Next, smooth out the strokes with a soft, dry brush and light pressure. I used a small (about 1/4″) frayed sable flat brush to rub color onto the surface of the panel. The color was kept thin enough to allow the details of the dead layer to show.
Blend lengthwise and crosswise over the area until the paint has been spread out completely. The result should be a thin, transparent layer of paint, like this:
You can also use a clean, dry rag to apply and spread paint. Fold the cloth into a small square, pick up a small amount of paint, and spread it over the area you’re working on. Here’s what that looks like:
The color on the left was applied with a cloth, while the color on the right was applied with a brush and blended, as described above.
NOTE: There isn’t much difference in the appearance of the resulting work, but using a cloth will probably create a more even paint layer. The layer will also tend to be less oily and will dry a little bit more quickly. In my opinion, a cloth is especially effective if you’re working on a larger area, but either method can be used anywhere.
After finishing with the Transparent Yellow Oxide, I rubbed Transparent Red Oxide into the redder areas. Where golds and red overlapped, I worked Transparent Red Oxide into the previous color, blending them wet-into-wet.
That was followed by a combination of Burnt Umber and a green made from Transparent Yellow Oxide and Manganese Blue into the shadows.
Finally, I rubbed a little bit of golden mixture into the leather straps of the bridle. The halter and bridle will be painted in a more opaque method, but I wanted some color on the bridle to help distinguish it from the horse (and from the halter, which will be blue).
I used the same brush for each step, working from light to dark and blending colors wet-into-wet as necessary. The only areas I didn’t work on were the eye and the long hairs of the forelock.
If you’re like me, the one thing you want to get to quickly is the detailing. Don’t do it! This is not the time to begin painting detail. Focus instead on building a color foundation, increasing value ranges, and beginning to suggest surface texture.
When you finish the first color layer, your painting should look almost as if you’ve placed clear, colored plastic over the dead layer.
If your painting is large, it may be necessary to work on the initial color layer for several days—that’s OK. Just work from one area to the next, finishing each part of the composition before moving to the next. It’s also a good idea to begin with the most distant objects first and work forward in the composition.
Take your time working through this phase. . . As with each of the previous phases, the beauty of this method is that each layer builds on the previous layers.
Stay tuned for the next installment in a few weeks!
This post may contain affiliate links.


