Birds and bamboo are two very popular subjects in Chinese Brush painting. Follow along with me as I paint a sparrow perched among bamboo branches, using the “xieyi” or “Freehand” style of painting which focuses on conveying the essence or spirit of a subject rather than an exact likeness.
Required Chinese brush painting supplies
For this painting you will need a small stiff-haired brush. I am using a brush called Happy Dot. The brush is made from stiff bristles which help to retain a nice point. The size is especially good for smaller paintings like this one.
I am painting on a 6” x 9” piece of mulberry paper also called shuen paper. Mulberry paper comes in a variety of colors and textures so experiment to find the ones you like. Larger sheets of paper can easily be cut or torn into smaller sizes.
You may want to make a few practice paintings on newsprint to get familiar with the brushstrokes.
Other supplies we are using include watercolor paints (Burnt Sienna and Sap Green), and black sumi-e ink. You will also need:
• a container of water
• a palette or old plate for mixing paints
• a few pieces of paper towel for blotting excess water from the brush
• a piece of felt or heavy cloth to put under your paper so that it doesn’t stick to the table as you paint.
NOTE: You will be painting with your paper flat on the table in front of you; you will not need an easel or any kind of special drawing surface.
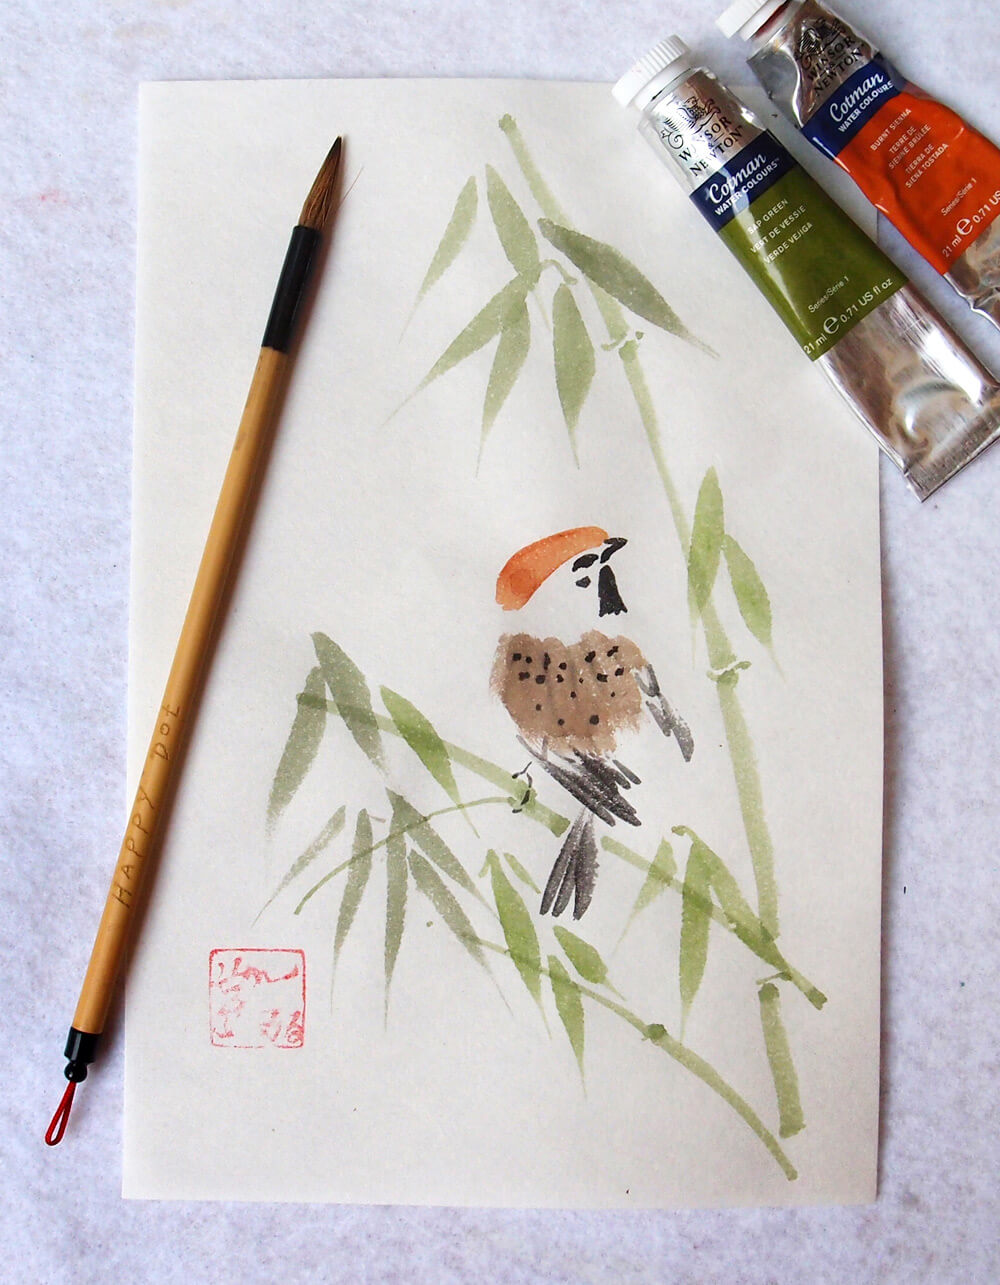
Supplies for this project: “Happy Dot” brush, mulberry paper, watercolor paint, and ink (not pictured).
The red square in the lower left corner is my name seal.
1. Painting the sparrow’s head
Wet your brush with clean water, dip it into your Burnt Sienna paint, and roll the brush on the palette to distribute the paint into the brush. Starting with the bird’s head, press the brush onto the paper and make a slightly curved stroke.
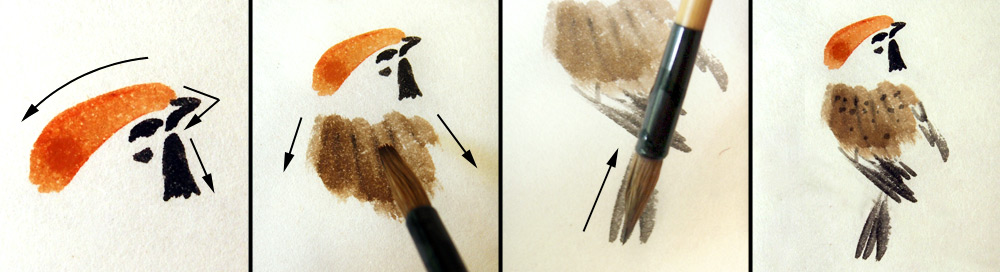
NOTE: Many references will instruct you to begin with the eyes and beak, but, if the head is turned like it is in our painting, it can be easier to add these once the size of the head has been defined.
Clean your brush and load it with ink. Lightly dab your brush on a paper towel to remove some of the excess water from the brush. You want the ink be a strong dark color.
Using just the point of the brush, paint a small triangle for the beak. Add a dot for the eye and then paint a line above the eye for the eyebrow. Add a small dot under the eye for the cheek patch. Add the dark throat patch by pulling the brush downwards starting from the bottom of the beak.
2. Painting the wings and tail-feathers
Without cleaning your brush, pick up some of the Burnt Sienna paint and roll your brush on the palette. The ink that remains on your brush will mix with the color to create a brown color. If your brush doesn’t have any ink remaining, just pick up a tiny amount with your brush tip and mix it into the Burnt Sienna.
Hold the brush so the tip is facing away from you. Press the brush down on the paper to make a stroke. Lift the brush up a little and place another stroke next to the first. Do this several times to create the back of the bird.
Clean your brush and load it with ink that has been mixed with a little water. You want to make a dark gray color. With the tip of the brush pointed towards you, pull the brush up to form the wing and tail feathers.
Add more ink to your brush, if necessary, and add dots to the back of the bird.
3. Painting the bamboo stalks
Clean your brush, dip it into your green paint, and then mix a little ink into the green to darken it slightly.
To paint the branch that the bird is perched on, press the brush onto the paper and push it away from you. If you pause as you make the stroke, the branch will appear more interesting.

To add more bamboo, start near the bottom of the paper. Press the brush onto the paper and push it upwards a short distance to form the first section. Lift up your brush to create a small space and then push the brush away from you again to form the next section. Keep doing this until you reach the top of the paper.
Repeat these steps to add another bamboo stalk. Vary the size and number of each section in a stalk. If the brush hairs begin to split don’t worry, it will make the bamboo more interesting.
Add joints to the bamboo by painting a wide “w” shape with the tip of the brush where each section of stalk meets the one below it.
4. Painting the leaves
Place the brush on the paper, pull the brush and lift off in a single smooth motion. Try to keep your wrist straight so the leaves don’t curve. Curved leaves are only painted when you want to show them moving in the wind.
Group your leaves into an arrangement that is pleasing to you. I like to overlap some of the leaves and vary the sizes. I also like to vary the color by adding more ink to my green mix.
5. Finishing touches
Once you have painted all the branches and leaves, add a foot for your bird in ink. Keep it simple with just a few lines formed into a “c” shape. Then, feel free to experiment and add your own special touches! Here are some ideas to get you started:
• Try painting the bird in different positions (or add another one flying in to land)
• Use different color combinations to change the species of bird
• Paint the bird and bamboo in shades of ink instead of color for a monochromatic look
• Use the same brush techniques on small pieces of watercolor paper to create a handmade card
• Use metallic inks or paints to add shimmery accents
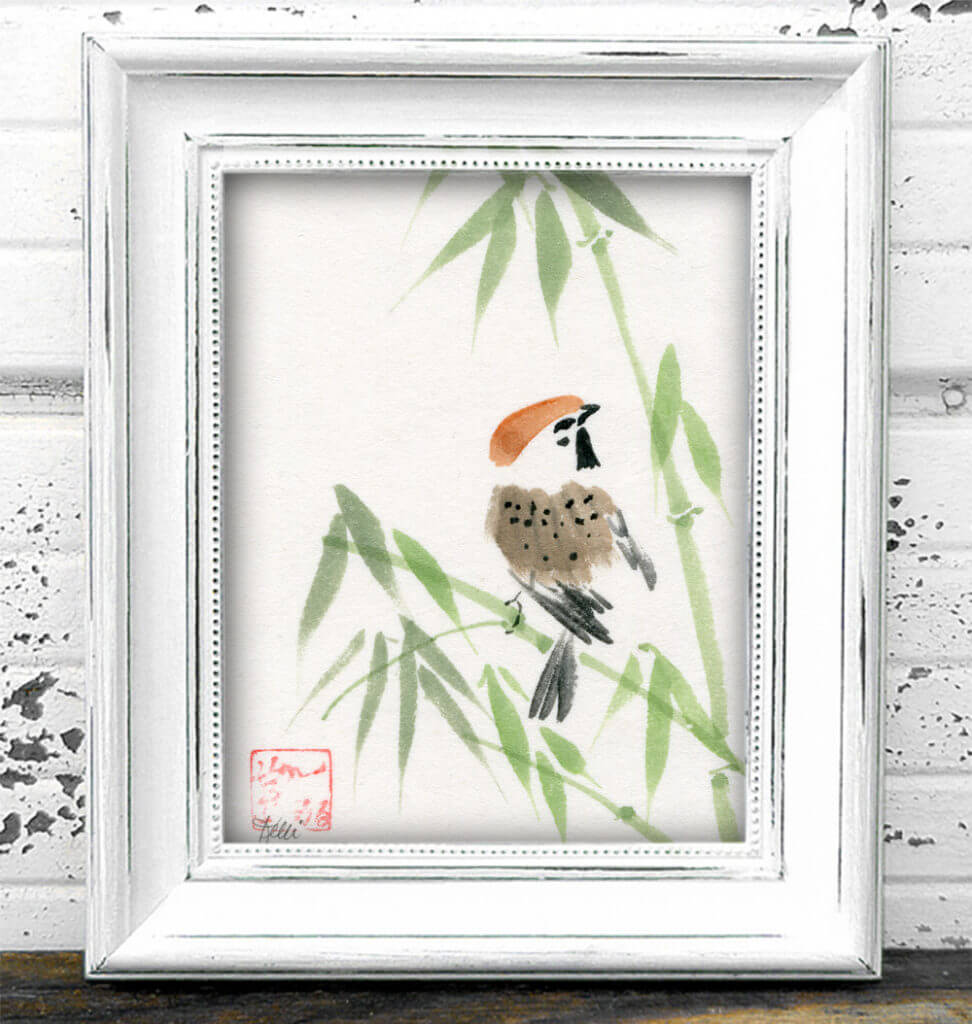
The most important thing is to have fun painting!
Special thanks to Kelli McNichols for sharing this sparrow and bamboo painting tutorial! To learn more about Kelli or her art classes, please visit her website.
This post may contain affiliate links.