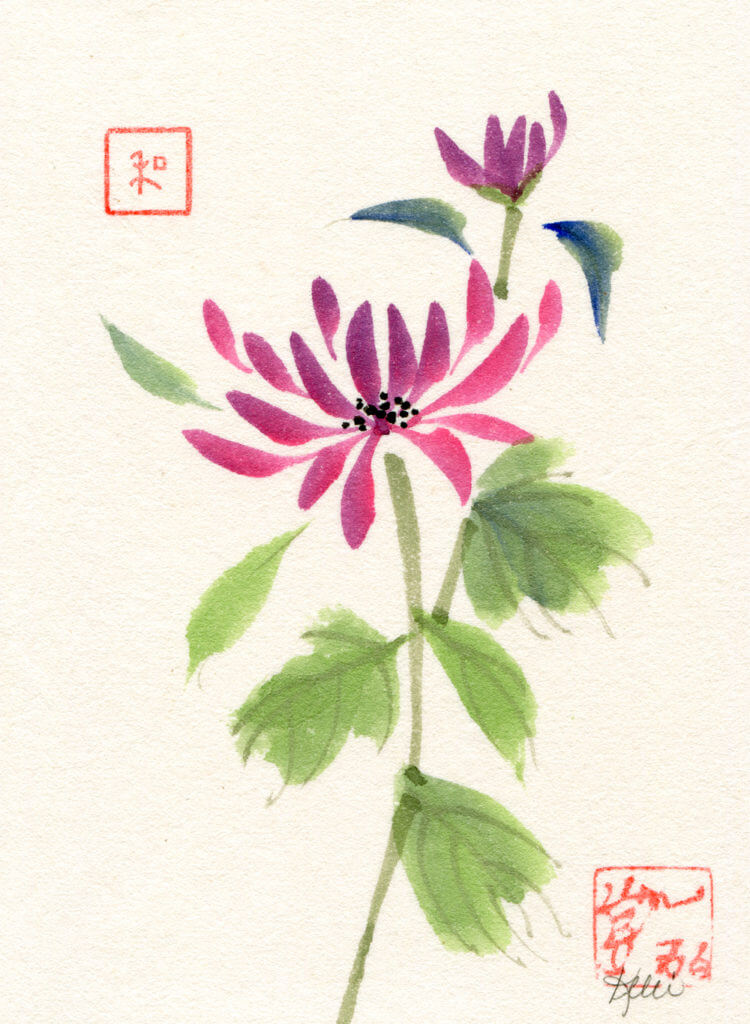
Chrysanthemums are the symbol of the Fall season in Chinese Brush painting. Mums come in a variety of colors from the traditional yellow to orange, red, pink, purple, and white.
For this painting we will be using the xieyi or “Freehand” style of painting which focuses on conveying the essence or spirit of a subject rather than an exact likeness.
Required Chinese Brush Painting Supplies
For this painting you will need a small stiff-haired brush and a medium-size mixed-hair brush. We will use the small brush for the flowers, stems, and details, and the large brush for the leaves.
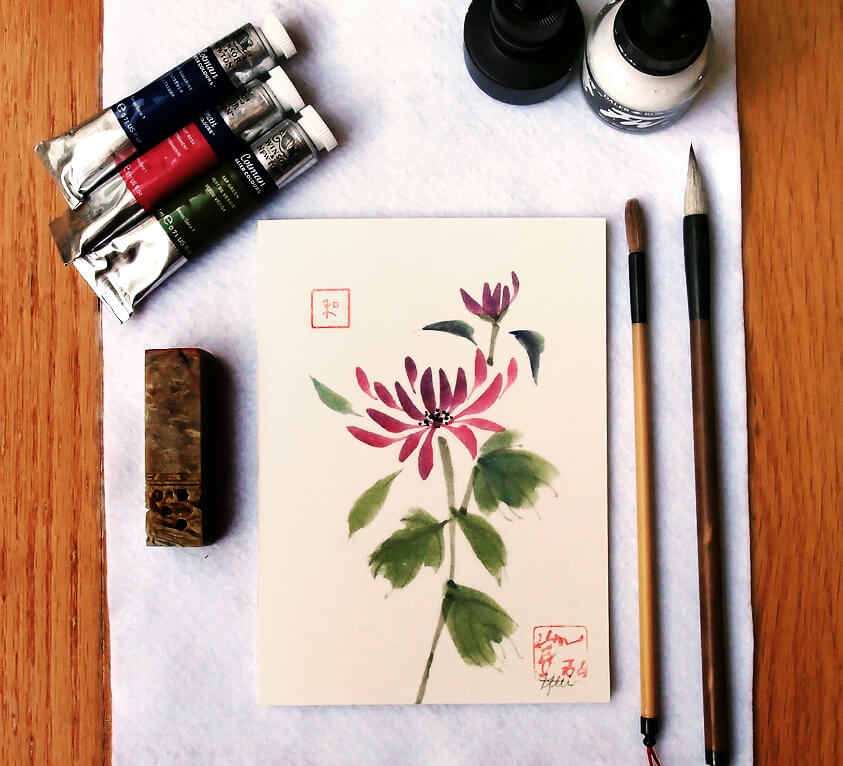
We will be painting on mulberry paper also called shuen paper. Mulberry paper comes in a variety of colors and textures, so experiment to find the ones you like. Larger sheets, sold at some art shops, can be cut or torn into smaller sizes. Smaller sizes are good for practicing. Any small pieces that you like can be mounted onto cardstock and sent as a greeting card.
You may want to practice on newsprint first to become familiar with the brushstrokes.
Other supplies we are using include watercolor paints (Permanent Rose, Ultramarine Blue, and Sap Green), and black sumi-e ink. You will also need:
• a container of water
• a palette or old plate for mixing paints
• a few pieces of paper towel for blotting excess water from the brush
• a piece of felt or heavy cloth to put under your paper so that it doesn’t stick to the table as you paint.
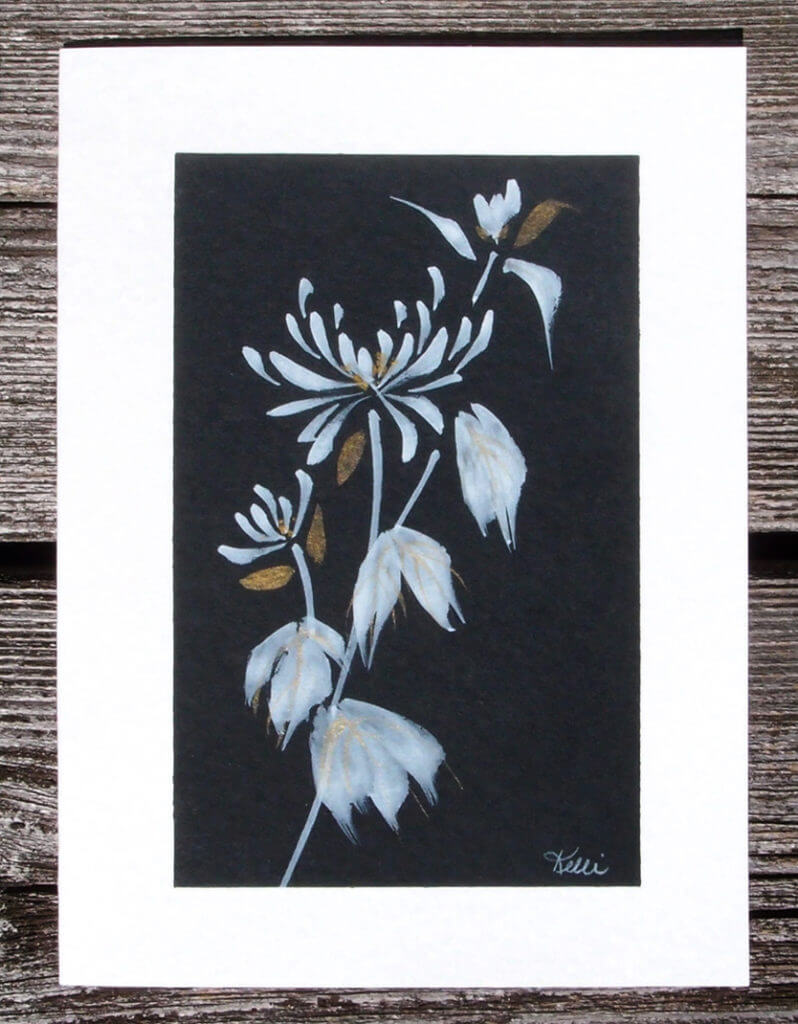
If you’d like to paint the white mum greeting card that is shown at the end of this tutorial, you will also need black paper (I am using Strathmore Black Mixed Media paper), white ink, gold pearlescent paint, watercolor card stock, and glue.
NOTE: You will be painting with your paper flat on the table in front of you; you will not need an easel or any kind of special drawing surface.
1. Painting the flower head
Wet your brush with clean water, dip it into your Permanent Rose paint, and roll the brush on the palette to distribute the paint into the brush. Then dip the tip of the brush into the Ultramarine Blue paint, and wiggle the tip of the brush on the palette to make a violet color. Do this each time you need to load your brush with paint.
Starting with the central petal, press the brush onto the paper, and pull it towards you releasing the pressure on the brush to taper the stroke. Place a few strokes on either side of the first one to make the center petals.
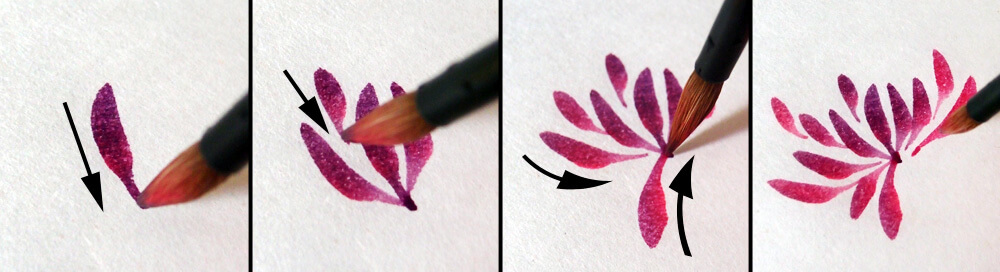
Reload your brush if necessary.
To form the outer petals, make a stroke similar to the short central ones, but this time, pull the brush further to create a longer tail. Arrange the petals in a cup-shape. If you have large spaces between your petals, just add a few smaller ones in between to fill out the flower. Follow the direction of the arrows in the diagram for painting the petals.
For flower buds, use the same brushstrokes for the full flower, but only paint a few petals.
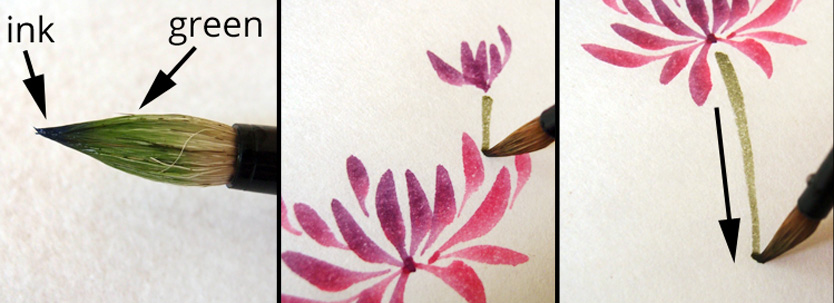
2. Painting the stem
Clean your brush and load it with Sap Green paint and add a small amount of black ink to the tip to make an olive green color.
Hold the brush vertically and paint a line for the stem. Try to maintain even pressure on the brush and leave some space for leaves.
3. Painting the leaves and details
Wet the combination brush and load it with Sap Green mixed with a little Ultramarine Blue. Place the brush on the paper and pull it towards you a short distance to make small leaves. If you curve your wrist as you make some of the strokes, the leaf will appear to be folding over.
For the large leaves, place the entire brush on the paper to form a large splotchy shape (called a “dot”). Make another “dot” next to the first. Add small strokes (only press half of the brush onto the paper) on each side of the “dots.”
You can vary the amount of blue you add to the brush to get varying shades of green.
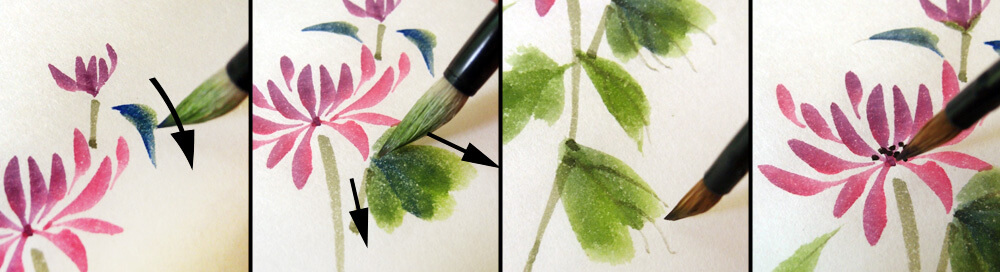
Load the smaller brush with Sap Green mixed with black ink to make a dark green color. Using the tip of the brush, add thin veins to the leaves. If you move the brush quickly and confidently, your lines will look more natural. Don’t worry if they extend past the leaf, this is very common in brush painting and gives the finished piece a more free-flowing look.
Finally, load the small brush with ink, and using the tip of the brush, add small dots to the center of the large flower.
4. Completed painting
To complete the painting I added a mood seal in the top left corner that means “peace.” I also added my name seal in the lower right. Seals are a way to finish a painting and personalize it a bit more. Seals can be purchased pre-made or if you are adventurous, you can purchase a kit and carve your own.
5. Variations
Painting on mulberry paper is traditional; however, it is also nice to experiment on other types of paper, especially if you like to create your own greeting cards.
I cut a piece of black mixed media paper so that it was smaller than my greeting card stock. Using the steps outlined above, I painted the chrysanthemum flowers, stems, and leaves, with white ink.
I added the details with gold pearlescent paint. Some brands of pearlescent paint may need to be a bit thicker in order to show up. Test out your paint on a scrap piece of paper first. If you notice the paint is hard to see, use less water on your brush.
Once the painting was dry, I attached the painting to the cardstock with glue.
Special thanks to Kelli McNichols for sharing this amazing chrystanthemum painting tutorial! For more from Kellie, please check out her other Chinese Brush painting tutorials on EmptyEasel (sunflowers, magnolia, sparrow on bamboo) or visit her website at art.mcngraphics.com.
This post may contain affiliate links.