The method of painting I’ll be describing in this series is based on the methods of Flemish Masters of the 16th and 17th centuries; painters such as Peter Paul Rubens and Anthony van Dyck. This method develops a painting from a detailed drawing through seven stages to the completed painting.
I’ve always been a fan of Classical art, but I first became aware of this technique ten years ago. I have tried it as described by various online courses, but an allergic reaction to Damar Varnish, which is one of the ingredients of the painting medium used throughout the process, necessitated alterations in the process. The process I now use most often is a personal adaptation of the original Flemish technique.
I also use a brand of oil paint that’s ground with walnut oil instead of linseed, safflower, or other oils. They age without yellowing and very few of the colors are opaque, which makes them ideal for Classical layering methods.
They can also be thinned with walnut oil (and you can even clean your brushes with walnut oil), so if you have health issues with standard solvents, you can use these paints without solvents or mediums.
The only drawback to walnut oil is that it dries more slowly than other traditional oils. For the style of painting I do, this is a bonus. However, the technique I describe can be used with all types of oil paints and acrylics, as well.
What is the Flemish Technique?
The Flemish technique is also known as the 7 Step Method. The seven steps are:
1. Imprimatura
2. First umber layer
3. Second umber layer
4. Grayscale layer
5. First color layer
6. Second color layer
7. Detailing layer
Traditionally, each layer was allowed to dry for a minimum of seven weeks, so it’s quite a long process. I highly recommend giving the Flemish Method a try at least once, however, even if you normally prefer Alla Prima painting or like to work wet-into-wet.
Let’s get started!
1. Plan your composition and draw it
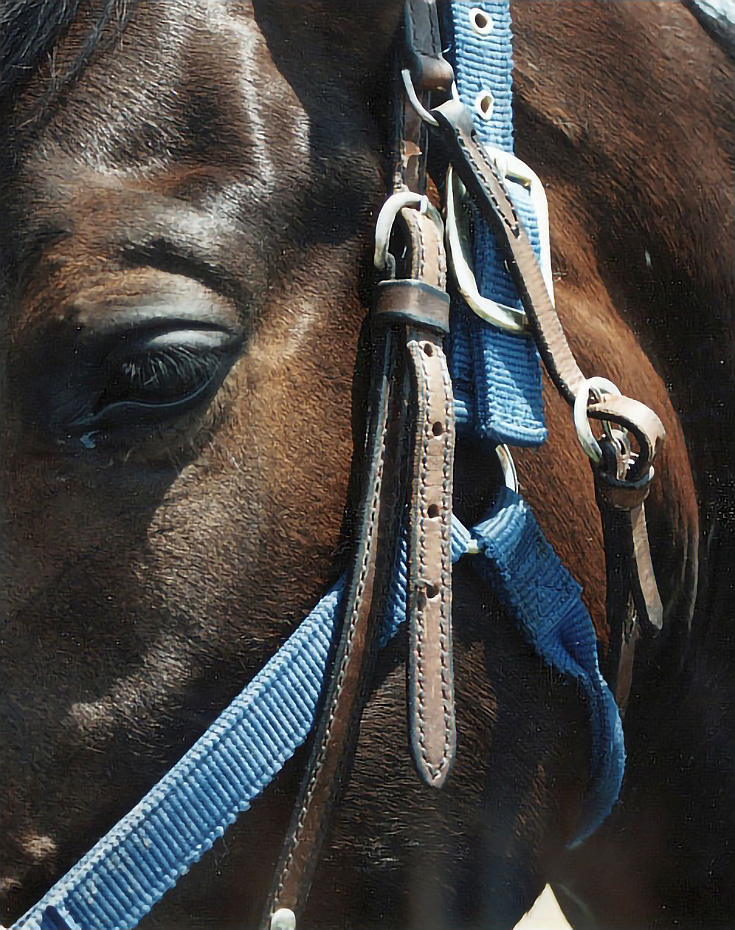
My painting surface for this demonstration is a 6×8 Masonite board. I planned out a composition of a horse, but with a focus on the buckles, straps, and shadows near the horse’s eye. I think of it as an equine still life, rather than a horse painting. Here’s the reference photo:
I spent a good amount of time working up a detailed drawing from the reference photograph using my grid drawing process, which helped me solidify my composition and learn the subject, as well as get the most accurate drawing possible.
2. Prep your painting surface
My painting surface was prepped with a 50/50 mix of Acrylic gesso and modeling paste. I thoroughly mixed the gesso and modeling paste together, then poured small amounts of it onto the panel at a time. The mixture was then spread over the panel with a large cake frosting knife (shown below).

I worked in all directions, alternately stroking the length of the panel, then across it, then diagonally. The goal was a smooth, thin, uniform layer. I continued to work with the mixture until it began to dry.
You’ll want to let the ground dry completely (usually about half an hour) for each layer.
Before applying the next layer, use a razor blade to remove any rough edges, dust, or dirt that may have settled on the surface. Hold the razor blade as shown below and use light to medium pulling pressure to clean the surface.
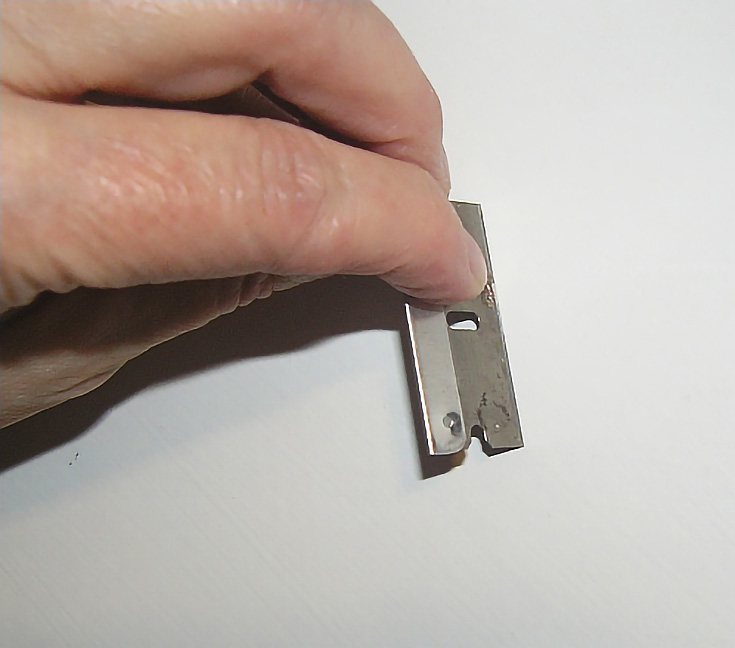
Be careful that you don’t press so hard that you gouge the surface. All you want to do is reduce any bumps or ridges. After smoothing my first layer, I added another layer, let it dry and then repeated the process again. All in all, I used three layers on this panel. In the end, my painting surface had a smooth, velvety feel, with a texture similar to an egg shell.
3. Transfer the drawing to your painting surface
To get the drawing onto my board, I used graphite paper and transferred the drawing directly. Because graphite will smear with the first application of paint, I “fixed” the drawing on my board by going over it again with India ink.
Of course, you can also make the drawing permanent by using oil paint, preferably in an earth tone such as burnt umber or raw umber. If you use paint, you’ll have to wait for it to dry before continuing, but burnt umber will usually dry overnight so it’s an acceptable alternative if you don’t have India ink.
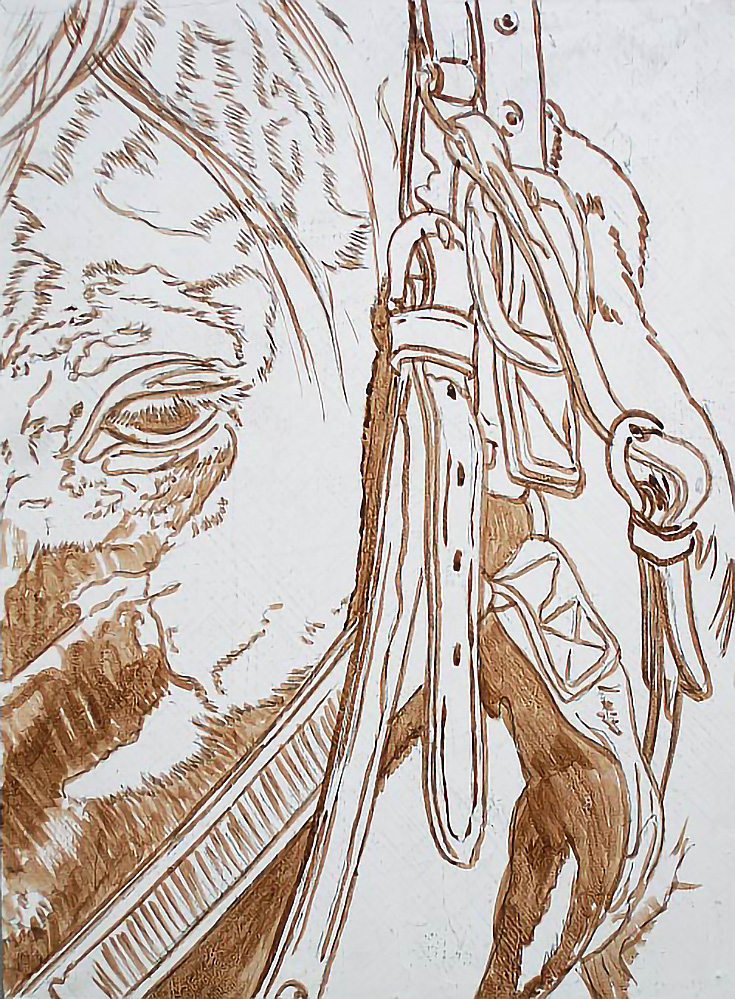
This illustration above shows the composition on my board in India ink. I took the liberty of inking some of the darker shadows to begin establishing the light and dark areas. You’ll also note that I used brown India ink, but any medium-value color will do as long as it’s not so dark it shows through the finished painting.
4. Add the imprimatura layer
The imprimatura is the last stage of your surface preparation before you can start painting. Essentially, it’s a very thin layer of paint with an olive hue, typically created by mixing a warm color, a cool color and white, then thinned with painting medium. For this painting, I used Yellow Ochre (warm), Lamp Black (cool), and Titanium White.
The standard painting medium for the imprimatura is 2% dry Damar Crystals and 98% turpentine. You can substitute Damar Varnish for the dry crystals if you wish, however.
Using a large, soft brush, thin your paint with painting medium and brush it over the surface, focusing on smoothing out brushstrokes and creating an even paint film.
I have allergic reactions to the Damar varnish, so I don’t use a painting medium. Instead, I apply paint without medium or thinner by using a clean cloth to apply paint, then wiping off the excess. The result is still a thin, transparent layer.
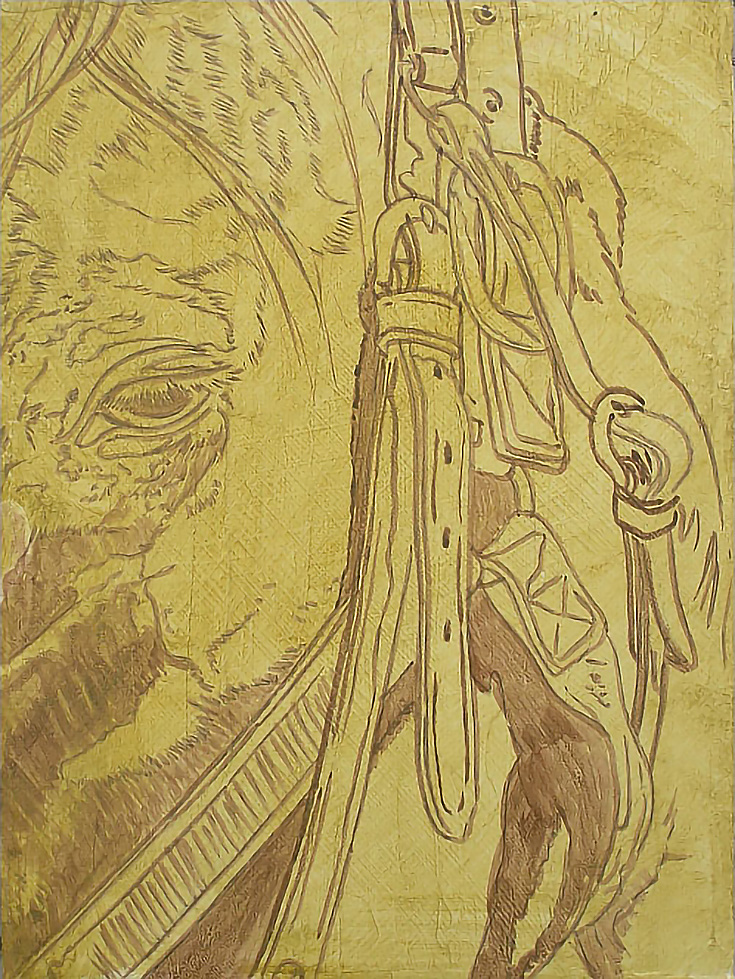
The imprimatura takes about a week to dry if you use painting medium. If you use the method I do, it will dry in 3 or 4 days.
By this point, if you’ve followed along with your own composition, you’re just about ready to begin painting! Since you’ll need to wait several days before moving on to the next step, you may wish to prepare another painting while your first one dries (but that’s completely up to you.)
In my next article, I’ll pick up right here and demonstrate how to do the first and second umber layers, as well as the grayscale layer. Then, in my third and final installment, we’ll finish out the painting.
I hope you’ll join me for those next steps. . . it should be a lot of fun. See you then!
This post may contain affiliate links.