Many so-called “rules” of art are more suggestions than rules. It’s helpful to know what they are, but you don’t have to follow them rigorously to make great art.
However—when it comes to oil painting, there are three rules that you absolutely, positively MUST understand and follow if you paint in layers, or your work will fail every time.
They are:
- Fat over lean
- Thick over thin
- Slow drying over fast drying
Why these oil painting rules are so important
Oil paintings will last much longer if you follow these three rules. Simply put, if you don’t follow them, your paintings are almost guaranteed to crack and age poorly.
Rule 1: Fat over Lean
This rule applies to the additives you might put into your oil paint. Additives fall into two basic categories: solvents and oils. Turpentine and odorless mineral spirits are solvents and will thin your paint down. Linseed oil, safflower oil, and Liquin are oils, and are used to make your paint consistently smooth and brushable.
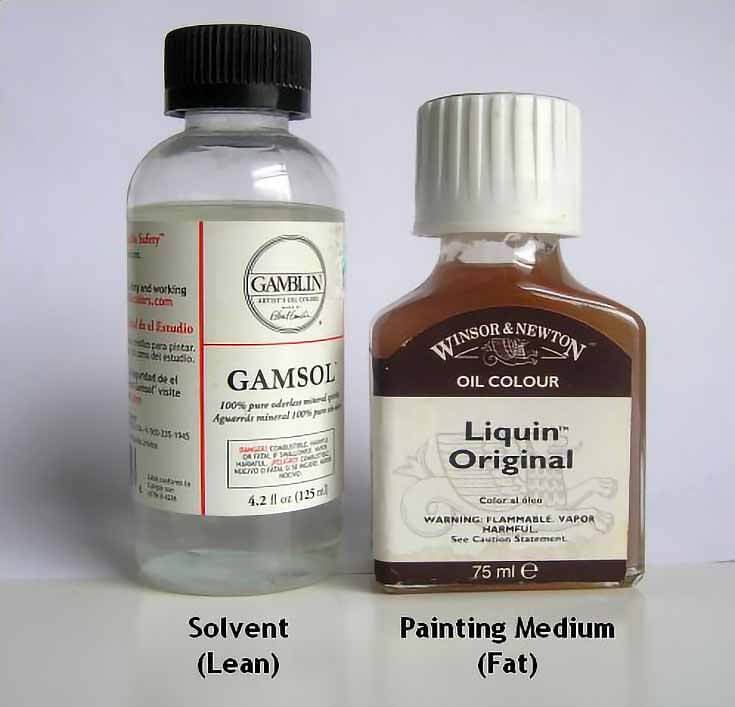
When you add oil painting medium to paint, the resulting mixture is said to be “fat.” When you add any kind of solvent to paint, the resulting mixture is said to be “lean.”
So the phrase “fat over lean” just means that you should always begin your painting with layers of lean paint (paint with solvent) and finish with fat paint (layers with painting mediums added).
Here’s why this matters:
Lean paint (with solvent) dries more quickly than fat paint. The solvents evaporate from the paint quite quickly, which speeds up the paint’s drying time.
If you put a “lean” fast-drying layer of paint over a layer with more oil in it, you’ll end up with a layer that’s still drying below a layer that’s already finished. This causes the top layer to crack as the paint below it changes finishes curing and changes dimension as a result.
In extreme cases, your top layer may even flake off or fall off altogether.
Early in my painting career, I used all kinds of additives in all kinds of ways. The worst result I ever experienced was a painting that crazed (tiny cracks formed all over).
Novice that I was, I simply repainted the area with the same colors and methods I’d used at first. And guess what? The paint crazed again. It was years before I figured out the reason – I’d broken one and probably more of these rules!
In later years when I was painting regularly, I used solvents to clean my paintbrushes and that’s pretty much all. As a result, I didn’t run afoul of the fat over lean rule
Rule 2: Thick over Thin
Paint can be applied to canvas in any number of ways ranging from glazes (very thin layers) to impasto (very thick layers).
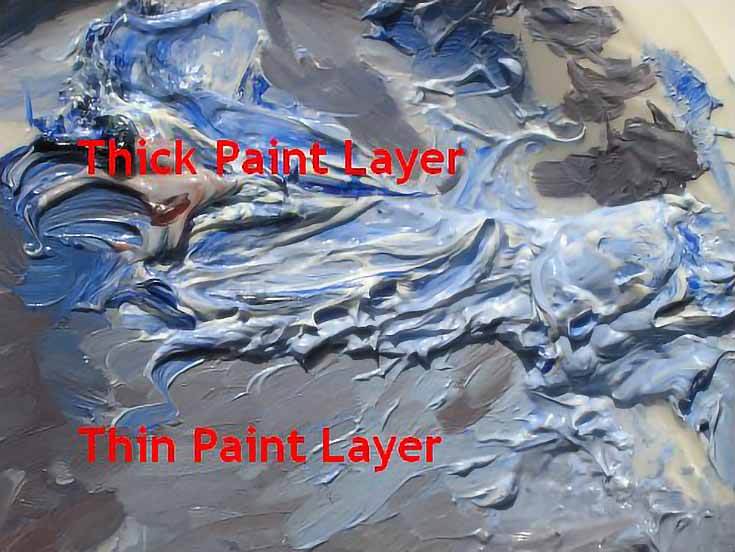
When you apply paint in different thicknesses, it’s vital to make the first layers thin, and save your thicker layers of paint for last.
Why? Because oil paint doesn’t technically “dry” by evaporation as water-based paints do—it actually “cures” until it’s solid through oxidation. The thicker a layer of paint is, the longer it takes to cure all the way through. It may feel dry on top, but it’s not completely solid yet.
Because of that, it’s not safe to paint over until it’s thoroughly cured, especially if you add a thin layer over the top. The thin layer will dry faster and may crack as the thicker layer underneath continues to dry and change shape.
The best practice is to begin with thin layers, then gradually increase the thickness of each additional layer. Or do all the layers thin, and then add thick layer accents after the painting is finished.
Rule 3: Slow Drying over Fast Drying
Some colors even take longer to dry than others, and the same sort of principles apply. It’s best to begin a painting with colors that dry more quickly and finish with colors that dry more slowly. Or, mix in some medium to your later layers so that they take longer (rule 1 can work to your advantage, too!)
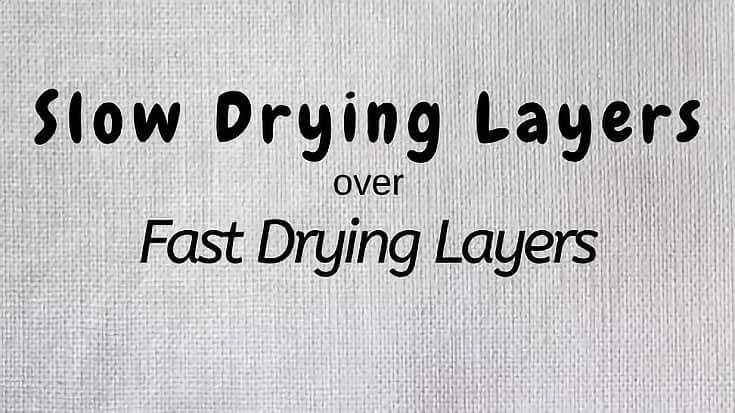
So how do you keep track of which colors dry fast and which dry slow?
A general rule of thumb is that earth tones dry fast (sometimes overnight) while jewel tones take longer. Sometimes it takes days or weeks for reds, blues, and yellows to dry all the way through. Blacks and whites can also be very slow drying.
To get the most specific information about your paint’s drying time, go online to your brand of paint’s website. Many of them publish charts listing the drying qualities of each color. Some even include drying times.
Of course, there are ways to paint in which you can avoid these rules entirely. . . make an entire painting with fast drying colors (or with slow drying colors). Or just use thin layers (or thick layers). You get the idea.
You can also do what’s called alla prima painting, in which you start and finish the painting all in the same setting, without painting layers. A lot of plein air painters use this method to produce beautiful paintings. Since the paint is all wet at the same time and drying at the same time, there are no distinct layers at different stages of the curing process.
But if you prefer working in layers, the best practice is to start each painting with thin layers of fast-drying colors that are thinned with solvent. Then, finish with thicker layers of slow-drying colors using painting mediums.
As long as you understand these 3 oil painting rules, your paintings will do just fine. Good luck, and happy painting!
Did you know that learning to draw objects you see around you in real life is one of the best ways to learn to paint? The foundational techniques in drawing create a platform to learn how to paint more effectively. If you’d like to brush up on your foundations so that you can paint better, read our new guide How to Draw EXACTLY What You See.
This post may contain affiliate links.