In my previous article, I explained how to start a three quarter view portrait drawing based on classical proportions. (If you haven’t yet read that article, I encourage you to go back and read it before continuing on.)
Now, let’s continue working through the portrait-drawing process:
6. Locating the eyebrow edge
The eyebrow’s outside edge is an important mark of the head. This virtual line marks a division of the head’s two visible planes, separating the front (i.e., the face) from the side of the head. It also serves as a border between tonal values of light and shadow.
The eyebrow’s edge location depends on your angle of view, so it has to be measured on the model by comparing distances “A” and “B” seen below.
Later on, this edge will also help us to determine the position of the ear, so it’s very important to measure and mark correctly. After all, if you place the edge of the eyebrow too far to the side, the face will be wide and distorted. If placed too close in, the face will be too narrow.
NOTE: The best way to measure distances for a drawing is using your pencil. For a recap on how to do that, read this article at the Drawing Academy.
7. Defining the contours of the face
Contours of the face are lines that help to define portrait’s likeness. These lines are unique to each individual, the angles of which must be measured as you study the model.
In the drawing below, I’ve marked the contours of my own model’s cheekbones and jawlines. Do the same on your own paper, based on your model’s features, and you’ll see the shape of your model’s head begin to appear.
8. Indicating the top edge of the ear
Unlike the facial contours mentioned in the previous step, the location of the top edge of the ear is universal for all people and portraits: it’s on the same level as the eyebrows line.
To mark the top of the ear, simply extend the eyebrow line horizontally towards backside of the head.
9. Bonus tips for placing the ear correctly
At the Drawing Academy I often see (or am asked to critique) portrait drawings that have one common mistake—a miss-located ear. To avoid this mistake in your own drawings, here are a few additional rules:
• The top of an ear is on the same level as the line of eyebrows.
• The bottom edge of an ear is on the same level as the base of the nose.
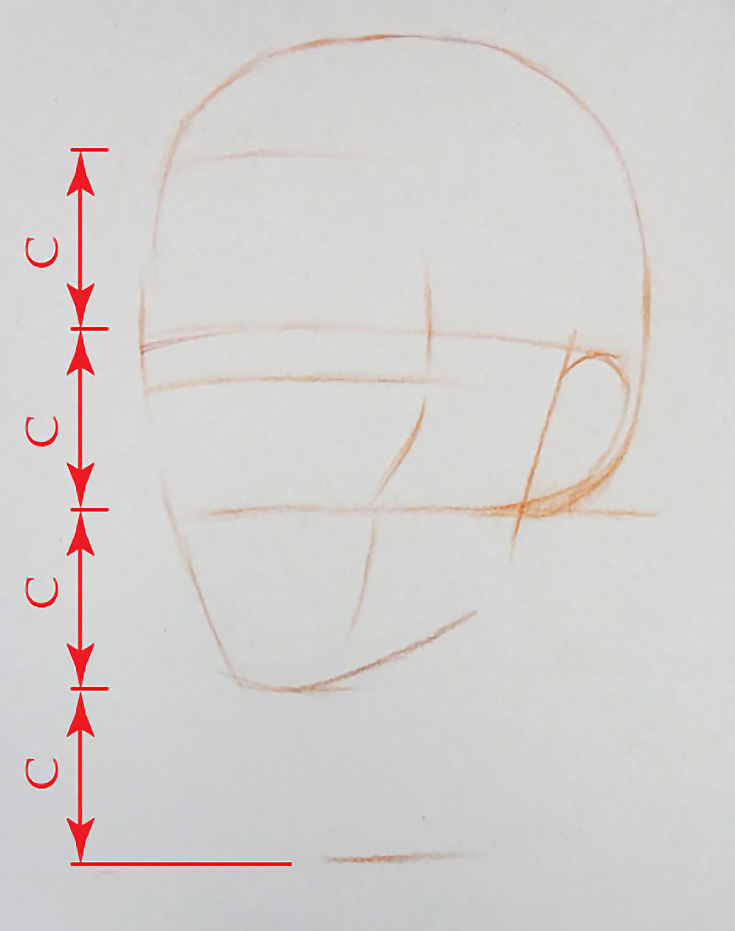
• The distances from the edge of the eyebrow to the ear, and from the edge of the eyebrows to the middle of the face should be equal (marked with the letter “C” in green below). When the head is viewed in perspective, these distances will be foreshortened, but otherwise it’s the same distance from the hair-root to the eyebrows line, the eyebrows to the base of the nose, and the base of the nose to the chin (all marked with the letter “C” in red).
• The front “line” where the ear connects to the head is not vertical, but tilted backward (see the blue line below).
10. Placing the pit of the neck
Another common mistake I see is when a student forgets about the neck during the early stages of a drawing, and simply draws it in as an afterthought when the head is fully drawn. This is unfortunate, since it’s almost impossible to draw believable looking portraits from life (or your imagination) without proper knowledge how the head connects to the shoulders via the neck.
So to finish up today’s tutorial, let’s indicate that very important landmark of any portrait: the pit of the neck.
It is located between the two collarbones just above the breastbone, and is the same distance below the chin as one-third proportion of the face (marked with “C” in red).
I hope you’ve enjoyed this series so far. . . keep practicing, and make sure to go on to Part 3 of this series as well!
Portrait drawing expert Vladimir London is a published author and founder of the Drawing Academy, an online class for learning traditional drawing techniques from home—make sure to click through for full tutorials, drawing tips, and more!
This post may contain affiliate links.