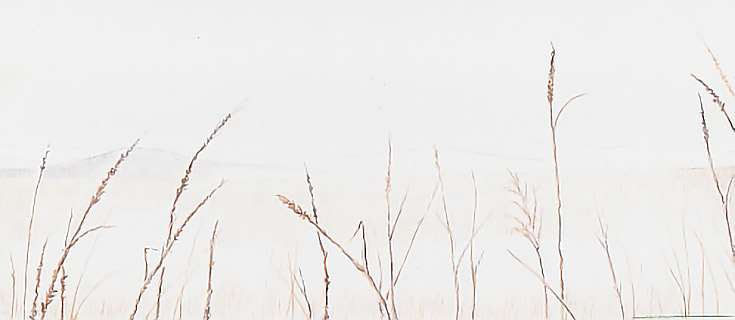
This article begins a three-part series on creating believable weather conditions in colored pencil landscapes. The series will focus on lighting and other aspects of weather conditions that come with rain. This week, we’ll work on the foreground and begin the middle ground.
I’m working on 146 pound Bristol board with a regular surface, because the paper is sturdy enough to take a lot of punishment and the surface is quite smooth.
A note on drawing order—colored pencils are not inherently opaque, so you generally have to place foreground elements first, then add background. You can work background to foreground, but if you do, you need to know where the foreground elements are and work around them.
For drawings such as this, which features tall grass overlapping the middle ground and background, it’s preferable to begin in the foreground.
Step 1: Establish the basic foreground elements
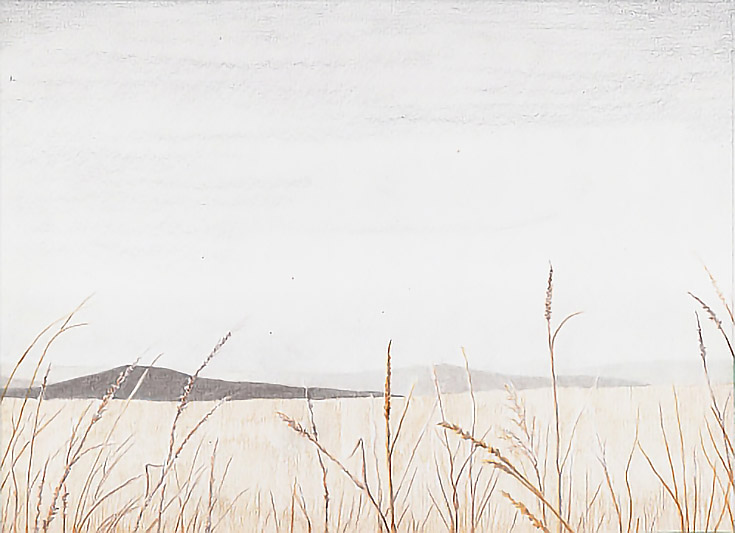
I started by using Prismacolor Dark Brown in the shadowed sides of stems, stalks, leaves, and heads. Larger stalks were drawn with long strokes beginning at the bottom and moving upward. For leaves and smaller stems, curved and/or broken strokes were used, and in the seed heads, squiggly strokes. I used medium pressure throughout, but let some of the strokes taper off toward the top, creating lines of decreasing width and darkness with each stroke.
Next, I added middle tones with Prismacolor Mineral Orange. I used the same strokes and pressure and overlapped some of the Dark Brown strokes. I also used a slightly blunt pencil.
I then sharpened the pencil and stroked in additional grasses using long, arching strokes and light pressure.
Behind those, I used shorter strokes with light pressure to add a more distant line of grass. Then, using very light pressure, I sketched in the crest of the middle ground hill and glazed Mineral Orange into the hillside. Finally, I sketched in the most distant hill with Prismacolor Cold Grey Light (#967) using a sharp pencil and light pressure.
Step 2: Build up detail
Beginning with the stems closest to the front, I drew shadows with Dark Brown, stroking in the direction of growth and reducing the pressure as the stroke moved upward. I used a long stroke for the stem and short, squiggly strokes for the seed heads. (#1 on the illustration below).
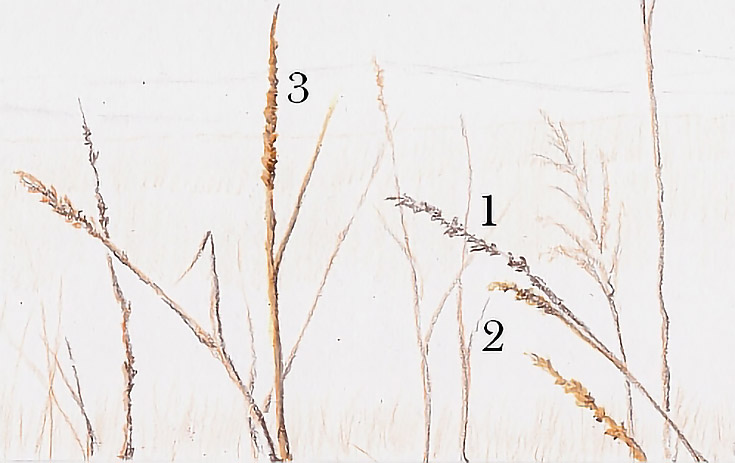
Next, I put Yellow Ochre alongside the Dark Brown using medium heavy to heavy pressure and moving upward along the length of the stem. In the seed head, I used the squiggly stroke in a pattern similar to the Dark Brown, but overlapping it in some places. The two stems above and below the #2 in the illustration show Yellow Ochre over Dark Brown.
Finally, I burnished Cream over all parts of the grass and alongside some of the stems on the lighted side. See #3 above for a visual.
Step 3: Place horizon elements
I used Cold Grey Light (PC 967) to lightly outline and fill in each hill on the horizon. To create evenly shaded shapes, I used closely spaced strokes, changing the direction of stroke with each layer.
The lightest hills are a single layer applied with very light pressure and a dull pencil. Additional layers were added over the darker hills, using light pressure for each layer.
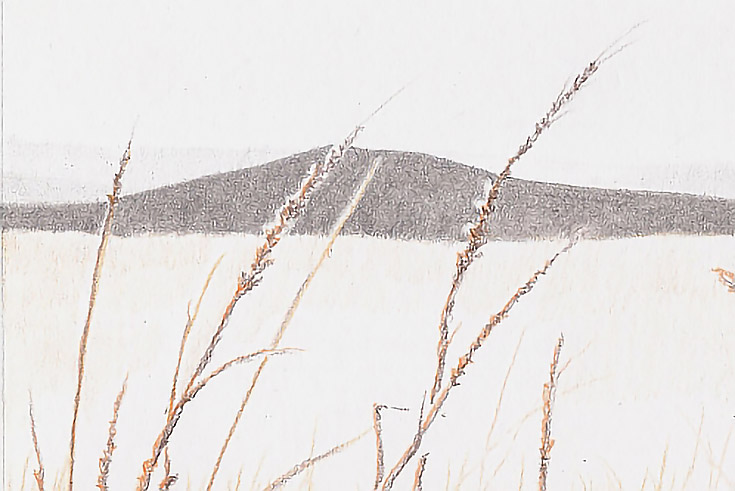
When I outlined the hills, I also outlined the individual blades of grass and worked around them. On the left side of some of the closer grass stems, I reserved the white of the paper to create highlights, as seen on the larger seed heads overlapping the background hill.
Next, I used Warm Grey 50% (PC 1054) on the darkest hill. I again outlined the hill and the stems of grass overlapping it, then filled in each area using light to medium pressure, a sharp pencil, and multiple layers. I finished by burnishing with the colorless blender.
Step 4: Develop the horizon elements
I layered additional grays over each hill and burnished with white. In the darkest hill, I used Warm Grey 50% and French Grey 50% (PC 1072), then burnished along the bottom with White, working in a horizontal pattern to soften the lower edge before burnishing the entire hill.
The most distant hills were finished with French Grey 50% using light pressure. Value variations were created by adding layers. I finished them by burnishing with White.
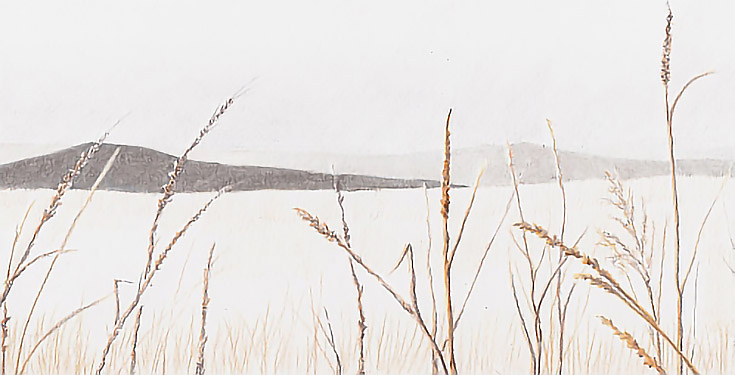
The hill in the center shows gradated value so I used two colors, beginning with a single layer of French Grey 50% over all of the hill, then a second layer of French Grey 50% on the left side and a layer of French Grey 70% (PC 1074) on the right. I worked around the grasses overlapping the hill and preserved a strip of paper color on the lighted sides to serve as a highlight on a few of the larger stems. I finished by burnishing that hill with two layers of White, concentrating on the gradations in color to make them as seamless as possible.
Step 5: Lay the foundation for the middle ground
I glazed Goldenrod over the middle ground, working around some of the grass stems, but glazing over most of them. I then used Goldenrod and Light Umber to add more grasses along the bottom and sides. For some, I used Goldenrod to establish each stem, and Light Umber to add the shadowed side. For others, I used only Goldenrod and for still others Light Umber.
I also used the stylus to impress lines and highlights into the smaller areas between the larger stems of grass.
In the most distant hills, I did one layer of Cold Grey Light followed by a layer of Cream. In the middle hill, I did two layers of each color, alternating between the colors. In the darkest hill, I did three layers of each.
At last, the major elements of the landscape are now in place. In the second article coming up, we’ll continue to develop the drawing by working on the sky. The third and final article will focus on perfecting the details and finishing the drawing.
Stay tuned!
This post may contain affiliate links.