If you work with colored pencil for any length of time, chances are good you’ll be drawing hair at some point. Being able to create beautiful, realistic-looking hair is a must. . . but how do you get it right?
Well before we get to specific examples, here are a few general tips that apply to all types of hair. Keep these in mind:
• Begin with light pressure and increase pressure with each layer.
• Preserve highlights in the early layers.
• Always, always, always begin at the root and stroke in the direction of hair growth.
• Stroke the full length of the hair, working around the highlights.
• Decrease pressure as you move toward the tip of the hair.
• Use heavier pressure in the shadows between hair groups.
• Layer several colors to build color and value.
• Let your colored pencils do most of the work!
Now, I’m going to demonstrate how to draw four types of hair. Please note, I’m using animal samples as illustrations, but the principles DO work exactly the same for human hair as well.
1. Drawing short, neat hair
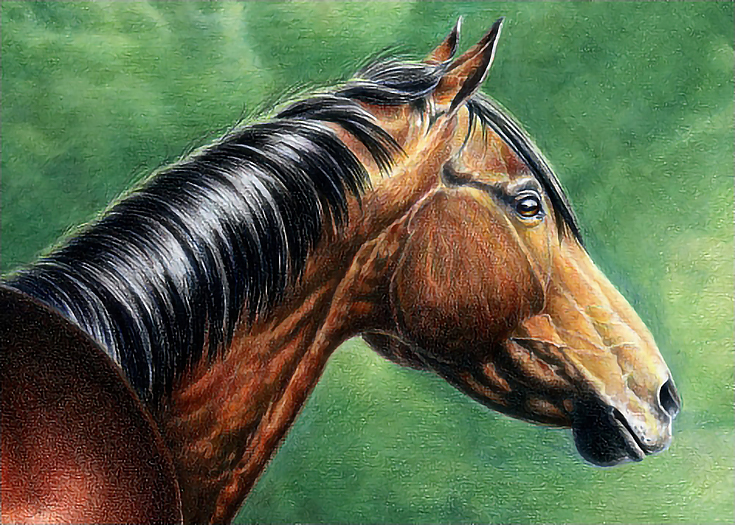
As with any drawing, draw in the overall shape of the hair first. Lightly sketch in the highlights, and then begin your shading with light pressure and directional strokes following the direction of hair growth.
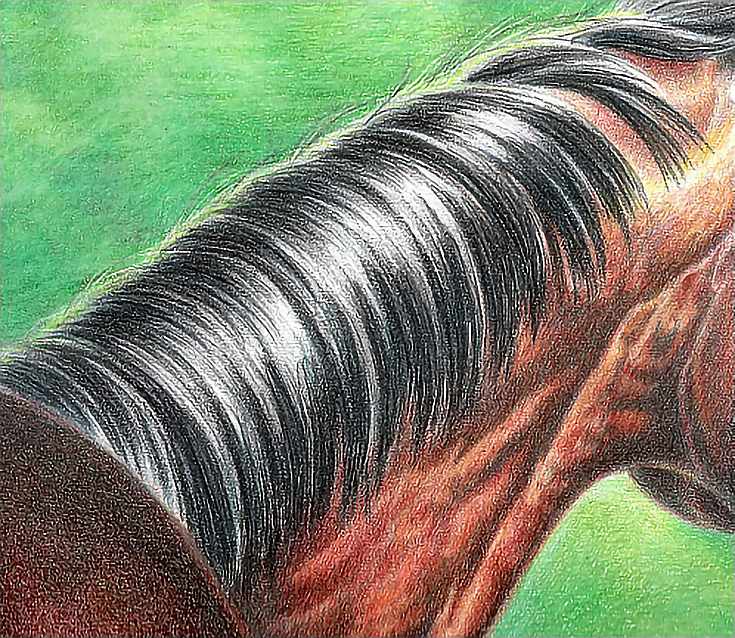
Work around the highlights, but make sure the edges are not abrupt or neat. After the middle values are well established, begin working the highlights with lighter versions of the basic color in the highlights, but also use lighter colors. For brown hair, consider Sand, Beige, White, and Jasmine. For black, use light blues, lavenders, and white.
Here’s a close-up of how I draw highlights and darker areas for shorter-length hair:
2. Drawing long straight hair
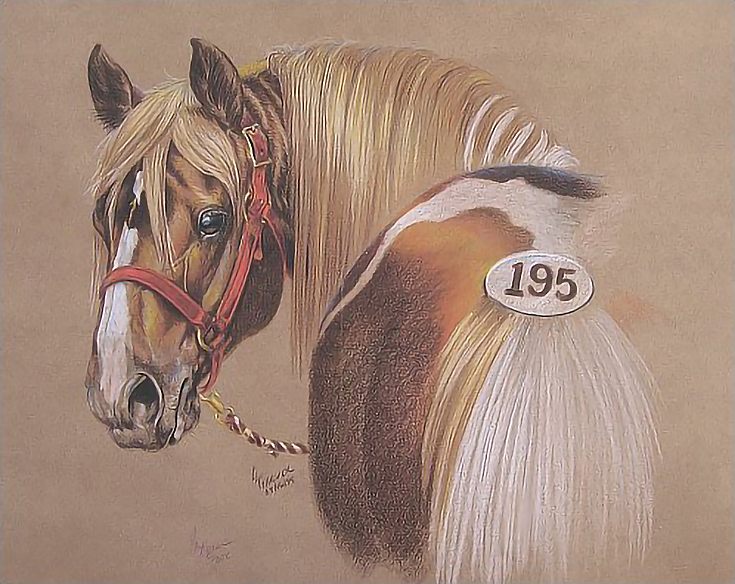
Long hair isn’t that much different than short hair. The length of strokes makes all the difference. Avoid short, overlapping strokes as much as possible. Start at the root and stroke all the way to the ends of the hair in the gaps between the main hair groups.
Be aware of the curvature of the structure from which the hair grows. In the example above, the pony’s neck is curved to the side. The hair falls like a curtain around that curve.
Likewise, long, straight hair falling from a head will fall like a curtain around the shape of the skull.
In both cases, proper placement of highlights and shadows emphasizes curves and adds realism.
Don’t forget the reflected highlights, especially if your subject is outside. A light blue mixed with strokes of white and blended with lighter hair color gives the hair depth and mass. In this portrait, I used a combination of blues and light lavenders to stroke in the reflected highlights along the top of the neck.
3. Drawing long flowing hair
The biggest difference between neat, straight hair and flowing hair is the movement. While it can look intimidating, it’s easier than you might think.
As with the other types of hair, the first step is a basic outline of the overall shape. Start with the big shapes first, and work toward the details.
When you begin your color work, start with a good middle tone color. Preserve the highlights by sketching them out, then working around them.
The sense of movement is going to come primarily from flowing lines, so use long, flowing strokes. Work in the direction of hair growth and movement, as always, but keep the strokes long.
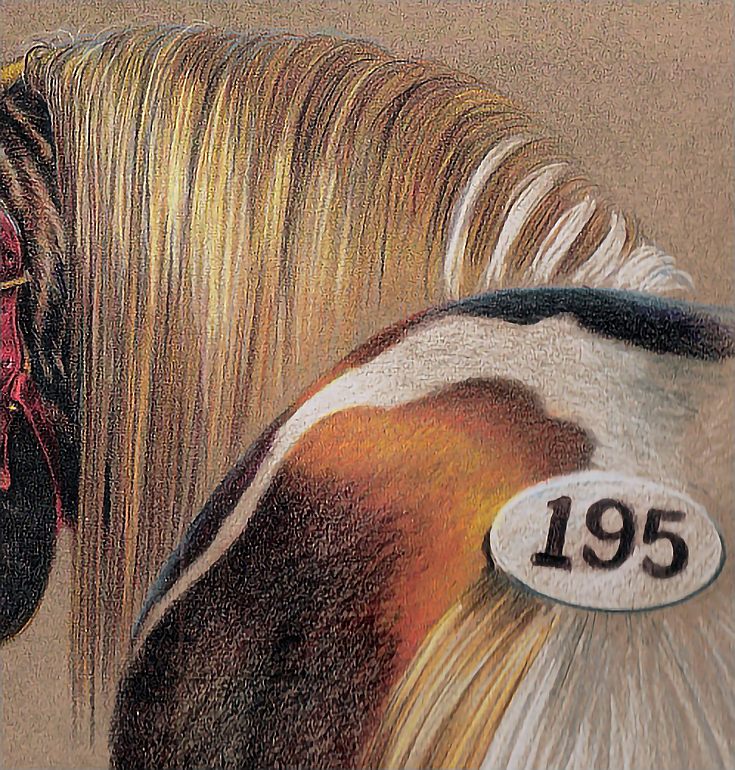
The highlights and shadows of flowing hair will look different and be placed differently than the highlights and shadows in neat hair. Be careful to draw what you see—not what you think should be there. In the illustration shown above, for example, the highlight is what defines the mass and shape of the horse’s flowing mane. Get this right and you’ve won half the battle.
Also note the different colors used around the edges of the highlights. Every hair color is made up many colors, but multiple colors are especially noticeable in black hair.
4. Drawing wild hair
At a glance, this type of hair is the most intimidating of all hair. Look at all those strands and curves!
Remember all hair is basically the same. Like short, neat hair, the basic shape of wild hair follows the contour of the shape to which it’s attached. In this case, a dog. The hair appears to be a wild mass of lines and curves, but it follows the contours of the dog’s head.
The first thing to do is take a look at the shape to which the hair is attached. Isolate and sketch in the shape of the head or body beneath the hair. This may take some time and practice to train your eye to see through the hair mass, but it’s worth the effort. You don’t need a spot-on accurate drawing of the head or body. Just accurate enough to give the mass of hair something out of which to grow and to give it weight.
Once you have a basic sketch of the head or body, fit the mass of the hair around it. Concentrate on the hair as a whole. Ignore individual strands or groups of hair. Establish the outer contour of the hair shape first! Get it accurately positioned and drawn around the shape of the head or body and you have an excellent foundation on which to “grow hair.”
If, as in this example, your subject has facial features within the hair, place them next. Eyes, nose, mouth; jewelry, collar, hat. Draw anything that provides a visual anchor.
With all the fixed points in place, start drawing hair. Begin with the larger shapes and, preferably, those in the front. Add increasingly smaller details until you have an accurate representation of the subject.
Also notice I used the impressed line technique to draw a few hairs over the nose of this dog before shading in the nose itself. I added more impressed lines, sometimes using my fine-point stylus, sometimes using a pencil, as the portrait progressed. This allowed me to put hair “in front” of other features, which is very important for wild, tousled hair.
As with all types of drawing, don’t expect perfection. In fact, forget perfection and concentrate on an overall likeness.
The more types of hair you draw and the more you experiment with color and style, with human hair and the hair of all kinds of animals, the better your eye will become at selecting the important details and emphasizing them.
This post may contain affiliate links.


