There are many ways to combine colored pencil with other media and achieve a wide range of results. Today, I’m going to demonstrate using graphite as the foundation for your drawing and glazing or layering colored pencil over to create full color artwork.
Here are a few important things to remember when using colored pencil over graphite:
1. Graphite is very easy to smear, so use caution in handling it while applying it and after it’s on the paper. It’s best to apply a coat or two of workable fixative or retouch varnish to seal the graphite before using colored pencil.
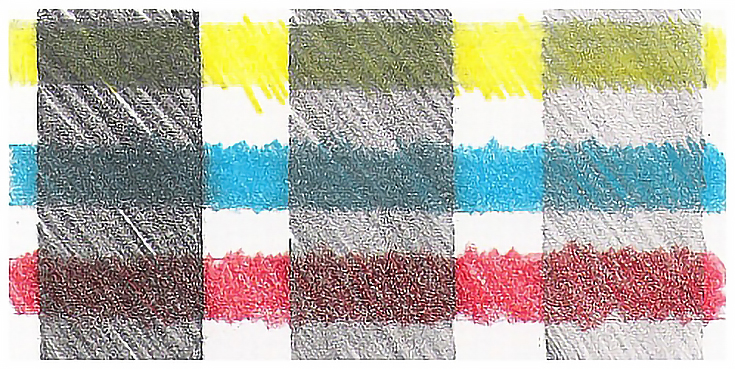
2. Colored pencil picks up graphite very easily, creating muddy, gray color. In the illustration below, I drew the horizontal lines with graphite, then applied colored pencil without first using a fixative of any kind. Note how much the graphite grayed, or “muddied” each of the colors.
3. Colored pencil is transparent, so don’t go too dark with the underpainting. As you can see below, the color glazes had very little effect on the top, dark line of graphite.
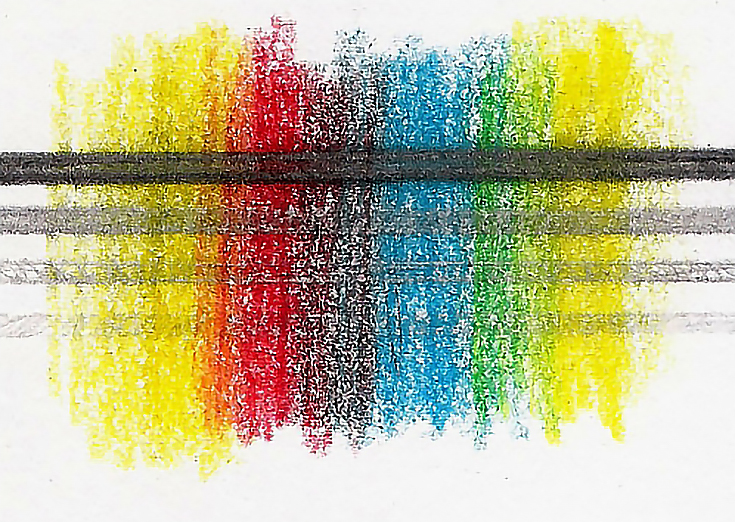
4. Try a variety of strokes at the graphite phase. Notice how the open stroke in this next image affects the look of the glazed color.
Let’s take a look at how a real drawing comes together when using graphite underneath. For this example, I’ll be drawing a simple green ball.
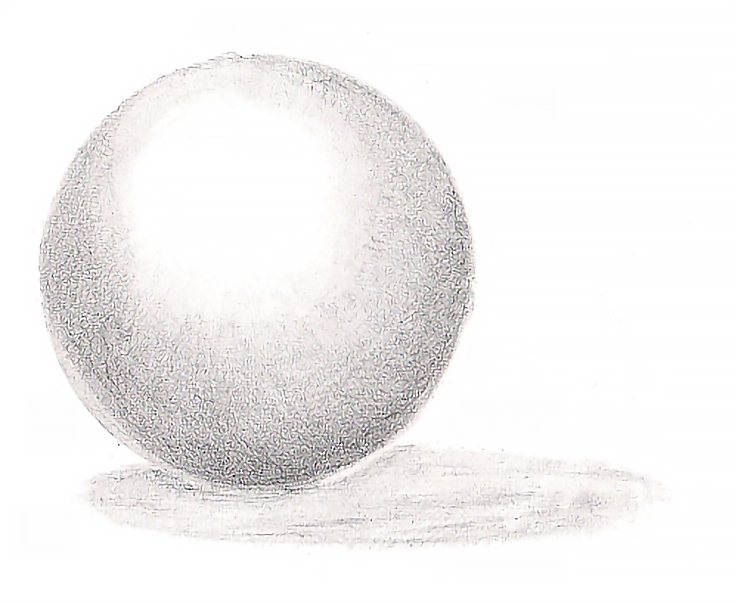
Step 1: The graphite under drawing
The first step in the process is creating the graphite underpainting (or, in this case, the under drawing or foundation).
I began with a basic line drawing. Details were developed layer by layer, working from light values to dark. I used Prismacolor Turquoise Drawing pencils in a selection of hardness ranging from 9H (very hard lead) to HB (medium hardness). The harder the lead, the more difficult to get dark values and the easier to erase. The harder leads are also less prone to smearing.
Step 2: Preparing for colored pencil glazes
Graphite is not what I consider a “permanent” media. Graphite images can last for years if properly managed, but graphite on its own is vulnerable to smearing. It will also be picked up by the first colored pencil you use on it and the result will be muddy color. Unless you want muddy color, the graphite foundation must be protected before you do any color work.
The easiest thing to do is spray the drawing with workable fixative or retouch varnish. Retouch varnish is the most secure, but workable fixative will also work. Make sure whatever you use is workable.
Before spraying your drawing, test the spray on a piece of scrap paper. You want to make sure the nozzle is clear or you will get ‘spots’ of fixative on the paper that may either damage the drawing or make it difficult to work over.
You also want to see how the spray reacts to the paper. Does it discolor the paper? Does it damage the drawing? A good spray shouldn’t but different papers react differently.
Also make sure the spray you’re using provides a good surface for colored pencil work. To do this, spray the test paper, let it dry at least 30 minutes, then try a colored pencil over it.
For work of this type, I recommend a good quality retouch varnish. Experiment and use the fixative or varnish that works best for you. I usually spray drawings at least twice no matter what spray I’m using.
Step 3: Glazing with colored pencil
The first color glazes establish the base color. Choose a color as close as possible to the base color and at the lightest value possible.
You also want to apply the first couple of layers gently, using the lightest possible pressure, so as to avoid muddying color. Even with a protective coating of workable fixative, the graphite is still workable; it can still be manipulated. The first layers of color help seal the graphite underpainting beneath the layer of wax. The first two to four layers of colors should be applied carefully and lightly.
In the illustration shown here, I layered Prismacolor Canary Yellow over all of the ball and the cast shadow, the followed up with a layer of Non Photo Blue, using light pressure and the point of well sharpened pencils for both colors.
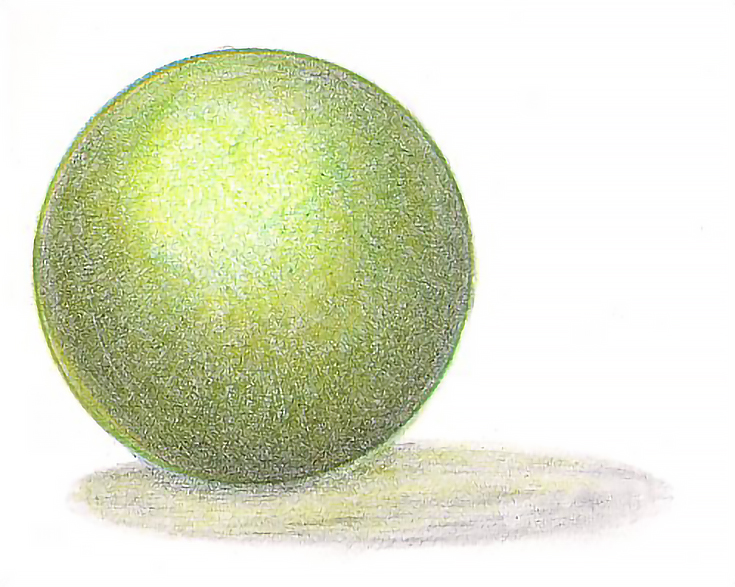
I added one or two more layers each of Canary Yellow and Non Photo Blue, alternating between the colors and increasing pressure slightly with each layer.
Next, I added a band of Indigo Blue along the middle outside curve of the ball to darken the shadow and give the ball more volume and shape. Another layer of Canary Yellow and Non Photo Blue followed to blend the shadow into the middle tones and smooth transitions in color and value.
I then burnished the ball with Canary Yellow to fill in the paper holes and make the colors more intense.
The last step was a layer of Prismacolor Apple Green applied with heavy pressure over all of the ball except the highlight. I colored out to the lower edge of the ball, then burnished the lower left curve with Canary Yellow to create an edge of reflected light. I used the same colors in the cast shadow, but also added Indigo Blue, fading the shadow toward the outside edges.
And as promised, here is the final green ball.

This was a simple demonstration, and a simple subject, so it’s a good one to begin with. If you’re looking for an easy and fun way to experiment with graphite and colored pencil, go ahead and give this a try for yourself.
Just keep in mind the tendency of colored pencil to pick up graphite “mud” (or maybe find ways to make use of it) and have fun! There’s really no limit to the subjects and styles of work possible with this combination of media.
This post may contain affiliate links.