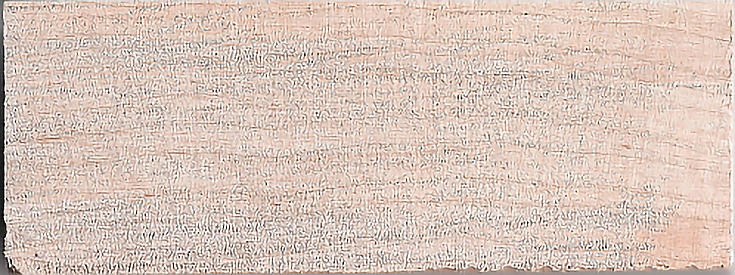
Birch wood has long been an accepted support for oil paintings and other artistic mediums, so when I came into possession of a few scraps, I decided to try it with colored pencil.
The piece I’m using is 1.5” inches tall by 4” long and is 3/8” inch thick. It stands on its own and is solid enough to have both sides colored if I wish. It is untreated and unsanded. Due to the way the wood was cut, one side is smoother than the other. I’ll be working with the smoothest side. I choose not to sand it or prep it in any other way.
Getting started
The shape of the wood suggested a panorama landscape so I began by blocking in the two main shapes: sky and land.
I used Mediterranean Blue, Light Cerulean Blue Light, Sky Blue Light, and White in the sky, applying each color in order. The texture of the wood made glazing impossible, so I used a medium to heavy pressure from the start; 6 to 8 on the pressure scale, with 10 being the heaviest.
Sky colors were applied as evenly as possible and with a variety of strokes working with and against the grain to create a cloudless sky.
The landscape was sketched with Jade Green (along the horizon), Olive Green (both Verithin and Prismacolor), Limepeel, Lemon Yellow, and Dark Green. Color application was more random in this part of the landscape. I began with the horizon, then used the Olive Greens to add shadows, Limepeel for middle tones, and Lemon Yellow for highlights.
In the landscape, I worked with the grain, using some patterns in wood grain to suggest topographical features. At the bottom, I left the wood bare because the direction and pattern of the grain fit so well with a sparsely covered landscape.
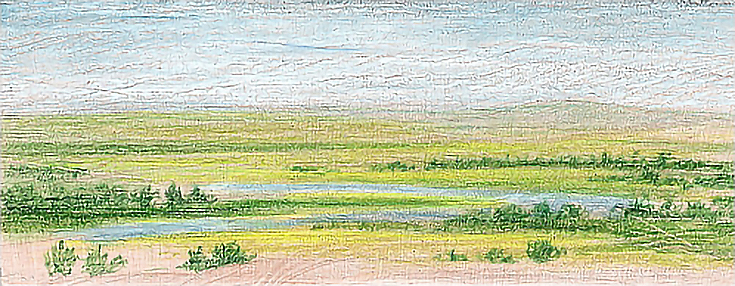
After getting the basic shapes and colors the way I wanted them, I decided to break up the landscape with a river, which I drew with heavy pressure and Mediterranean Blue and Sky Blue Light. A few strokes of Dark Green and Olive Green along the river’s edge and a few more trees lining the riverbanks and the first stage was finished.
Finishing the sky
I used the same combination of blues and white in the final phase, but applied each color with the heaviest possible pressure.
I used tight, circular strokes with Mediterranean Blue in the top 1/8” or so. I filled in as much grain as possible.
I followed up with Light Cerulean Blue in circular strokes in the top quarter inch, including the layer of Mediterranean Blue. I burnished the Mediterranean Blue and pulled some of the color into the under painting.
The last colors I used were Sky Blue Light and White. I burnished all of the sky using vertical and horizontal strokes with each color.
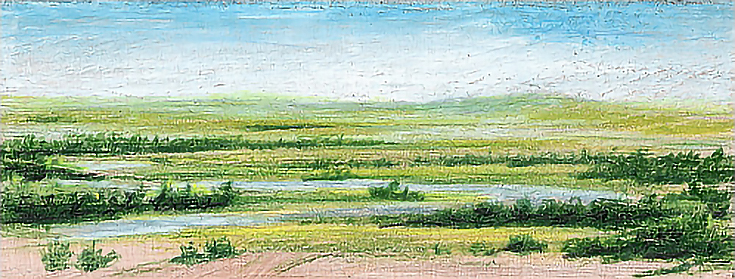
The sky was heavily layered with color too patchy, so I used rubbing alcohol and a cotton swab to break down the wax binder and blend the color more evenly.
Finishing the landscape
I used Limepeel and Olive Green as light and dark base colors. In the lighter areas, I added Lemon Yellow or Jade Green. Dark Green and accents of Black were used in the shadows, especially among the trees.
The distant background was created with a layer of Limepeel burnished with Sky Blue Light. I also accented the water with touches of Sky Blue Light. I used heavy pressure (8 or 9) throughout and burnished (10) in some areas.
Conclusion
The coarse, somewhat pliable surface of the wood was a great medium for colored pencil. Fine detail is difficult, but for a painting like this miniature landscape, lack of detail is not a hindrance.
I also found that laying down color in the same direction as the wood grain produced a lighter value look than stroking in the opposite direction, especially with a lot of color. The difference was in the wood fiber. Working with the grain smoothed it down, while working against the wood fiber roughed it up.
Whenever I try a new support, I let the resulting artwork “cure” for a while and observe how the color and medium responds to the support. Does it stay in place or flake off? Does it peel or crack? Does discoloration form?
After a few days, the painting looked unchanged, so I sprayed it with retouch varnish. In the weeks since, I’ve examined it periodically and have seen nothing that suggests the support is anything but stable. The wood itself should be stable, but it is untreated, so I’m not certain how stable the colored pencil painting itself is. In a circumstance like this, I ordinarily let a painting sit around for a few months or a year or two and see how well it fares.
Given the size of this painting and the fact that the wood stands up on its own, I’ll put it on a shelf or on my desk and see what happens over the next few months.
That being said, I am confident of working on birch wood again.
This post may contain affiliate links.