Are your canvases piled up in a jumble? Can you access your easel without moving stacks of storage boxes?
No matter what size your studio is, you’d probably like more storage space. And you might think the solution—a wall of storage units that tidily houses all of your supplies—is beyond your financial means.
Think again!
If you’re resourceful and willing to re-purpose cast-offs with a little elbow grease, your dream can come true. You can create a studio storage wall for less than $100. . . and quite often, for even less than that. I’ve done it in my own studio. You can do it too.
First, clean and make a plan for your space
Your first step should be to purge everything you don’t use or need. (Do you really need 23 ballpoint pens? Or those tubes of paint whose contents have gone gummy?) Don’t waste valuable space on things that serve no useful function. Dump or donate them.
Next, carefully evaluate your particular needs, and make a detailed list of all the items you plan to keep in your studio space. This will determine the type of storage you’ll require.
EXAMPLE: Painters of miniatures may only need a few shallow drawers for storing their canvases, whereas those who work on a much larger scale will need storage that can accommodate much larger supports.
Once you’ve made a list of all your supplies, and you’d like them to be stored, the next step is deciding where to locate your storage wall. Your options may be limited by where your windows, doors, outlets, and switches live. Measure the wall space you’ve chosen, both the width, height, and depth so you know exactly how much room you have to work with.
Now, you’re ready to start finding the pieces for your storage wall!
Cheap storage cabinets & furniture for your studio
Virtually any piece of sturdy furniture that was designed to hold books, electronics, china, etc, can be converted into studio storage. Here’s what’s commonly available, and how it can be adapted for your art studio:
 Old entertainment centers
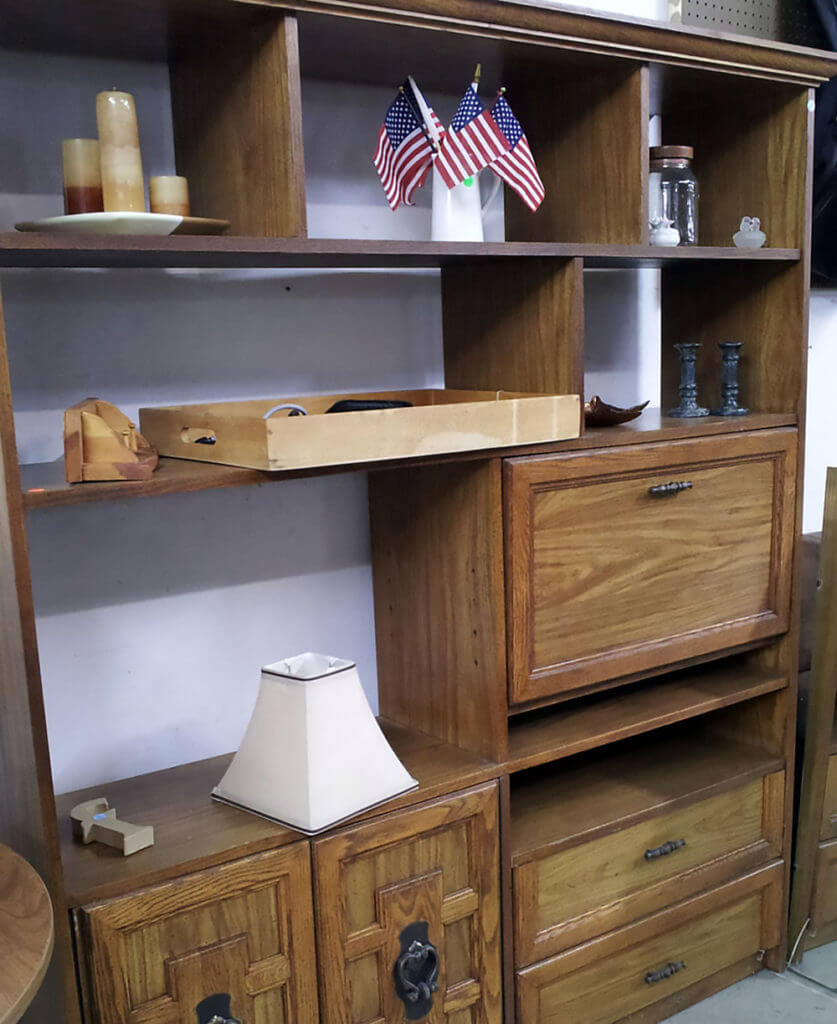 Old entertainment centers
If they’re in good condition, entertainment centers are ideal candidates for re-purposing.
With the current trend toward slim profile wall mount televisions, these clunky dinosaurs are now a dime a dozen in thrift stores and at yard sales. You’ll also find them in abundance on Craigslist in the Free category.
Entertainment centers can easily accommodate larger canvases in the area where a television would sit, and the surrounding shelves and cabinets are perfect for housing other art supplies.
Console models can fit nicely under windows while tall armoire types make good use of vertical space.
Bookcases
These storage staples can hold a great many items besides books. Use their shelves to organize smaller supports, bottles of paint, mediums, varnishes—whatever fits. Like entertainment centers, you’ll often find them for free on Craigslist, FreeCycle, Facebook Marketplace, and similar sites.
Used base cabinets
Know anyone who’s remodeling their kitchen or bathroom? Ask if they’ll save their old base cabinets for you. You’ll be doing them a favor by taking them off their hands, and they’ll be doing you a favor by saving you hundreds of dollars. (Skip the upper cabinets unless you’re planning to install them on the wall.)
Base cabinets are usually 24 to 25 inches deep, so they’re great for storing larger items like tabletop easels, pochade boxes and photography light tents.
If no one you know is remodeling their home, drive through older neighborhoods where homes are being updated. Look for dumpsters in their driveways—a sure sign of remodeling taking place—and ask the job supervisor if you can have their base cabinet tear outs. If you’re lucky they’ll give you the old counter top, too (great for large work surfaces).
Used office desks
Desk tops are usually clad in laminate, and they almost always have drawers for stashing brushes and other painting essentials right where they’re needed. You can obtain desks at very reasonable prices from stores selling used office furniture, but they’re commonly found at yard sales and thrift stores for even less.
Craigslist, Freecycle and Facebook Marketplace are good sources for desks being given away.
A DIY “desk”
This is another option that maximizes floor space. Simply lay a plain hollow core door or other flat surface over a pair of file cabinets or storage chests.
If you already have file cabinets on hand, this project will cost less than $40 to assemble if you buy the door brand new at a big box home center. To lower that cost even more, look for a used door at a Habitat for Humanity ReStore or a discount building supply selling overstocks.
Old doors are also readily available from previously mentioned online sources for free or at bargain prices. I’ve used several versions of this DIY desk for years in my own studio, and all have served me well.
Functional storage ideas for your studio walls
Wall space (above your work desk, for example) should never go to waste in a studio! Here are some options for utilizing it to the max:
Pegboard
Pegboard is by far the most useful and versatile form of wall storage, and it’s quite affordable, too.
A 4×8 foot panel can be had for less than $20 at major home centers. A set of hooks to go with it usually runs from $7 to $10. Be sure to use pegboard spacers to create a gap between the pegboard and the wall so that the hooks can fully extend into that area.
In my studio my pegboard panel is indispensable. It holds all my scissors, a level, rulers and T-square, a hair dryer, paint brushes, scrapers, masking tape, an assortment of mats that serve as viewfinders, funnels, a squeegee and my 4-inch brayers.
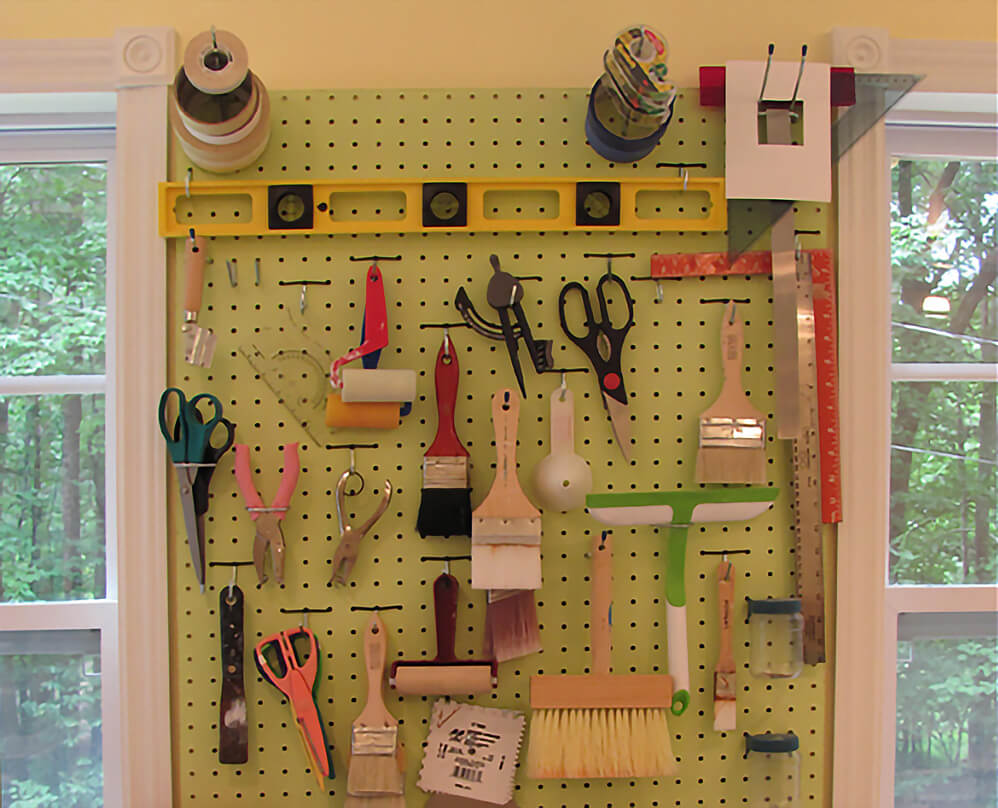
Positioned on the wall between two windows, within easy reach of my worktable, it’s one of the best investments I’ve ever made. It has saved me many steps and spared me many hours of searching for items I use daily.
Crib rails
Crib rails are easy to find and cost very little. Thrift stores and yard sales are good places to look, but sometimes just asking around among people with young children will net you crib rails at no charge.
Turn them sideways so the rails are horizontal and, as with pegboard, hang them with spacers so they’re not flat against the wall. Use S-hooks to suspend brushes and other items on the rails, or drape collage papers or magazines over the rails. If the rails are wood, you can drive small nails into them to serve as hooks.
If drilling holes in your wall isn’t possible (often the case if you rent your studio space) you do have other options:
Louvered shutters & louvered bi-fold doors
These items can store a surprising number of items very efficiently. Simply lean them against the wall, add S-hooks to the louvers, and then hang canvases, brushes and other tools on the hooks. Or use jumbo sized binder clips to display papers on them.
Look for louvered doors and shutters at Habitat ReStores and yard sales as well as salvage shops. Prices vary, but rarely will you have to pay more than $20 if they are not considered architectural antiques.
Command Hooks & Command Strips
Command products (made by 3M) are invaluable in storage-deficient studios. Now available in a wide range of sizes and styles, they’re easily applied to a smooth, clean, dry wall and can be removed just as easily, leaving no traces of adhesive.
In my studio, various Command hooks hold a broom and dustpan, my painting apron and smock, and my stencil collection. In the winter months they also hold coats and sweaters. These studio workhorses can be purchased for a few dollars at any hardware store, discount store, or home center.
Retractable clotheslines
Need a place to hang drawings or watercolors? Retractable clotheslines can turn overhead space into display and storage for your paper pieces. Travel versions are ideal for rental situations where drilling holes in walls is prohibited.
You can find retractable clotheslines on Amazon, in mail order catalogs aimed at travelers and in department and discount stores. Most are priced at $10 or less.
Desktop storage solutions for artists
Used storage cubbies & desktop shelves
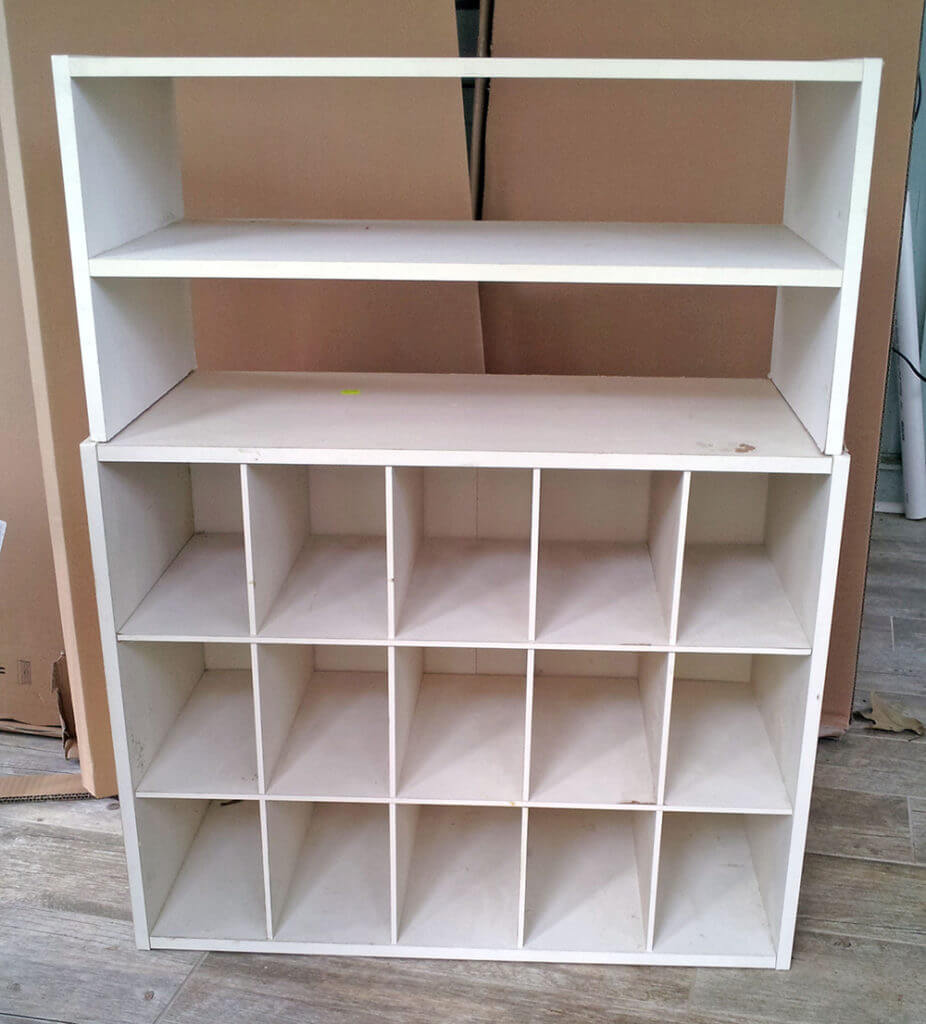
They may not be as easy to find as other items I’ve discussed, but if you spot them languishing in some dusty thrift shop, don’t pass them by if they’re in decent shape.
These beauties can expand your storage space merely by sitting on a desk or table. Bought new, cubbies can cost upwards of $50 or $60. Snatched up at a thrift store, they’ll be a bargain at a fraction of that.
Desktop shelves are equally useful.
Recently I found a cubby and a desktop shelf together in a local thrift for the ridiculously low price of $3.75. That price covered both pieces. As soon as I can clean them up I’ll be storing a ream of 11×14 paper in the desktop shelf and a variety of mixed media supplies (foam strips, wires, air dry clay and other doodads) in the cubby.
Baskets, cardboard boxes and cans
Miscellaneous containers like these do a fine job of corralling pens, pencils, markers and brushes for free or almost free. Empty coffee cans, soup cans and the like can be prettied up by wrapping decorative paper around them.
Placed on their sides and taped together, a stack of cans makes an ideal home for Sharpie markers which should be stored horizontally, not vertically, according to the manufacturer.
Cardboard boxes can be camouflaged with decorative paper and put to use as storage bins. Not only will you spare yourself an outlay of money, you’ll be helping to conserve resources by recycling and re-purposing discards than would normally end up in a landfill.
And don’t forget baskets, found in abundance at thrift stores and yard sales. I’ve bought them for as little as five cents. Stop by a yard sale at the end of the day and you might get them for free.
Final tips for your art studio storage wall
Take your graph paper sketch and a measuring tape along when you go hunting for studio fixtures. Furniture always appears smaller than it actually is when displayed on a sales floor. Measure it carefully. You’ll want to ensure your prize will fit its intended place on your storage wall.
NOTE: You’ll also need to make sure it will fit through any doorways and around any stair landings it will encounter on the way.
Be willing to investigate what’s under the junk when shopping at thrift stores. Diamonds in the rough can be buried under it and go unnoticed. Many thrift stores have discount days and other budget friendly promotions so be sure to ask about them.
If you find an item that perfectly fits the vision you have for your storage wall, buy it. It probably won’t be there if you leave and come back for it the next day.
So how much does a DIY storage wall cost?
Less than $100 if you look for bargains. I only paid $10 for a used door to create a desktop work space, $20 for pegboard, and $8 for pegboard hooks. Command Strips and other miscellaneous storage were $5 or less each.
Even if you add $5 per crib rail, $10 per louvered shutter, or $9 for a clothesline you’re still easily under $100!
Who says your dream studio can’t come true?
Special thanks to Lynn Edwards for sharing this post! To learn more about Lynn or her art, please visit her website at www.lynnedwardsart.com.
This post may contain affiliate links.