Chalk pastels all by themselves are a unique medium, famous for their bright colors and soft effects. Using water to blend your pastels lets you enjoy a truly “painterly” experience with minimal dust and plenty of room for artistic changes as you work.
This approach combines the powerful strokes of pastels with the flowing softness of watercolor. . . if that sounds appealing, then the following technique is for you!
You’ll need some soft chalk pastels, watercolor paper (the stronger the better), masking tape, board, small jar of water and a few paintbrushes—points and rounds suitable for watercolor painting tend to work best.
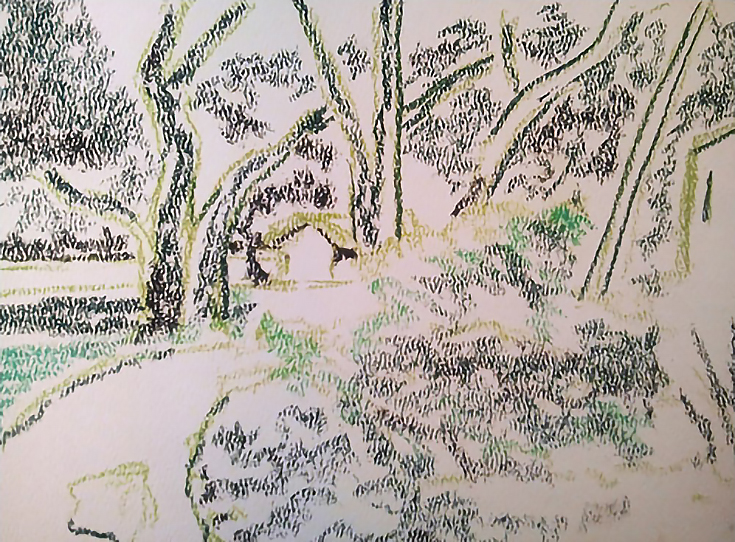
Step 1: Sketch your composition
Tape a piece of durable watercolor paper to your board (the higher quality the paper, the more flexibility you’ll have with this technique).
Take a medium value dry pastel and sketch in your composition. To keep your picture consistent, it’s a good idea to choose a color that will set the tone for your painting.
After you’ve sketched in your composition, lightly block in where your darks will go. Leave the white paper as lights for now.
Step 2: Create a monochromatic underpainting
Sticking to the colors in the same family as your initial sketch color, fill in a broader range of lights and darks.
Deepen shadows, bring dimension to big forms, and leave your lightest lights untouched for now. The goal for this stage is to identify the lights and create a nice dark ground for areas where you will later build up color.
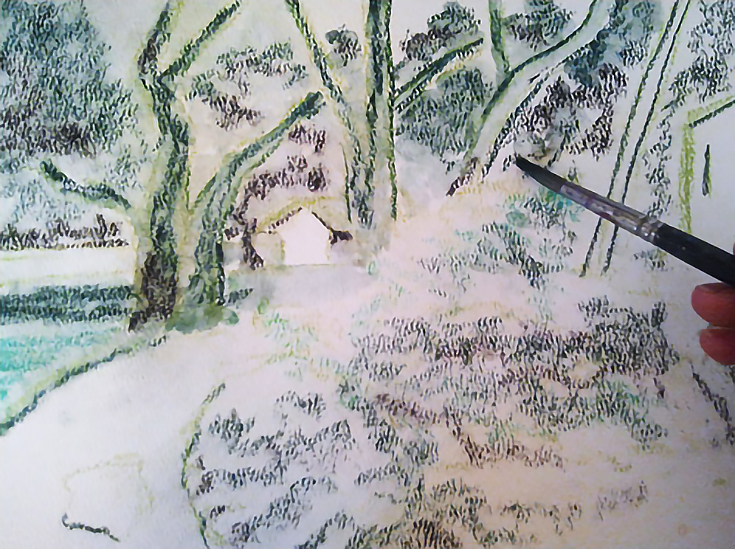
Once you’re satisfied with the lights and darks, dip your paintbrush in water and begin to blend the chalk, softening lines and darkening your shadows. Lightly draw a bit of water over your lightest areas, giving them just a tinge of color. Use a larger watercolor brush for large areas.
Tip: If you’ve used heavy layers of chalk, the water may “ball up” on contact. Simply pop the ball of water and push it around, or go light on your chalk layers until you find a balance of water and pastel that works for you.
At this stage, set your painting aside and allow it to dry completely.
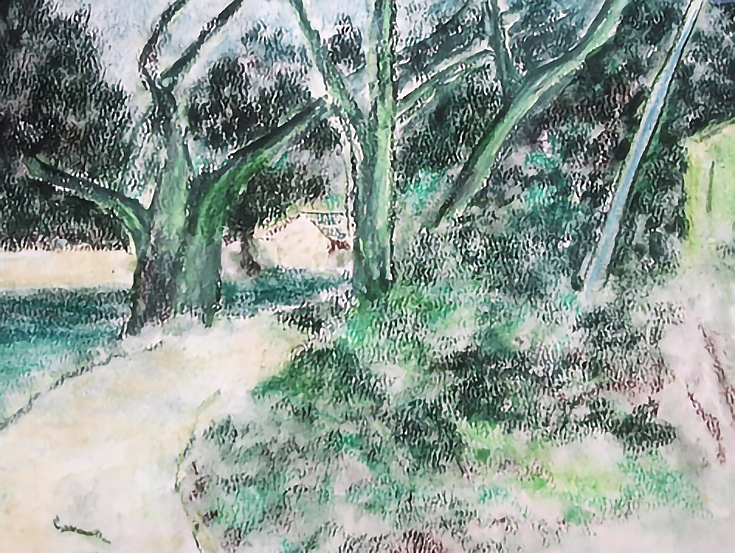
Step 3: Deepen darks and brighten lights
After your sketch has dried, it’s time to build on it, using warm or cool colors (depending on your color scheme) to deepen your shadows and identify your lights.
Stick to deep or neutral colors in this stage, saving bright colors for the very end, otherwise colors may turn muddy when blended.
Take a wet brush (preferably a point) and work through the picture to sharpen or soften edges. Go over your darkest areas with the water for emphasis. Keep your brush just wet enough to get the pastel to blend—try not to let water drip onto your painting.
If you do get excess water on the painting, you can lift it off with a paper towel. Once you’re finished, set your painting aside again and give it plenty of time to dry.
Tip: Water acts as a natural adhesive in this process, so fixative isn’t necessary after finishing this stage. However, if you like the effect of fixative (or just feel more comfortable using it), a light spray on your dry painting before adding the final layer works fine.
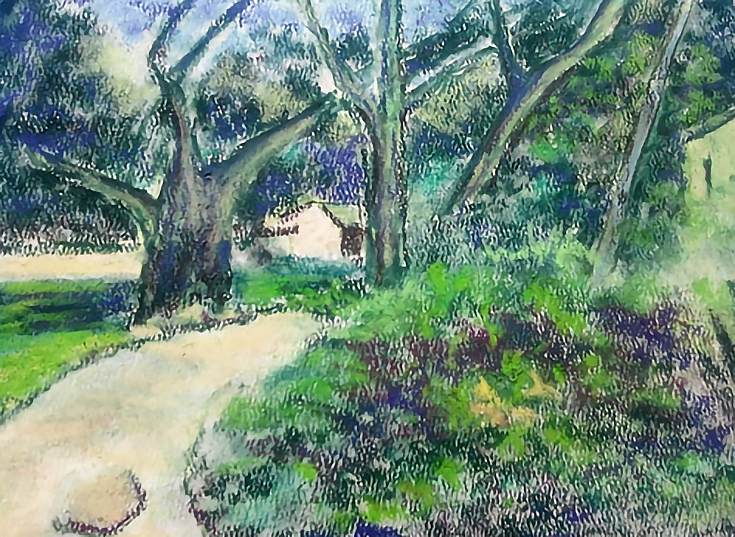
Step 4: Add final details with dry pastels
Once your painting has completely dried, you’ll be left with a somewhat dark, almost monochromatic pastel picture. For the last layer, get out the bright colors and lights!
Work the dry chalk over your water-blended picture to add details, color, and bright lights. Feel free to keep those dark pastel sticks out, as you may need to add a little back in once you get all of that light and color on there.

At this stage, you can still take out the brush if you need to correct or blend an area, as long as you keep it to a minimum. However, now is the time to use dry blending techniques or allow the texture of dry pastel strokes to emerge, if that fits your style. When you’re done, don’t forget to sign your painting!
To display, make sure all areas of the painting have dried completely and then frame under glass as you would a regular pastel.
This post may contain affiliate links.