I live in a part of the world where it is warm and sunny most of the year, so when I get the time I truck my paint gear outdoors and set up for some plein air painting. My gear needs to be portable, easy to tote, and above all, cheap (meaning that I’m not into the more expensive plein air pochade boxes you can find at most art supply stores).
Over the years, I’ve also streamlined my plein air painting gear several times, each time trying to take only the items which are absolutely necessary.
As with all plein air set-ups, portability is always of first concern. I’ve taken the set-up I’ll describe below in my checked luggage on long air flights without much concern. I also paint in acrylics, so I only need water to dilute paint and wash my brushes. Acrylics are fast drying so I have no problem transporting my finished paintings.
All together my stuff fits into two bags—an old back pack and a re-purposed bag from a portable folding chair. Oh, and I stand to paint, so I don’t need to tote a chair.
My set-up is detailed in the following photo:
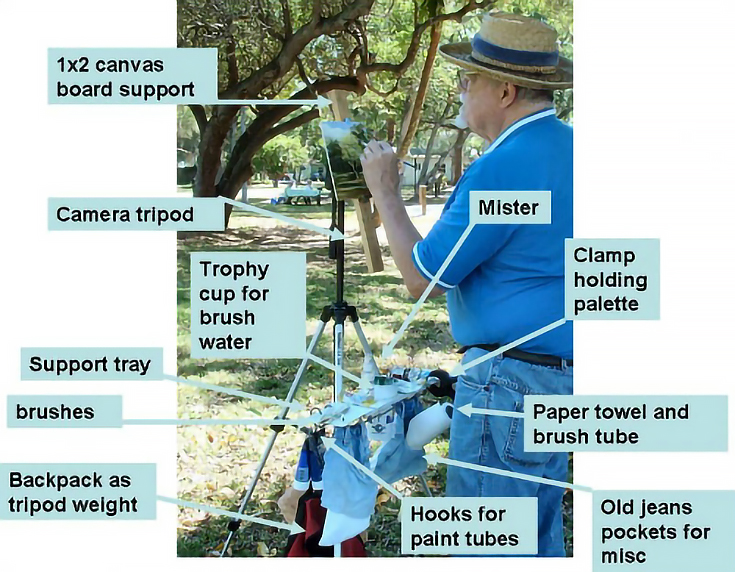
There are three main parts: the camera tripod, the support tray that fits across two legs of the tripod, and the vertical bar that fastens to the tripod platform
Camera tripod
The camera tripod is standard (any basic tripod will work) and needs only a little explanation. My unit happens to have slots in the leg extension bars. I put an S-hook, described below, in one of the slots to hold my back pack, which acts as a weight for the tripod. You’ll know why this is important the first time you paint in a stiff wind.
Support tray
The support tray is my current simplification after many attempts, yet it still has many parts. To start with, two L-shaped pieces of wood extend from its underside to capture the legs of the tripod. The hole in the middle of the support tray contains a large disposable drink cup, my water holder.
Along the bottom of the support tray hang pockets cut from an old pair of jeans. The pockets hold my paints and a tube of paper towels. (The tube itself is closed at each end with rubber crutch ends and holds my brushes during transport.)
Around one end of the support tray is a rubber band, which holds my brushes securely in place while painting. At the other end, I fasten a plastic lid, which I use as my painting palette.
Many (but not all) tubes of acrylic paint come with hanger holes at their far ends. I hang those on several S-hooks inserted through holes drilled in the support tray. Any tubes without hanger holes go into one of the pockets.
Vertical bar
Lastly, the vertical bar is a 20-inch strip of 1-inch x 2-inch wood with holes drilled every inch. I use only canvas board. I mount the canvas board between two machine screws, each with a washer and a wing nut as shown in the photo.
Although I have painted 16 x 20 canvases on this set-up, I prefer 8 x 10 canvases. They offer less wind resistance and I can paint more of them in the same time.
Now. . . what goes where when heading out on location, you ask?
The tripod, support tray, vertical bar, and drink cup go into the folding chair bag. The paints, paper towel/brush holder, canvases, palette, S-hooks, and the all-important water bottle go into the back pack.
Oh, I never forget my straw hat, sun screen, coffee, and a nutrition bar or two.
Set-up time? Three to five minutes. Take-down time? Three minutes, faster in the rain.
For more from Jim Thorne, please visit his website at oldhobbyist.blogspot.com.
This post may contain affiliate links.