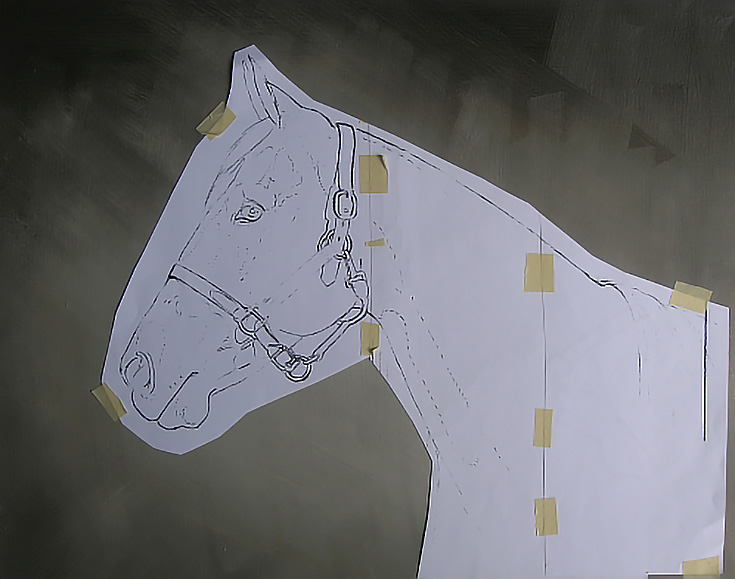
An oil transfer is a method of transferring a line drawing to a canvas (or any other painting surface) using oil paint rather than graphite or charcoal.
Why use an oil transfer?
If you typically start with a drawing, and then use graphite to transfer that drawing to your canvas, you can’t really just start painting. Instead, you’ll need to make the transferred drawing permanent by going over each line with India ink or oil paint.
By using an oil transfer, you save a step—the transferred drawing is already in oil, which means you don’t need to go over the drawing a second time. With a highly detailed or very large drawing, this can be a significant time saver.
I don’t normally use this method myself, although I’ve known about the process for some time. And the reason why I chose this painting for an oil transfer was simple: it’s a painting that I had to start over.
Since my canvas already had a layer of dried paint on it, I knew an oil transfer would probably work a little better than a regular graphite transfer—and it was a good opportunity to try something new!
So, after the new drawing was ready, I made a full-size copy of my drawing, cut it down to focus on my subject (a horse) then mounted it to the panel. After a couple of days of review and one minor adjustment as to placement, it was ready to transfer.
Here’s how to do an oil transfer of your own:
1. Prepare the painting surface
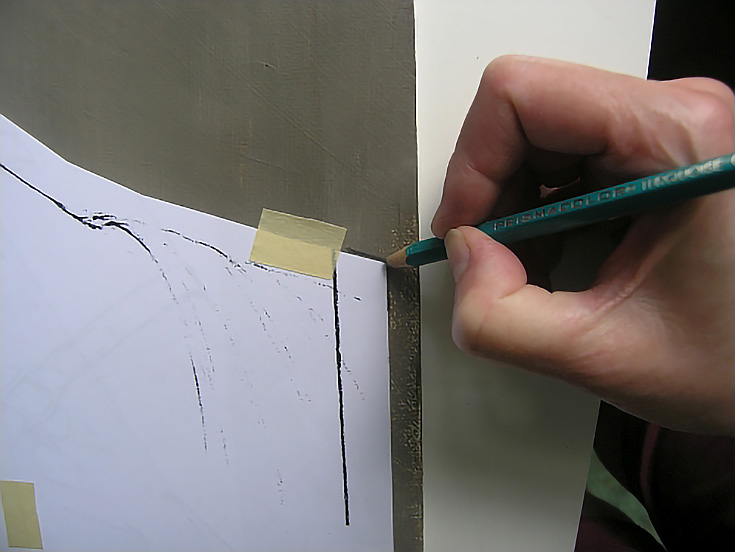
I marked the corners of the drawing while it was taped on my canvas so I could put it back in the same place when I started the oil transfer.
I used a 6B pencil to mark two opposing corners before removing the drawing. In the illustration below, I’ve marked the top edge and the right edge of the upper right corner.
Once the drawing was removed, I lightly sanded anywhere on my panel where the lines of the horse would fall. This helped me get the cleanest possible transfer drawing. (Of course, if you’re working with a new, unpainted panel or canvas, you can skip this.)
2. Spread paint on the back of your drawing
The supplies for an oil transfer are quite simple: all you need is a stiff-bristled brush and some paint. You can even use an inexpensive paint for oil transfers if you wish. If you use this method a lot (or frequently produce large paintings) it may be wise to keep a tube of student grade oil paint on hand just for this purpose.
Also, I recommend choosing an earth tone. The artist from whom I learned this method suggested using raw umber. Since that’s my favorite underpainting color, that’s what I used, too. In addition to being a good, opaque color, it also dries quickly – usually within 24 hours.
Just like a graphite transfer, your oil transfer will start by putting a layer of paint onto the back of your drawing paper.
You don’t need to use a thick layer of paint, however. Instead, just scrub a fairly thin layer of paint into the paper. You also don’t need to cover every inch of the paper to the edges. It’s sufficient just to cover the lines of the drawing.
To avoid using any more paint than necessary—paint is expensive after all—I held the drawing up to a window several times and make sure I’d covered all the lines.
It’s important to scrub the paint into the paper well or you risk getting globs of paint or smudges on the transfer drawing. It doesn’t seem to make sense to spread the paint so thin, but it is the best way, as you’ll see in a moment.
3. Place the drawing and start tracing
When I’d painted as much of the back of the drawing as necessary, I mounted it to the panel again, being careful to line it up with the register marks from earlier.
I taped two of my corners very securely, and taped the other two with very small pieces of tape. This allowed me to lift a corner to make sure the drawing was being properly transferred without risk of moving or completely dislodging the drawing.
After your drawing is taped in place, trace over the lines of the drawing with normal pressure. You can use a ball point pen or a pencil.
NOTE: I used a red colored pencil so I could see which lines I’d traced, but any color that helps you see where you’ve already traced will do.
After redrawing the lower part of the horse’s face, I carefully lifted that part of the drawing to see how the transfer looked and to make sure I’d traced over everything. As you can see, the oil transfer lines were crisp and clean. There were no marks where I didn’t want them.
In the end, the only messiness was where I hadn’t rubbed the paint thin enough.
Checklist for doing an oil transfer:
• Use inexpensive paint for the transfer
• Use an earth tone for quick drying
• Scrub paint into the back of the paper
• Cover no more of the paper than necessary to transfer every line and detail
• Use a sharp pen or pencil for the transfer
• Use a bridge to avoid resting your hand on the drawing as you transfer because this will leave a smudge on the painting surface
• Let the transferred drawing dry before starting to paint
Enjoy!
This post may contain affiliate links.


