Every savvy artist knows there’s more than one way to draw a line. The normal way is easy—just put your pencil on the paper and draw!
Another way, however, is to create an impression in the paper using a pointed object, and then shade color over the top of that impressed line. The line will gradually come into focus as color is applied all around it.
Using the impressed line technique
If you make an impression on blank paper, those impressed lines will retain the color of the paper through all but the heaviest applications of color. The appearance of the lines can be changed by burnishing or by heavy applications of color over parts of the line, but unless you deliberately fill it in, it will remain visible.
The light strokes in this sample were impressed into the paper before color was applied. The resulting marks are the same color as the paper, which was light gray.
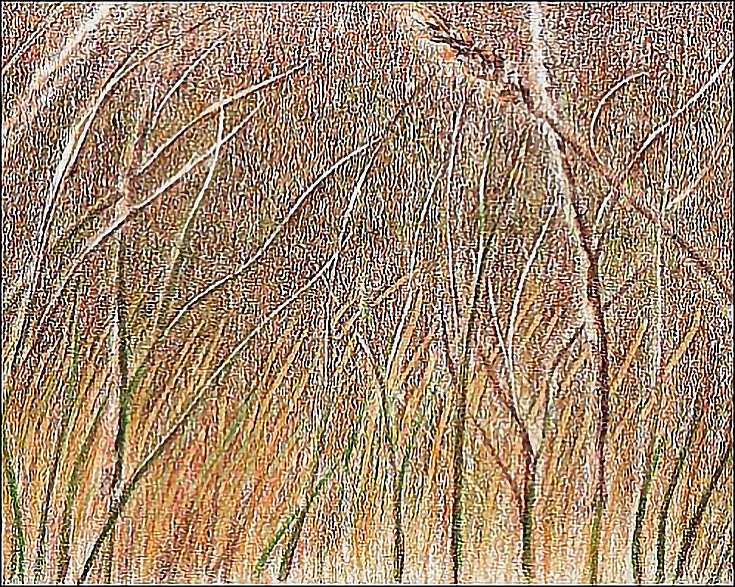
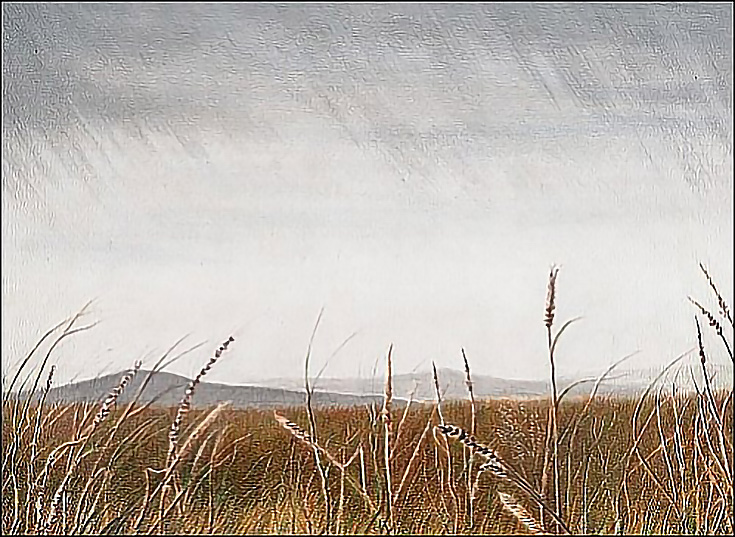
Below is the complete drawing. The impressed lines don’t make a lot of impact when viewed as part of the entire drawing, but they do add just a few touches that mimic wet grass reflecting the colors of a gray sky.
Best of all, I didn’t need to do anything with them after impressing the lines!
Creating impressed lines in color
If you add impressed lines after a few glazes of color, the resulting marks will retain the colors that were on the paper when you impressed them. So if you want to add details that are blue in color, add blue to the area, then impress the required lines, then continue adding color. The lines will show up as blue through all subsequent work unless you fill them in.
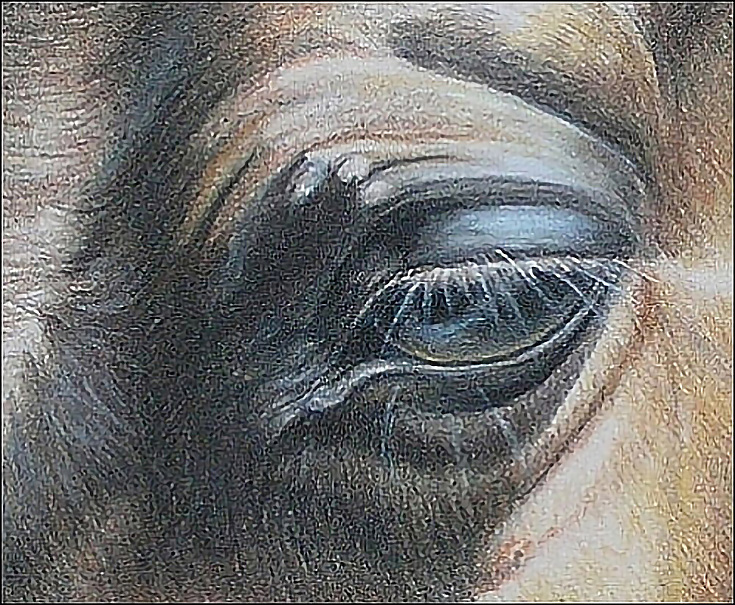
In the following illustration, the brightest eyelashes were impressed before I began adding color to the eye. The darker eyelashes were added after the first layers of color had been applied. I used impressed lines to add eyelashes two or three times through the drawing process. Consequently, the eyelashes appear to be “layered” so that some of them catch a lot of light, and some catch just a little.
Making an impression at the end
Believe it or not, you can also use impressed lines toward the end of the drawing process. The lines will not show up as well, since they will reflect all the colors you’ve already applied, but they will show up a little. (The more layers you apply after impressing the lines, the better.)
In the illustration above, I used Verithin White to add eyelashes after everything else was finished. In illustration below, lines were impressed throughout the drawing. The brightest of them were impressed early in the drawing. Others were impressed after a few layers of color had been added, and I added still more after most of the hair had already been drawn.
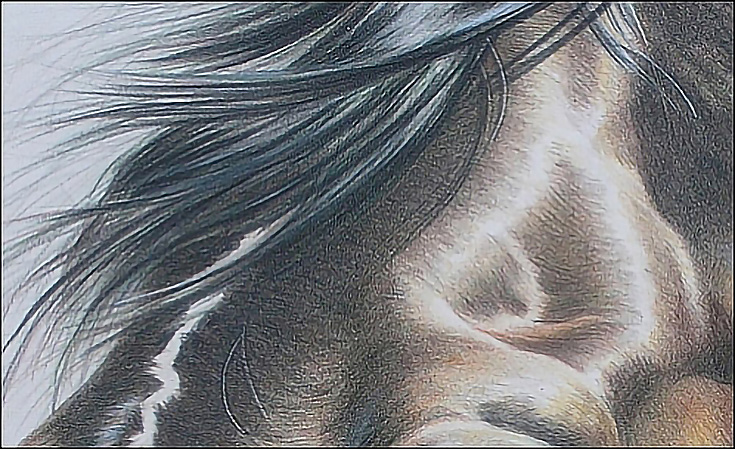
When impressing lines late in a drawing, it’s helpful to use a hard lead colored pencil such as Verithin pencils. Because hard lead colored pencils contain less wax than the softer pencils, they are capable of “cutting through” the layers of wax. Marks you make with a hard lead pencil and medium heavy to heavy pressure will not only leave an impression in the paper; they will also leave a little color.
You might be wondering what the advantage is to impressing lines so late in a drawing. No, the impressed lines will not be as bright or obvious as lines impressed at the beginning or even in the middle, but they’ll still add subtle details and give your drawing a more realistic, three-dimensional appearance.
Here’s the completed drawing.
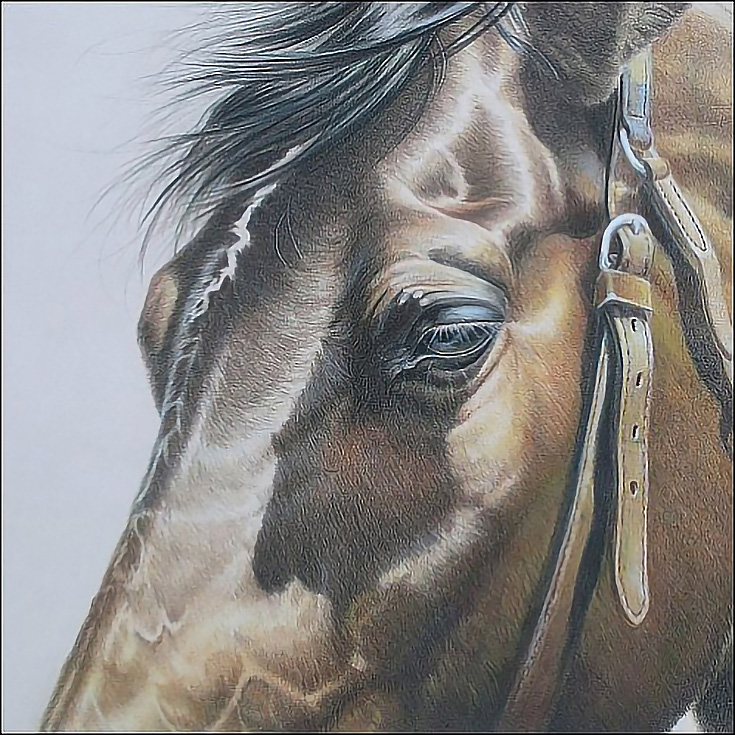
The impressed lines added around the eye and in the forelock give the horse a more life-like look than it would have had without the impressed lines. Using impressed lines to add these details also resulted in drawing time that was much shorter than if I would have drawn each eyelash and hair individually.
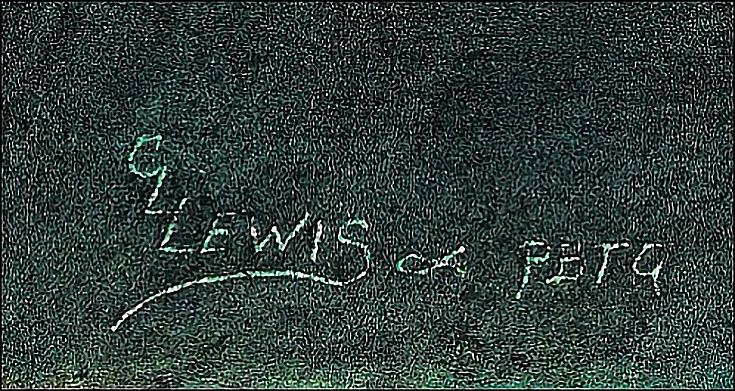
Signing your name with impressed lines
One way to sign your colored pencil drawings is to impress your signature into the paper before you start working. I like to use a stylus for this, but a needle-sharp, hard lead colored pencil works just as well and adds a little color, too.
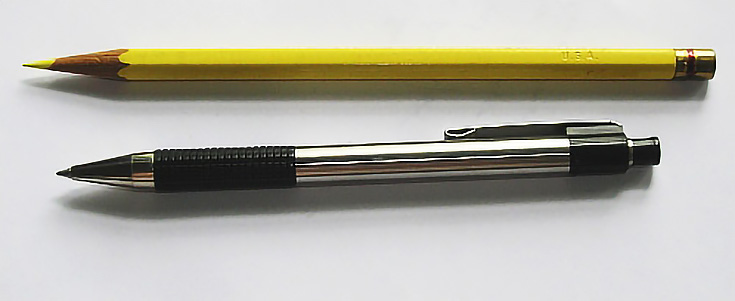
Useful tools for this technique
You can, of course, buy a special tool for making impressed lines. Styluses of all sizes are available at most online art supply websites and in some specialty stores. If you’re as ardent about impressed lines as you are about drawn lines, you can collect styluses just like you collect colored pencils.
A sharpened hard lead pencil such as Verithin also makes a great impression, however. (They’re nice for adding color to the impressed line, too.)
An impressed mark created with yellow pencil such as the one in the illustration below will show yellow through all but the heaviest applications of color. You can use this method before applying any other color or after a few light applications of color – it’s not effective over heavy applications of color, though.
And of course, if you choose a pencil that matches the color of your paper, it will essentially leave no color in the impressed line.
Other household items such a paper clips (use the rounded ends), bobby pins, and the handles of spoons or forks are great tools for creating a variety of impressed lines and marks. I’ve even used a thumb nail or fingernail upon occasion.
But my favorite tool for making impressed lines? A dead ball point pen. The pen in the illustration above is a Zebra fine point (.05mm) and it’s great for flyaway hairs and detailing grassy areas. It’s possible to vary the thickness and character of an impressed line by increasing or reducing the amount of pressure I use and it’s also great for impressing my signature into a drawing.
A collection of pens of varying points provides suitable tools for almost any type of line you want to impress. I do have one warning though—make sure they’re all out of ink!
Good luck, and happy drawing!
This post may contain affiliate links.