The ocean is a natural subject for artists. Whether you’re looking to paint a peaceful ocean view or a stormy day at sea, soft (chalk) pastels are a great medium for depicting ocean waves and seascapes.
Every artist has his or her own unique take on the ocean, so techniques and styles vary. After many years of painting ocean scenes with my pastels, I’ve stumbled on some helpful reminders that help me get the results I want. Today’s article is simply a quick tutorial with a few of the basic tips I’ve learned for using pastel to paint ocean water.
If you’d like to follow along, you’ll need paper or your choice of surface, painter’s tape, board, your preferred type of soft pastel, and fixative if you use it.
Step 1. Create a sketch of your basic composition
Choose your surface carefully—if you’re painting a lot of ocean water, you may want to choose a toned paper that enhances the colors you’ll be using for the water. Neutrals or gray-blue or gray-green tend to work well. I’m using a dark gray-toned piece of textured paper for this exercise, as it was a particularly cloudy day when I took my reference photo.
After taping your paper to your board, map out a quick sketch that includes your horizon line and any big waves or objects in your seascapes. Just like landscapes, seascapes are particularly powerful if you use the 2/3 rule of composition (2/3 water and 1/3 sky, or 2/3 sky and 1/3 water).
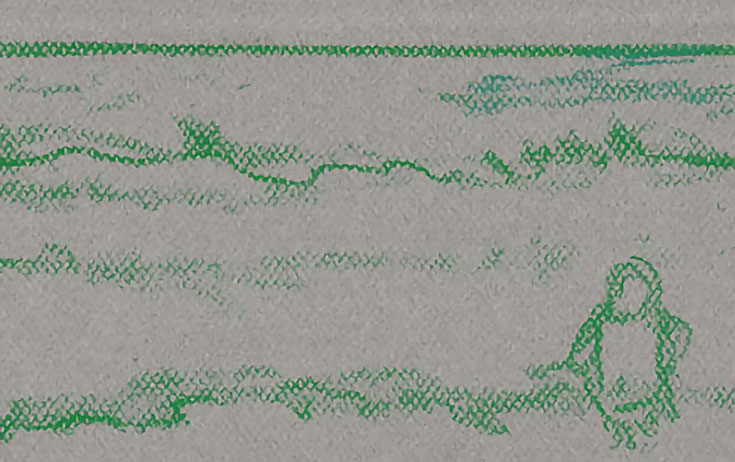
Since we’re focusing on the water for this tutorial, I brought the horizon line even higher and left just a bit of sky for contrast.
Technique tip: As ocean water recedes toward the horizon, it gets deeper. Your value for distant water should be darker to reflect the increased depth.
Step 2. Begin your underpainting
Using a color you’d like as an undertone for the water, sketch in the darks and leave the tone of the paper to show lights. Keep your strokes horizontal as you work—the eye reads water as horizontal.
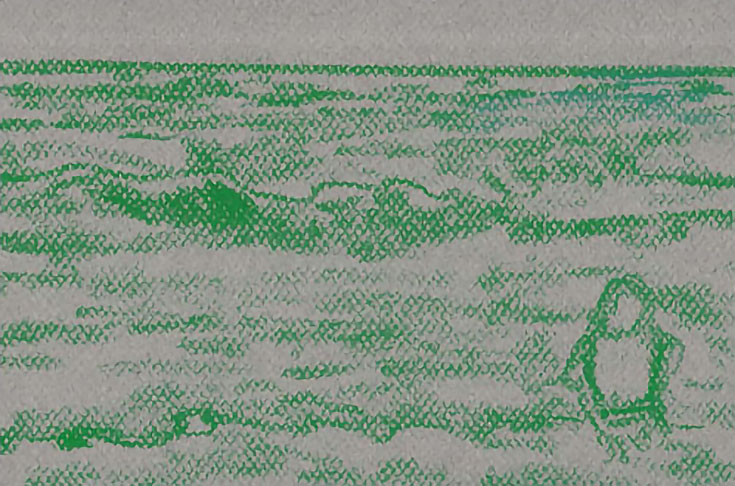
Color tip: If you want to paint convincing ocean water, use green in your underpainting. Even if you’re looking at a very blue ocean, work a little green in first (I learned this from a local artist who painted a lot of San Diego scenery).
You can mix your own cool greens (it’s best to avoid warm greens) by applying alternating strokes of blue and yellow before smearing to blend.
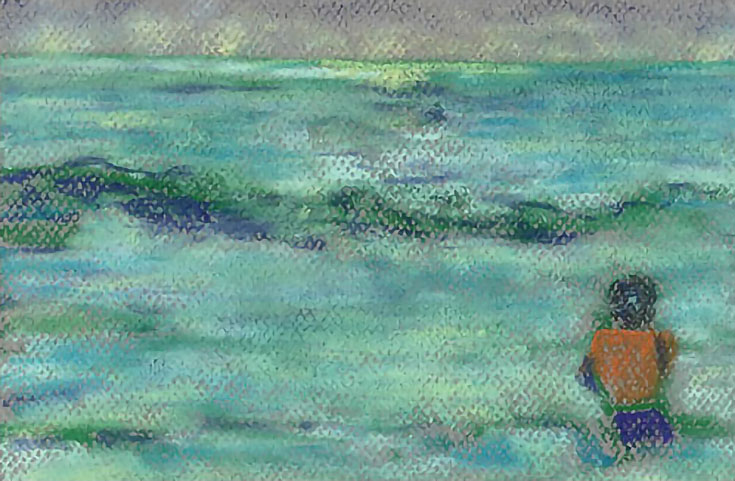
Step 3. Blend in lighter colors
Layer in more colors, expanding darks and including a few lights over the darks—keep the lights color-based, as you’ll want to save the white pastel for the very end. Add a few light touches to the sky (a hint of mist or clouds is great) so that it complements that water. Smear your pastel to soften and blend.

Once you’ve got your painting blended, go outside and give it a light spray of fixative if you’d like. The fixative’s tendency to darken the pastel is useful in this exercise, as you’ll want to maintain dark strokes in the water to contrast with the lights.
Safety tip: Remember to tap or gently shake the pastel dust from your painting into the trash instead of blowing it off the paper—airborne pastel dust is dangerous to your lungs. Follow all directions and heed precautions when using fixative
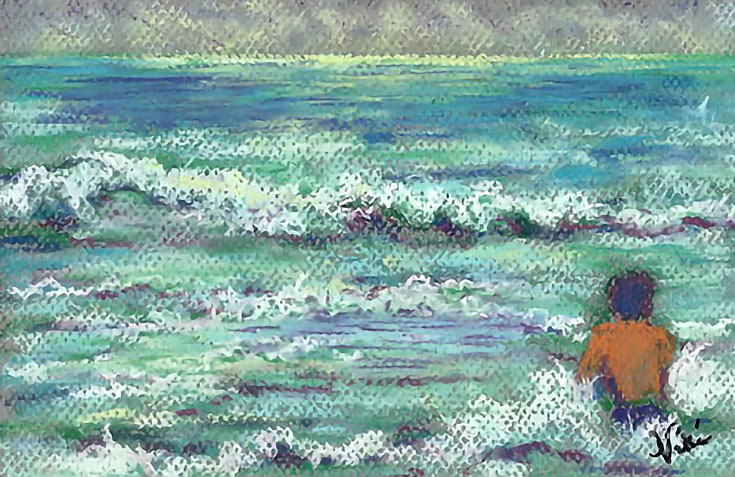
Step 4. Refine the movement of the waves
Once the fixative has dried, begin adding some of those stronger lights (now is a good time to use a softer brands of pastel sticks, if you have the option).
Depending on your light source, you can add some of the play of sunlight on the water. In this exercise, the light is over the horizon, so it’s strongest there and I’ve added a few hints of it over the waves.
Now is also a good time to work on any big waves, making their underside darker and using some “curly” pastel strokes to show the movement of the water. Varying the horizontal strokes (some short, some longer) and adding hints of a contrasting color to the water help build depth and show movement.
The farther in the background the water is, the closer together you can make your pastel strokes—leave some space between your horizontal strokes in the foreground (I don’t have an explanation for why this works, but it’s something I’ve observed after years of painting the ocean).
Keep in mind that waves are constantly in motion, so don’t make them straight across the page (even if they look that way to you). Vary their edges, making some parts come forward and some recede, so that you get the “push-pull” feeling—as though they are rushing toward or away from the sand.
If there are objects in the waves (such as people or rocks), use the pastel strokes to show the waves breaking around those objects. Smear a few of the softer areas to blend them and then take the painting outside for another light spray of fixative.
Step 5. Add your final highlights and ocean foam
Time to break out the soft white pastel! Once the last layer of fixative has dried, work in some white pastel strokes (follow the form of the wave crests and spray) to give that final feel of rushing water. Stick with color-based lights for the calmer parts of the water to contrast with the white highlights of the waves.
This is the time where I usually end up obsessing over individual pastel strokes—make sure to stand back and double check that your strokes are as horizontal as possible; that you’ve varied your strokes to show light, dark, and the movement of the water; and that your horizon line is straight.
Remember that because you’re depicting a fluid subject that’s constantly in motion, it’s better to have lots of small, horizontal pastel strokes as opposed to blocks of color (even in the calmer areas of the water).
Once you’ve added any last details of line or color, you’re done! As always, don’t forget to sign your painting and frame your pastel under glass when it’s ready to hang.
This post may contain affiliate links.