Today I’m going to take you through the process I use to make my own canvases.
As I mentioned in an earlier article on improving compositions, choosing the correct size and crop of your artwork is extremely important.
If you’re a painter, the only way to really do that is to stretch your own canvas to the shape and size you want.
Required tools and materials
I use materials and tools that anyone can find at their local hardware store and make large canvases for a tiny fraction of the price that it would cost me to buy them ready-made.
Materials needed
Each canvas I create has an inner frame made of:
- 1×2 wood
- quarter-round trim
- staples
- headless nails or wire brads
Tools needed
- miter box and hand saw, miter saw, or another power saw
- staple gun
- pencil for marking
- tape measure
- small hammer
Step 1: Choose the size and cut the frame pieces
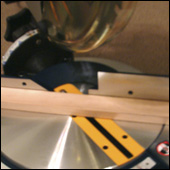
Once I’ve decided on the size that I want my artwork to be, I cut four pieces of 1x2s (one for each side of the canvas), with a forty-five-degree angle at each end.
You can use a miter box and hand saw or power tools. Either way works just fine. The most important thing is to make good, equal, 45-degree cuts at each end so that the wood fits together properly at the corners.
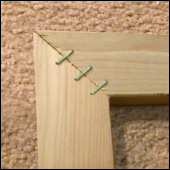
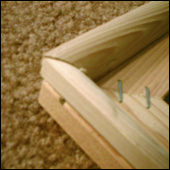
Step 2: Staple the corners together
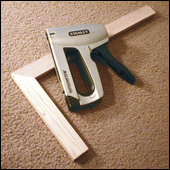 One cut of the saw actually creates an entire corner, as you can see in the picture to the left.
I use a simple hand-powered staple gun to secure the corners together and usually place 3 staples on both the front and back of the joint.
With 6 staples fastening each corner, the entire frame becomes very strong and rigid.
Once all four corners are stapled, the frame might look complete, but it’s really not.
Step 3: Cut trim pieces for a raised edge
You see, when stretching canvas, it’s important to keep it raised off of the frame.
For this reason, I use quarter-round trim pieces as well, so the frame’s outside border will have a lip or edge.
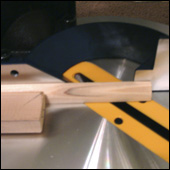
You can cut the trim pieces with whatever tool you used on the other pieces of wood.
However, you may want to use a miter box instead of a power tool for them.
The trim pieces are so thin that if you use a power saw, brace the trim piece with another piece of wood so they don’t move all around and your fingers don’t have to be anywhere close to the blade when cutting.
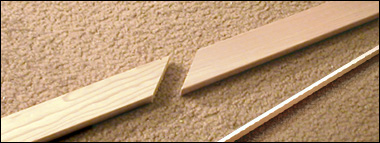
 Unlike the 1x2s, a single cut with the saw does not make a perfect corner out of two trim pieces. It will always be necessary to take one piece back and cut off another small amount to get the right angle.
I like to lay a long piece down and mark just once where my next cut is, and then repeat that process again for the next side of the frame, and again, until you have all the trim pieces you need.
Cutting all your pieces at once doesn’t usually work out so well since the angles to cut on the quarter-rounds are trickier than on the 1x2s.
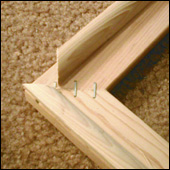
To create a raised lip or edge, you’ll need to place one flat side of the quarter-round against the stretcher bars, and the other flat side facing outward. The curved edge of the quarter-rounds should be facing inward toward the center of the frame.
 In the picture to the left, you can see what a corner should look like when all the pieces have been correctly cut and aligned.
Step 4: Fasten the trim pieces with headless nails
At this point, all that’s needed is to fasten the quarter-rounds permanently in place. The best way to do that is to nail them to the frame with headless nails. The ones I use come in a package labeled “wire brads” but finishing nails would work as well.
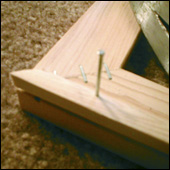 Make sure to buy nails that are no longer than the width of your quarter-round and 1×2 combined, and space them along the trim pieces about every 4 inches, or until it’s solidly in place.
Step 5: Stretch and staple the canvas to the frame
When the entire frame is finished, it’s time to start stretching the canvas. You’ll need a rectangular piece of canvas larger than the size of your stretcher bars, plus the staple gun you used on the corners before.
Stretching the canvas correctly
From the diagram below, you can see the proper method of attaching the canvas, but I won’t go in-depth on that here. Instead, take a look at my canvas stretching tutorial.
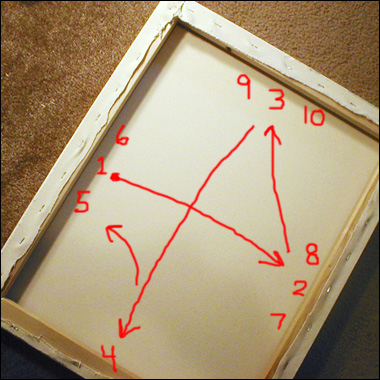
It can be quite a workout if you really want a tightly stretched canvas, but it’s worth it in the end. A good canvas should almost sound like a drum when you rap your fingers against the front of it after it’s all done.
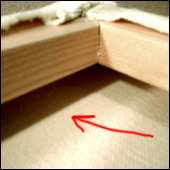 The quarter-round pieces will raise the canvas off of the stretcher bars.
If you’ve ever used cheap canvases, you may have felt the edge of the wood stretcher bars through the canvas from the front, or even painted near the edge and had different types of brush strokes occur from hitting the wood behind it.
Here, the entire front face of the canvas has the same feeling, from the center to the edge.
Wrapping Up
Although there are other solutions for creating canvases, this is the one I’ve chosen because it’s easy to do and it’s cheaper to buy all the parts separately.
So now if you ever get the urge to paint a canvas in a size or shape that the store doesn’t have, just pick up some wood, a saw, and some canvas, and make your own.
You might never want to pay for a pre-made canvas again.
(PS, when you’re ready to get your paintings online in front of potential buyers, check out Simple Artist Websites, EmptyEasel’s website service for artists that does all the work for you, and lets YOU get back in the studio.)
This post may contain affiliate links.