In my previous article, I talked about the camera’s shutter, how it works, and what impact even a few fractions of a second’s difference can have on an image.
I’ll talk about your camera’s ISO settings in another article, but today I want to explore the other main control that works alongside your shutter to create a properly exposed image—the lens aperture.
And just like the shutter, the aperture can also be used as a creative tool.
Understanding the aperture
For lenses used with 35mm format cameras, like DSLRs and SLRs, the aperture sits inside the lens. The aperture is made up of several thin metal blades placed in a spiral pattern around an opening (the opening is where the light enters). The metal blades are adjustable, which allows the diameter of the aperture/opening to be adjusted smaller or larger.
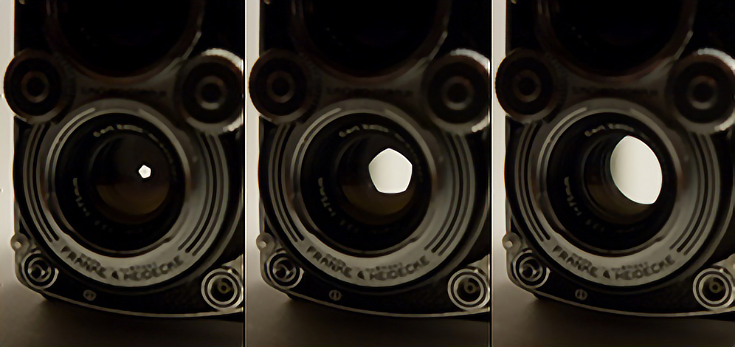
Unlike the shutter, the aperture is always at least partially open so light always enters to some extent. Take a look at the three different aperture settings clearly visible within the lens of this old Rolleiflex camera, here:
Every camera lens is manufactured with a label on the front, showing the widest possible aperture that lens can achieve, along with the focal length.
For example, many manufactures sell a “50mm f/1.8 lens.” This tells us that the focal length is 50mm, and the largest possible aperture is f/1.8.
While it may seem counterintuitive at first, greater f-numbers refer to smaller apertures. As its smallest aperture our example lens may have a setting like like f/16 or f/32.
The aperture’s job is to restrict the amount of light passing through the lens, although unlike the shutter the aperture is always open. A scene with more light will require a smaller aperture (f/8 or f/16) and a scene with less light will require a larger aperture (f/3.6 or f/2.8).
One easy example is the difference between inside and outside shooting.
Let’s say you decide to use the same shutter speed to take a picture indoors and outside. In bright daylight, outside, you’ll need to shoot at a smaller aperture, like f/16, but inside the building where its not nearly as bright, you’ll need to use a larger aperture, like f/4, to correctly expose the image.
Changing the size of the aperture also has an effect on an image’s focus. With a DSLR or other 35mm-format cameras, mid- to large-sized apertures will create an image that is partially out of focus in certain situations. This effect can be exploited to create striking photographs.
Using the aperture creatively
When thinking about the aperture, ask yourself “how small or large?”
1. Use a small aperture to increase focus
If you’re taking a photo of a landscape, and you want both nearby and distant subjects to be in sharp focus, you will need to use a smaller aperture.
You can see how this works if you start out with a large aperture, and take a photo of a landscape, and then move down one f-stop and take another, and so on. With each additional photograph, you will have more and more of the scene in focus.
Once you get down to a very small aperture (like f/16, f/22 or f/32) you can keep the subject, foreground and background all in focus in one photograph.
2. Use a large aperture to limit focus
If you want to intentionally push the foreground or background out of focus you can use a large aperture. The farther something is from the subject you’ve focused on, the more it will fall out of focus.
Case in point, by opening the lens up all the way to f/1.8, I was able to better isolate this palm frond from the forest behind it:
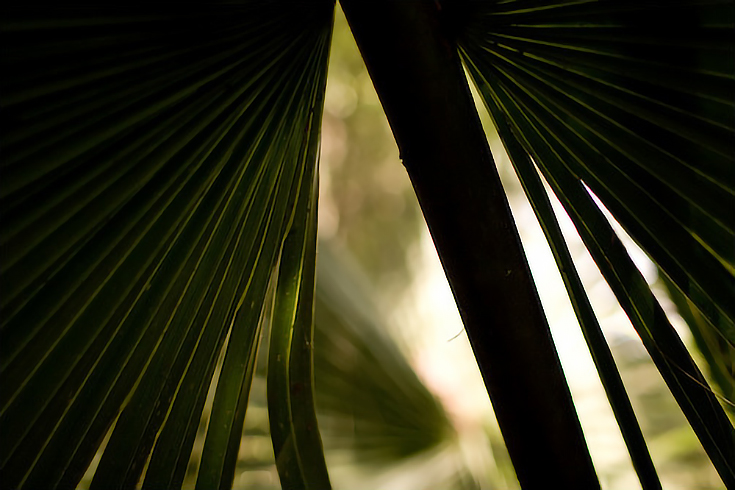
This same technique can be seen at its most extreme with a telephoto lens shot wide-open, at f/2.0 or f/2.8; or on a miniaturized scale with macro photography. But, even normal focal length lenses are capable of creating this effect.
TERMINOLOGY NOTE: “Depth-of-field” (often shortened to “DOF”) is the term used to describe the amount of an image that is in focus. An image with the foreground, middle ground and background in sharp focus has “deep depth-of-field” and an image with only a small part of the image in focus has “shallow depth-of-field”.
3. Experiment with what you know
In addition to “auto” and “manual” mode, most cameras will let you choose “shutter priority mode” or “aperture priority mode.” Choosing one of these modes will allow you to concentrate on either just the shutter or just the aperture while the camera itself makes sure the image is properly exposed by adjusting the other control as needed.
In full manual mode, YOU will set both the aperture and shutter speed. Manufacturers label these modes differently, so check your camera’s instruction manual if you’re not sure how to change modes.
The shutter and aperture work together to expose the image correctly. If you want a slower shutter speed (which means that you’re leaving the shutter open for longer periods of time, and allowing more light to enter) then you’ll need to compensate by using a smaller aperture to make sure you don’t overexpose the image.
Likewise, if you want to use a larger aperture, the image will be overexposed if you don’t use a faster shutter speed.
For example, if you’re outside and you’re going to take a photo of someone standing under some trees, your camera may automatically set the aperture to f/5.6 and the shutter to 1/125.
If you’d like to use a larger aperture, say, f/4, you’ll need to use a slightly faster shutter speed. You can do this by manually changing the shutter to 1/250, or if you’re using aperture priority mode, the camera will make the calculation and change the shutter speed itself.
When you pick up your camera and look through the viewfinder, think about the options you have to better control the look of your pictures.
Could your image be improved by creating shallow depth of field? What would it look like to use a slower shutter speed?
Always experiment with slightly different settings and decide which works best for the image—just remember the overexposure and underexposure happen when you change either the shutter or the aperture, and forget to adjust the other one, also.
This post may contain affiliate links.