Every artist needs to keep visual records of their work—and whether you plan on selling your art right away or keeping it for years, you should always have up-to-date images ready to share.
In this tutorial I’ll explain exactly how to take great photos of your artwork, and cover a few VERY basic steps in Photoshop that will get your images ready for print or uploading onto the internet.
All right, lets get started. . .
After the paint is completely dry, take your painting or drawing outside on a sunny day. Natural outdoor light is your best option for lighting. If you have a room with lots of windows or tons of bright lighting, you can give that a try too, but usually outside is best.
Find a wall, or any place really, where you can prop up your artwork so that it stands almost perfectly upright.
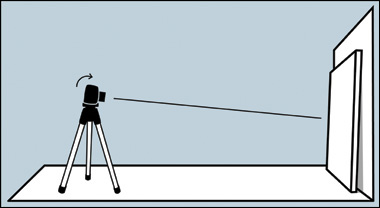
I’d suggest using a tripod with your digital camera or phone to make sure that you’re taking perfectly steady shots.
No tripod? Don’t sweat it, a box or small table works just as well. Just make sure to steady your phone or camera on SOMETHING to keep it from shaking.
When you take the photo, remember to tilt the camera slightly down (if necessary) to match the angle that the artwork is leaning—this will help minimize distortion of the original image.
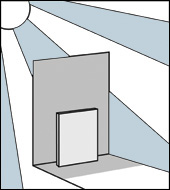 If it’s extremely bright, find somewhere that gives little shade, otherwise put the painting in direct sunlight.
Later on I’ve included a photograph which was taken on a really bright summer day in Idaho. I had to tone the sun’s intensity down just a bit so I placed my painting in a shadow.
Normally this won’t be the case, however.
Many people have trouble with their artwork looking slightly bubble-y, with each side bulging outwards. That’s an issue with the camera lens, but it’s easily fixable.
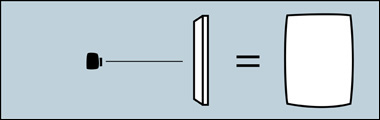
The solution is to use the “zoom” on your camera, and then back a step or two away from your art. This will create a more natural amount of depth to the photo and keep those edges from ballooning unnaturally in your photo.
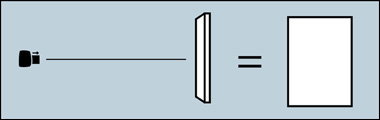
Be sure to fill the viewfinder of the camera as much as possible and then check to see that all the edges of your work are parallel with the edges of the viewfinder. You’ll want to especially avoid these types of photographs:
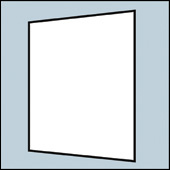
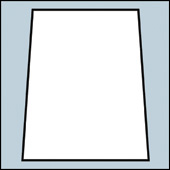
Both of those distortions come from the camera not being dead center to the artwork.
Take several pictures because it won’t always be as easy to tell on the viewfinder whether or not there’s any distortion. Once your images are up on your computer, you’ll be able to see for sure which photo is best.
When you’ve uploaded the photos to your computer, bring them up in Photoshop or whichever photo-editing software you use. Although the next few steps will be based in Photoshop, you’ll be able to find something similar in any photo-editing program.
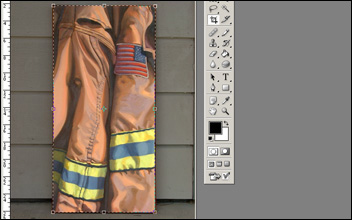
Here’s a picture of one of the pieces in my series of firefighting paintings from the local fire station. As you can see it’s photographed and in Photoshop to crop and correct.

The first step here is to correct the contrast. Although it’s a fairly good photo already, it’s a little dull compared to the real painting.
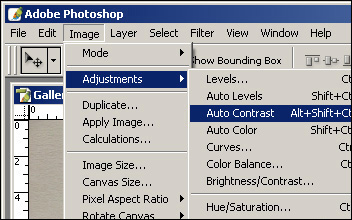
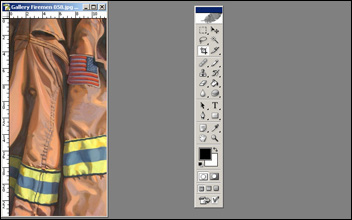
In Photoshop, select “Image,” then “Adjustments,” then click on “Auto Contrast.”

That did the trick. Since it was such a sunny day the colors turned out great without needing any extra work.
Now it’s time to crop the artwork.
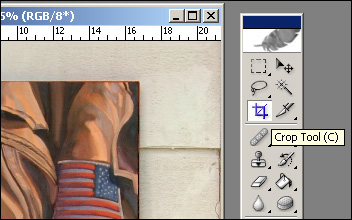
Select the “crop” tool from your tool bar and position it at one corner of the painting.
Click and drag the tool to create a box of dotted lines. Unclick at the opposite corner from where you started.
If you lined up the edges in the viewfinder while you took the photo, then you shouldn’t have any problems at this point.
You can see that everything outside the crop has been dimmed. You’ll want to zoom in to make sure that you’re cropping EVERYTHING out but the painting.
However, I usually crop just a TINY bit into the painting, which takes care of any slight distortions in the photo.
And there’s the finished digital image. Save yours as a TIFF or PSD so that you don’t lose any file quality later on. Save it again as a JPG if you’re planning on uploading it to the internet.
This post may contain affiliate links.