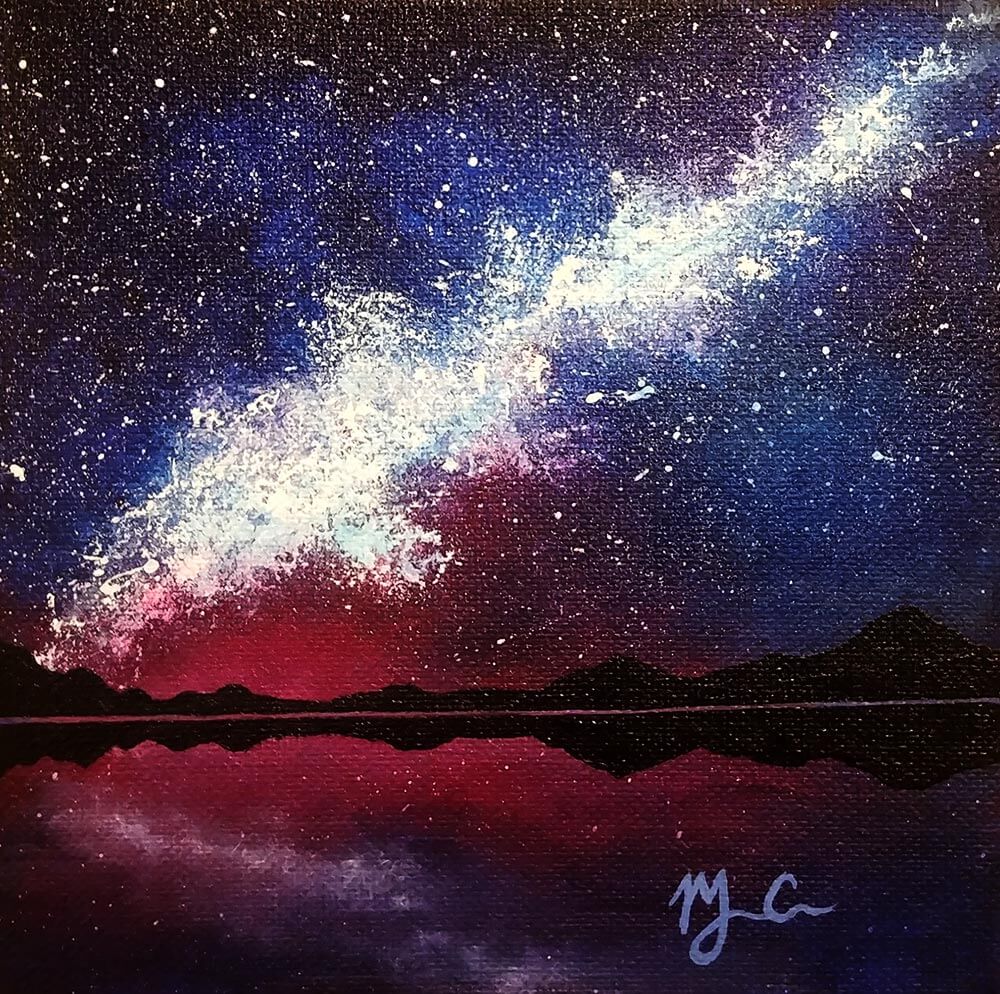
Have you ever wanted to paint a night sky, with all its stars and galaxies?
Today’s tutorial will show you how!
This tutorial tends to be a bit messy, so it is a good idea to prep the space you are working in with a drop cloth. We will be using sponges, so you can also opt to use gloves if you don’t want to get paint on your hands.
Before you start, you will need to gather all the materials necessary for the painting.
Tools & materials
- Something to paint on: canvas, canvas board, wood panel. . . pretty much anything will do!
- Medium paintbrush
- Old toothbrush
- At least 5 small crafting sponges
- Large bowl with warm water
- Old dishtowel or rag
- Gloves (optional)
Paint colors
I use Liquitex Heavy Body Acrylic paint, however, any version of the following colors will work:
- Titanium White
- Mars Black
- Quinacridone Magenta
- Phthalocyanine Blue
- Dioxazine Purple
Step 1: Prep your canvas
Mix blue and white to create an opaque light blue. Completely cover your canvas and allow it to dry.
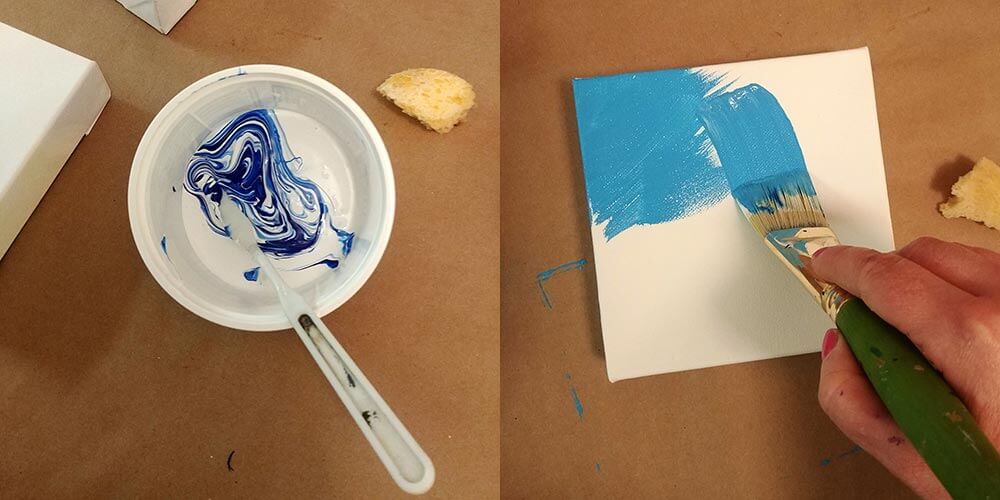
NOTE: I will often opt to mix my blue with white gesso for this step because I like the smoother texture it creates.
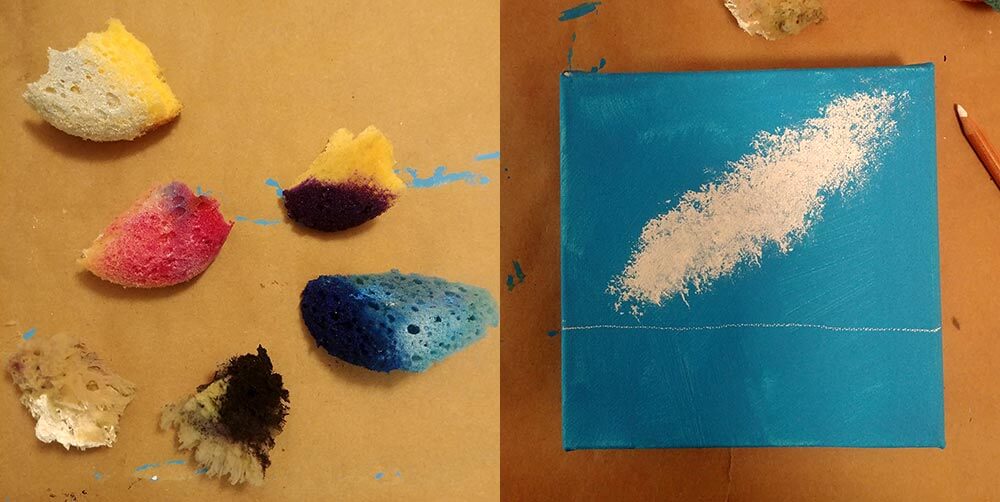
Step 2: Prep your sponges and palette
While your canvas is drying, wet the sponges within the bowl of warm water. Be sure to squeeze them out well. Squeeze any extra water out with your cloth.
I tend to use 1 sponge per color. Once your sponge gets too muddy, use the bowl of warm water to completely rinse it out. I will do this many times throughout the process and will change the water several times too.
I like to use a large enough palette so that I have plenty of room to mix colors, while still having room to keep the main colors reasonably clean.
Step 3: Decide your composition
This step is not written in stone! But it is good to have a rough idea of where you would like the main elements of your painting to go.
This particular painting has a galaxy, mountains, and a lake. It is helpful to determine where the lake’s horizon line is so that colors can be created in the reflection during the first stage of the painting, and getting the galaxy roughed in will help create structure once you start laying the layers of space color.
- Using any kind of pencil, draw a line where you want the horizon
- Use a damp sponge and pick up some white
- Tap the sponge several times on your palette to remove any excess paint, and to work the paint into the sponge
- Gently dab the sponge on the canvas to create a galaxy zone
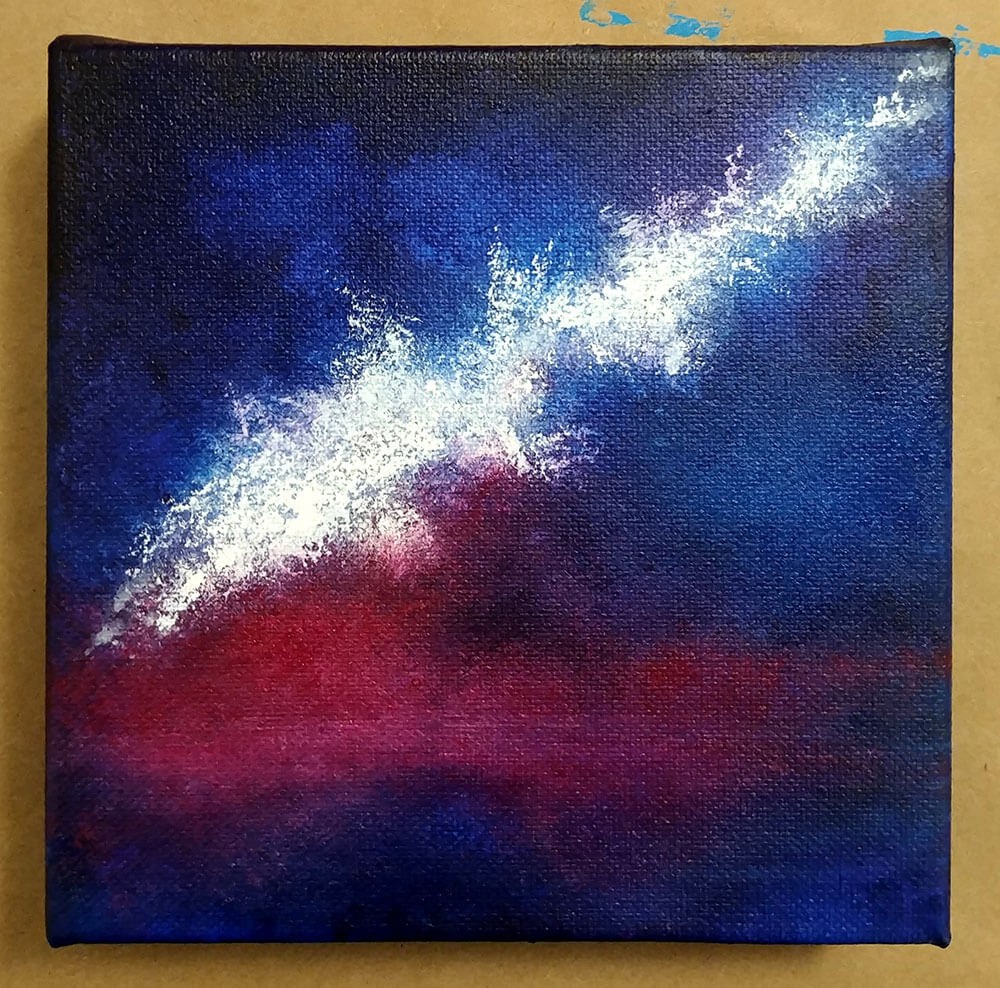
Step 4: Add the first layer of color
Starting at the top of the painting gently dab purple around your galaxy to darken the night sky. Then do a layer of black, then blue. Each step will slowly fill in more of the sky.

Generally, the sky will be darker at the top and lighten as it descends to the horizon. It is really easy to overdo the black, so start with a small amount. Be sure to have fun with this, as there is no wrong way!
If you are finding that your paint is getting too muddled up, take a break and let the layer dry. Once you are happy, allow your painting to dry before continuing.
Step 5: Continue adding layers
Once the first layer of paint has completely dried it is time to add more color, and at this point, it is all about playing! Don’t be afraid to work up to and on the Galaxy portion as well. Adding some random sponge marks of color in and around the white will create more interest and depth.
Don’t forget to continue down into the lake area of the painting too! I will often use more side-to-side motions to create a more watery texture. It is also important to remember it is a reflection of the sky that implies that it is water. Try to mirror the colors in the lake area.
Mixing your colors:
There are two ways you can mix your colors. The first is to mix colors directly on your canvas. This creates a free-flowing look and is a great way to create subtle blotches of color.
The other option is to mix the colors on your palette first, then transfer them to your canvas. This allows a little more control. I tend to do this when I want to lighten, darken or add more punch to a particular area.
Using your sponges:
Using your sponges in different ways will create different textures and effects. Try lightly wiping to create wisps, and circular motions to create a cloudy effect, dabbing, twisting, and rubbing will work together to create a more natural un-uniform sky.
Step 6: Galaxy time!
Now that you have your sky in, it is time to work to create some highlights and dimension for your galaxy. Start by using a clean slightly more wet sponge. Water down the color that you would like to use and gently glaze the color over the white of the galaxy (be sure that it is dry). This will create that bright color pop.
Add some bright white random dabs over the glazed area and out into the sky.
Step 7: Shoot for the stars
Probably the most FUN part of this whole painting!
I encourage you to play with this technique a little before you commit to your painting. This will help you to avoid the big splotch in the middle, or a million very large ‘shooting’ stars across your painting.
- Dilute your white paint with water in a bowl so that it is slightly thicker than heavy cream.
- Dip your toothbrush into the paint and tap it gently on your palette to remove some of it.
- Using the pad of your thumb flick the bristles of the toothbrush over some scrap paper.
- Try playing with it from side to side, lengthwise, far away, and close up.
Once you are confident in the effect your toothbrush and paint will create go ahead and Star up your Sky!
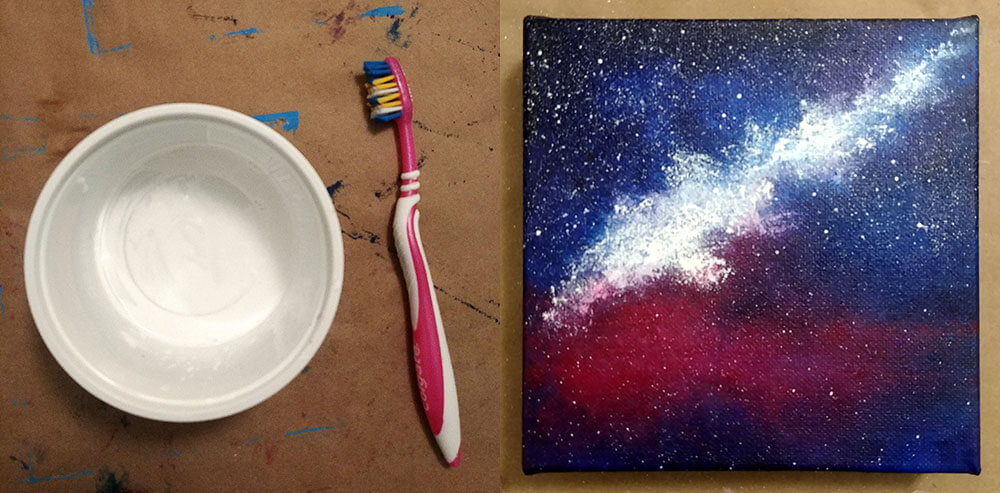
TIP: Generally there are fewer stars toward the lighter horizon line and the lake.
BONUS TIP: If you get a big ol’ splotch or star that you really don’t like, use the end of a Q-tip to blot it out.
Step 8: Creating silhouettes and reflections
The foreground in this particular painting is a lake lined with mountains. However, you can put whatever you like. I am a big fan of simple silhouettes such as trees, mountains, grasses, lakes, tree swings, and cabins. The possibilities are endless.
- Using Mars Black outline the shape of your mountains and fill them in
- Mirror the reflection. This doesn’t have to be perfect, just try to match the main shapes. Also, the reflection doesn’t have to be exactly the same size height-wise. It can be slightly “shorter.”
NOTE: If you want to lighten up the skyline a touch (which I did in this painting) it is easier to do it before adding the mountain silhouette.
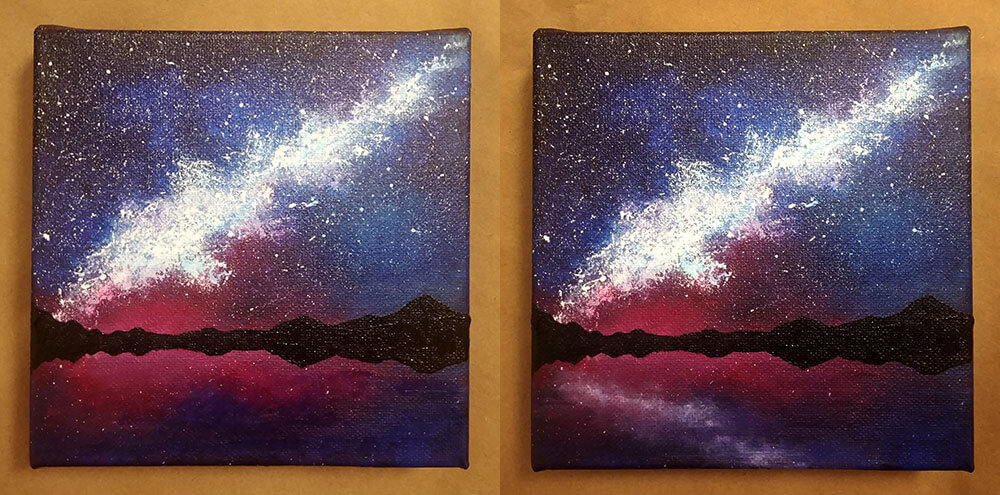
To create the reflection shown in the right-side image above, apply a very small amount of slightly diluted white paint across the lake matching the general direction and shape of your galaxy. Using your almost dry sponge or a small paint brush rub/scrub in the edges of the white paint creating a blurry effect.
TIP: If you are finding it difficult to blur out the white paint try adding a touch of the lake color to the edges.
Step 9: Finishing Touches
Adding a reflection and a shoreline will give your silhouette more dimension. With a waterline, it is important to have it be as straight as possible.
- Paint a thin straight line just above the middle of your mountain silhouette.
- Try to match the color of the line with the sky that is directly above.
Lastly and most importantly, sign your completed painting!
Congratulations! I hope you have enjoyed this process, and continue to let your creative imagination soar.
Special thanks to Monique Cudbertson for sharing this tutorial! If you’ve followed along and created your own painting, please share your creations with Monique on her facebook or instagram pages. And to see more of Monique’s art, please visit her portfolio of star-gazing nightscape paintings.
This post may contain affiliate links.