Last month my husband and I lost George, a friend who had just celebrated his 90th birthday. At the celebration of life service, I learned a few new things about him from his family and friends—they noted his many accomplishments and how he continued doing what mattered to him, even after having a serious stroke.
The service was both somber and upbeat, and included a heartfelt poem that George had written years before. In our years of friendship, he also shared his interest in watercolor and designing projects that he built during his retirement.
So to honor George’s memory, and show how much his friendship meant to us, I decided to make a celebration of life card for the family. Bleeding tissue brings vibrant color possibilities, which is a little out of my comfort zone but it fit this project because of George’s interests. And I decided to choose excerpts from his poem in pencil because he would have often used those in sketching out plans.
Note: This technique is often used in children’s art classes, but if you missed out on doing it earlier in life, here’s a chance to catch up!
Here are the materials you’ll need:
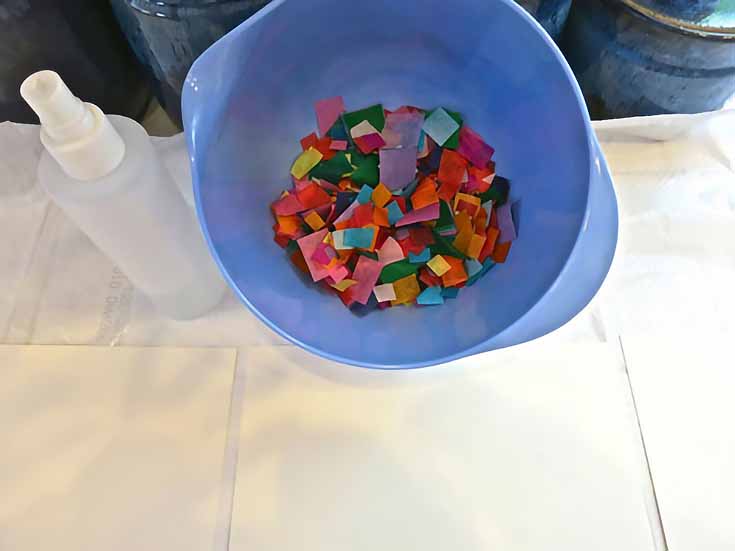
1. Pacon brand Spectra (bleeding) Art Tissue (no substitutes!)
2. A few sheets of hot pressed watercolor paper, at least 140 lbs/300 gsm. (I recommend 9″ x 12″ but any size you have is fine—you can also cut down larger watercolor sheets like these from Blick. Cold pressed paper is OK in a pinch, but it’s harder to write on.)
3. 1/2 – 1” flat or pointed watercolor brush
4. plastic paper to protect your working surface (remember this tissue bleeds and will stain)
5. A sharp object to lift the tissue when paper is dry
6. Old clothes to wear!
The bleeding tissue technique:
Choose a few or a lot of colors. Cut tissue into varied sizes and shapes, squares, triangles, etc. Or, you can tear it into strips. Experiment!
Brush clean water over the paper. You don’t want puddles, but get it wet. Place the tissue randomly and quickly into position. Because I intended to letter on the paper afterward, I did a border design on the left and bottom edges. The amount of water is important. . . you want enough to release the colors, but not so much that it pools on the paper.
Keep an eye on it and if it needs a little more moisture (i.e. if it’s not bleeding), touch the tissue with a damp brush.
You can also mist it gently, although the mister can move the paper if the spray is too robust—so apply just enough water to get the color moving.
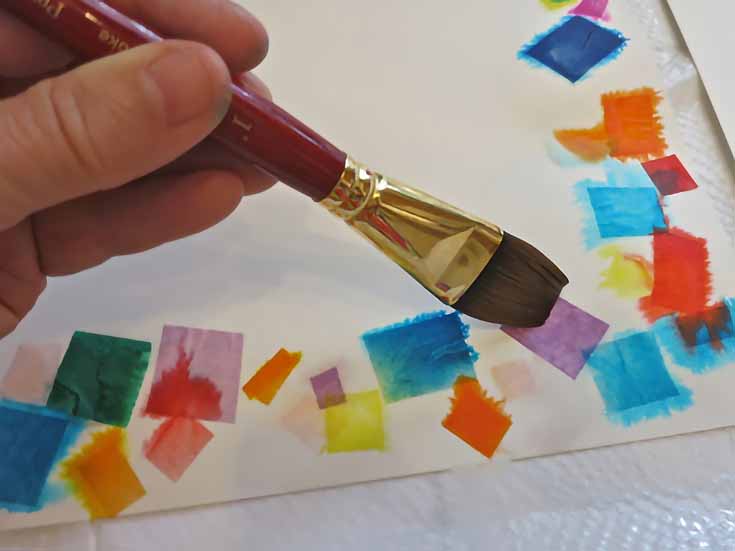
Let the tissue dry for 10-20 minutes, or until the paper loses its shine. Tilt the paper up and most of the tissue will fall off. Remove remaining pieces with the tip of a paring knife or similar tool.
Using a pencil I lettered some words from George’s poem. I hope I captured his spirit for his family and I felt an artistic kinship with George’s spirit as I created this.
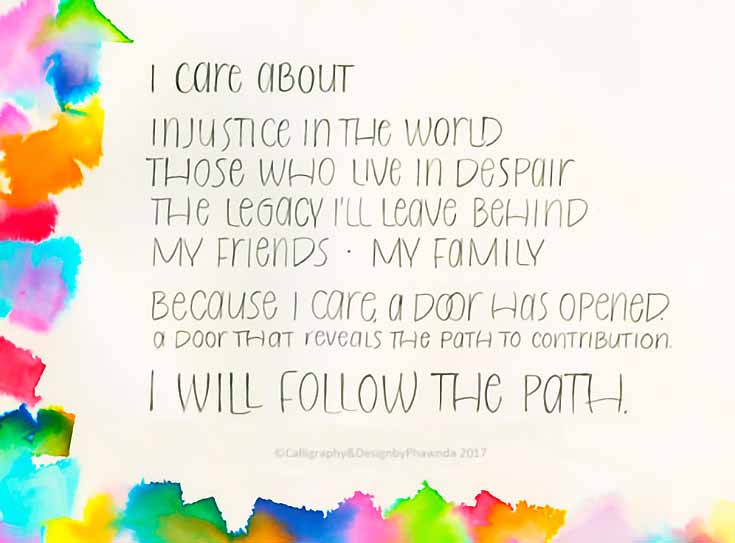
Our words (and art) are eternal. That’s worth celebrating!
Imagine if everyone left a poem behind as beautiful as this one. . . what would yours be? What do you care about?
I hope you’ll join me for more projects, classes, and tips, at Calligraphy and Design by Phawnda on Facebook.
This post may contain affiliate links.