I’ve always had a love of flowers. Some of my earliest memories are planting pansies and sweet peas with my grandmother in early spring. As a military brat we moved a lot, but my mother always left her yard filled with flowers for the next family.
Combining my love of flowers and art was a natural choice. When I started painting, I learned that watercolors in particular worked well with the delicate, ethereal nature of flowers. No other medium captures their essence like transparent watercolor. . . There’s just something about the fluid nature of the watercolor and the movement of the pigment with the water that makes a watercolor floral painting so exciting.
But there I go, getting ahead of myself. :) Today, we’re not painting at all—we’re drawing!
Why not just jump in with paint, you ask? Because no matter what kind of flower you’re painting, you will ALWAYS need to understand the structure of your flowers, and the best way to do that is to draw them.
How to draw the shapes in a flower
When you look at flowers, many of them have a standard “cup” or “bowl” shape. This shape may be deep or shallow depending on the flower, but it will always be large and open at the top, with curving sides that form a narrower, flat bottom—in short, much like a bowl, or cup.

Roses, tulips, poppies, and anemones are all types of flowers that have this “bowl” shape.
Of course, most of the time when you’re drawing flowers, you won’t be viewing them from head on. So it may help to also become familiar with ellipses instead of perfect bowl-shaped circles.
One way to do that is to take a bowl or cup from your kitchen. Viewing the opening from above, all you see is a circle. . . but as you turn the cup or bowl away from you, the outer rim becomes an ellipse. The more you turn it, the less you will see of the inside of the cup, and the more “squished” the ellipse will become. Because of their curved structure, flowers are exactly the same way.
To draw a circle or ellipse, hold your pencil further up toward the eraser for a loose wrist action. Using a light touch make several light circular lines overlapping one another using your whole arm. This motion helps with the drawing. These multiple lines will produce a pretty decent circle and you can erase the lines that are not part of the round shape.
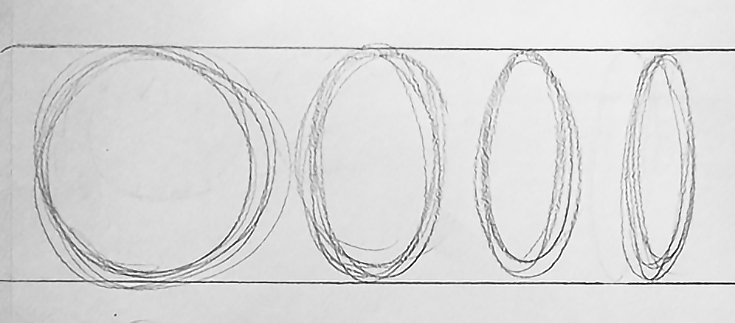
Remember, the key here is a basic form, not drawing a perfect circle. Aim for round, curved edges—not a pointy football!
Drawing a rose
Start by drawing the ellipse of the top of the rose. Depending on your view, you will probably see the side of the rose but may not see much of the base. It may help to draw cross points on the top and run a vertical one down. This will show you where the stem should join the base.
Now, imagine the rose is transparent and draw the ellipse at the base of the rose. Drawing what you can’t see helps you keep that sense of volume and define the boundaries for your drawing.
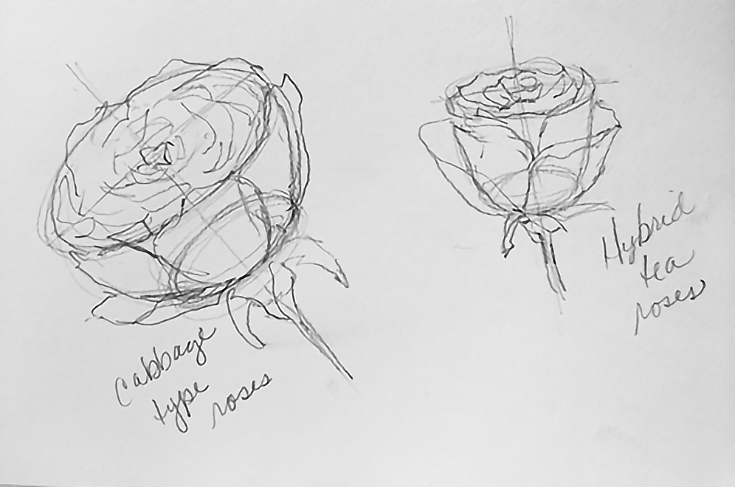
Once you’ve got the volumetric shape of the rose drawn in correctly, add the petals, leaves, and stem to give it realism.
Remember, practice makes perfect! Experiment drawing cup/bowl shapes from as many different angles as possible. After you’ve got the hang of it, start drawing florals from real flowers, not photographs—photos tend to “flatten” objects, so they’re less helpful when you’re trying to create volume in your drawings. Look for those realistic details in the petals as you finish your drawings.
Good luck, and have fun! Next time we’ll add color to those flowers!
This post may contain affiliate links.