What’s the difference between painting in GIMP and drawing in GIMP? A big part is the tools that you use. In today’s tutorial I’ll show you how to use the Pen tool in GIMP to create beautiful lines that remain adjustable even when you’re finished drawing.
The Pen tool is a little tricky, so we’ll begin with a basic heart shape just to learn how it works. If you’ve never used the Pen tool before, drawing a heart may seem far too simple. . . but really, it’s perfect to learn on.
Let’s start by opening a new document. (The shortcut for that is Ctrl+N.)
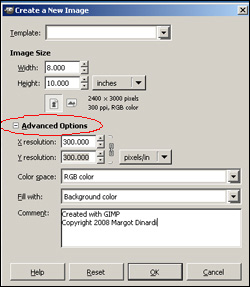 GIMP’s pre-made document templates are a quick and easy way to choose a new document size, but what if you want a custom size?
Under “Image Size” change “pixels” to “inches” and type in the dimensions you want. I put in a standard frame size in case I want to get prints made later on.
Open up the advanced options to make sure you have a resolution suitable for printing: at least 300 pixels per inch.
When finished, hit “OK” and save your document (Ctrl+S) as a GIMP.xcf file.
There are several buttons and editing areas that help us control the Pen tool, all of which are highlighted in the image below.
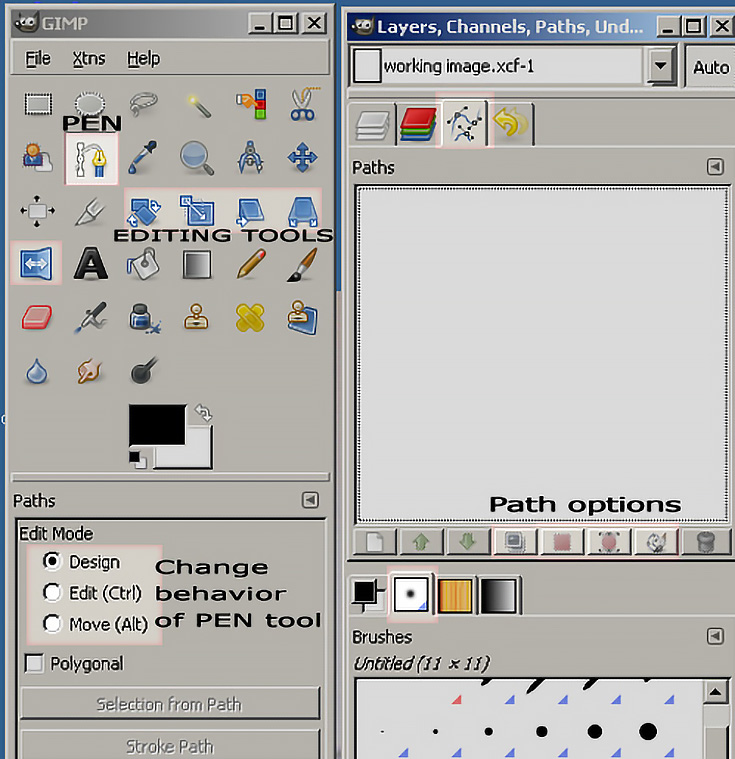
Clicking on the curvy path button near the top of the Layers/Channels/Paths window will show you all current paths made by your Pen tool (none so far). The row of buttons underneath that space will all alter your paths in different ways—but more on that later.
Clicking on the paint splotch button farther down will show you a selection of brush tips you can use to paint your paths with. There are also five path-editing tools, and of course the Pen tool itself, over in your toolbox.
Let’s begin making our heart shape by creating some straight lines and then editing them to become curves.
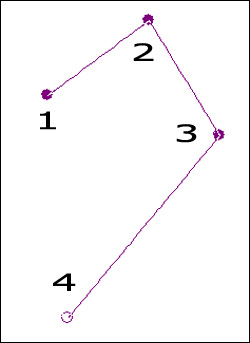 With the pen tool selected (and “design” checked below the toolbox—see above) click once in the middle of the document to create the first point in the cleavage of a typical heart symbol.
Move your mouse to the right and up, then click again to create a point at the top of the hump. Move to the right and down, then click a third time to create a point at the shoulder. Move directly below the first point and click once more to create a point at the tip of the heart.
Hit “Enter” or “Return” on the keyboard to tell computer you are finished.
Now, let’s create some curves from those points.
In the tool box options area, choose the “Edit” button. This will allow you to alter your path. (You can also just hold down Ctrl while clicking to edit the points you just made.)
Click, hold, and drag on point #2. Try dragging to the right and the left without letting up—one direction will create a curve similar to the image below. When you like your curve, release the mouse button.
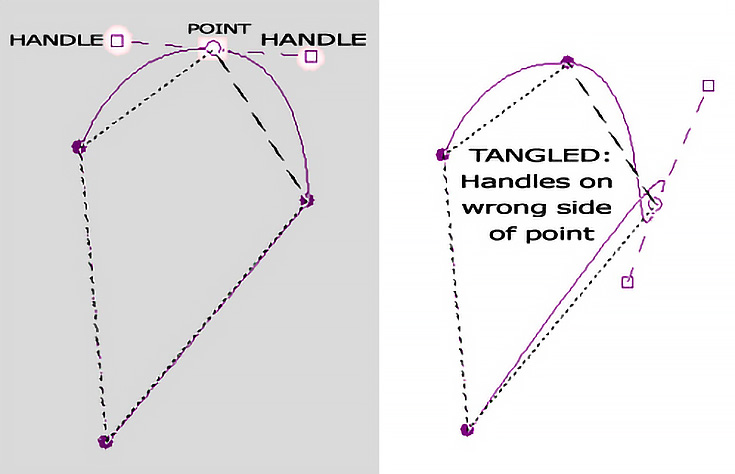
You’ll notice that point #2 now has two handles that control the curve. You can adjust the curve as many times as you’d like by clicking and dragging those handles—HOWEVER—your lines can get tangled if you pull the handles to the “wrong” side!
Continue creating curves for your heart shape by pulling out the handles on points #3 and #4. You can move individual points by just dragging them to a new location.
To move the entire object use the “Move” option or just hold down Alt on your keyboard while in Design mode.
Using the keyboard shortcuts like Ctrl and Alt will help you draw much faster—if you practice using those shortcuts right away, they’ll soon become second-nature.
 At this point the path you’ve drawn will be different from your current selection (the selection line looks like a row of moving ants). Right-click on the path and choose “Select” then “From Path.”
Viola! The selection will change to match your path (which by now should look like half a heart).
Since we have one half of the heart finished, and the heart is a symmetrical shape, there’s no need to draw a second half—instead, we’ll just duplicate and mirror the first half. This part is a little tricky, but here’s how to do it:
First, make a new path from your current selection by pressing the button marked with a “1” in the image below. The default name of your new path is “Selection.”
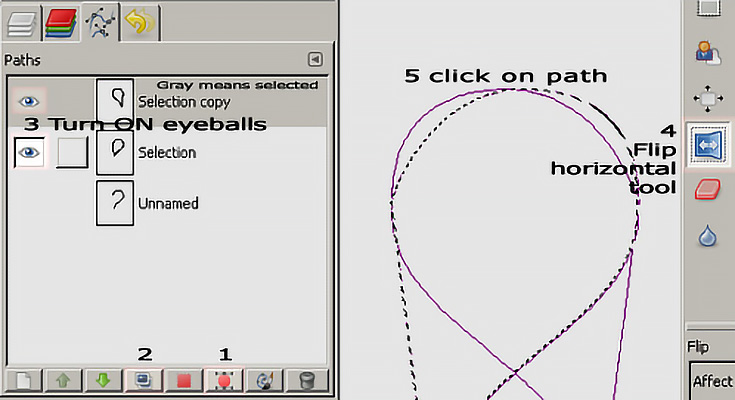
I decided to duplicate that new path once more by pressing the button marked with a “2”—that way if I mess up, I still have my original path to go back to. (Turn on the eyeballs for just the two new paths so your old path doesn’t distract you.)
To mirror-image one of your paths, you’ll need to select the “Flip Horizontal Tool” in your toolbox (marked with a “4” in the image above). In the options area below the toolbox, click on the curvy path button so that your Flip tool will only affect paths.
Then move your mouse over to your path and click on it once—it will flip horizontally.
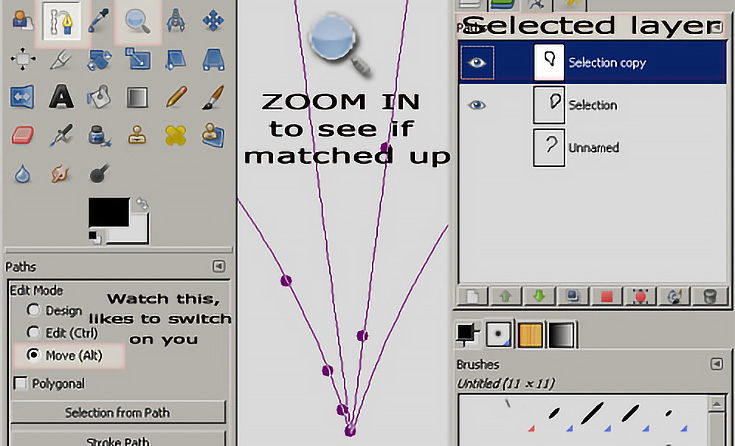
At this point you should have the two halves of the heart visible, but they’ll still be right on top of each other! Go back to your toolbox and select the Pen tool again, then click and drag on the top path to move it off of the path underneath.
Now it looks more like a heart, doesn’t it? Let’s create a selection that combines both those paths, then fill it with a solid color.
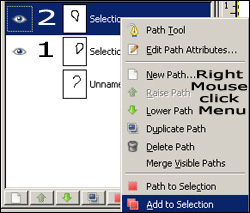 Right-click on your top path, choose “add to selection,” then do the same thing for your second path.
Feel free to turn off the eyeballs for those paths, since they can be distracting.
You can then fill your heart-shaped selection with a solid color—simply select the paint bucket from your toolbox and click inside the shape.
To outline (or “stroke”) your heart, you’ll first need to create a new path from your heart shape. Click on the “selection to path” button, marked with a “1” in the image below. That will turn your current selection a new path.
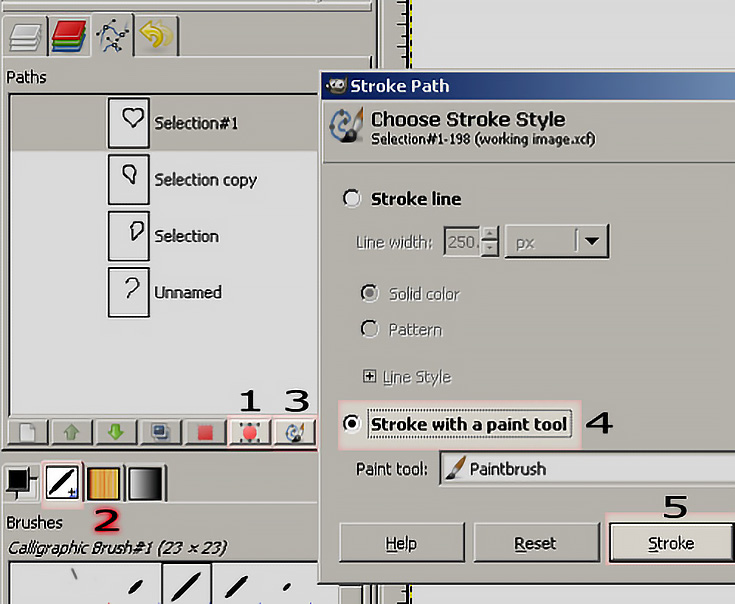
Choose a new color and a different brush tip if you’d like, then select the full heart-shaped path from your paths box before clicking on the “paint along path” button (marked with a “3” in the image above).
In the dialog box that appears, choose “Stroke with a paint tool” then click the “Stroke” button. Depending on your brush tip and colors, your heart should end up looking something like this:

If you followed all the steps in this tutorial, you now know how to create straight and curved paths with the Pen tool, duplicate and modify those paths to build basic shapes, and then fill and stroke those paths with color.
I’d suggest using the Pen tool to make more simple shapes—and since we started with a heart, the other three suits of a deck of cards might make a good project. The more you work with it, the better you’ll get.
Stay tuned for another GIMP tutorial for you next Friday. Until then, keep practicing!
This post may contain affiliate links.